


Introducing Questor.
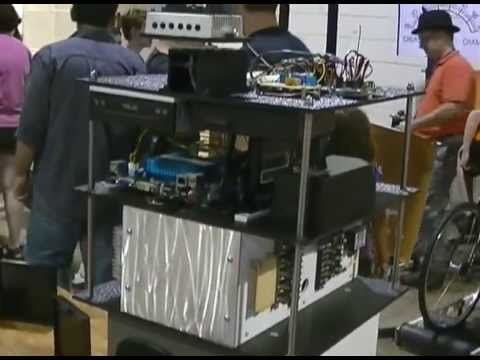
I put a hold on my large robot project Magnus awhile back due to budget and time constraints. I wanted to have a platform that was way smaller, easy to modify for testing purposes and small enough to roam around inside the house autonomously. Questor will serve as a test platform for systems that will eventually be placed in Magnus. Questor was not intended to be a cool looking robot platform, just functional and very basic in appearance. My main goal is for him to be autonomous with the option of me being able to take over remote control separately if needed. I would like for him to be able to automatically find and connect with his battery charger and to eventually have a good A.I.
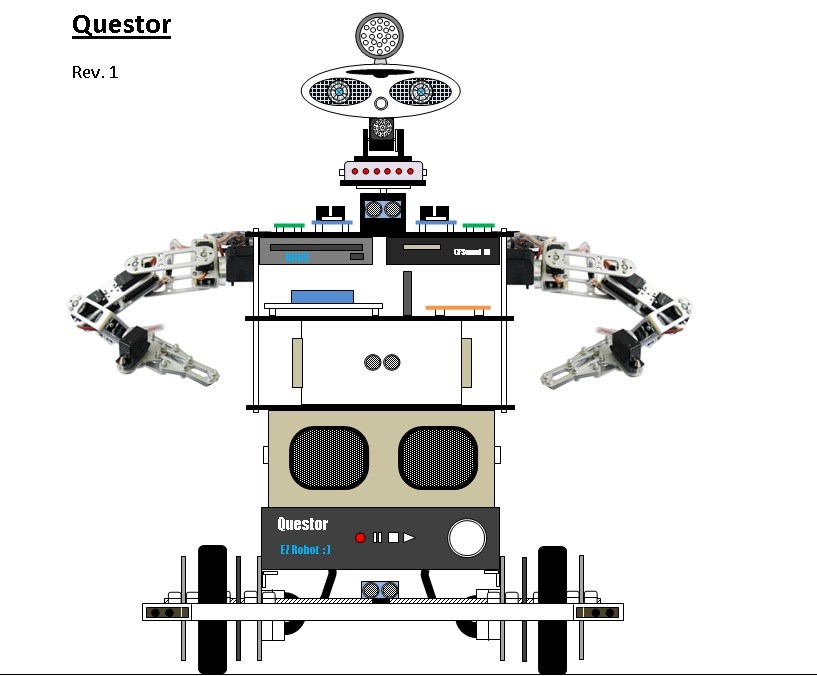
So here is a first look at him...
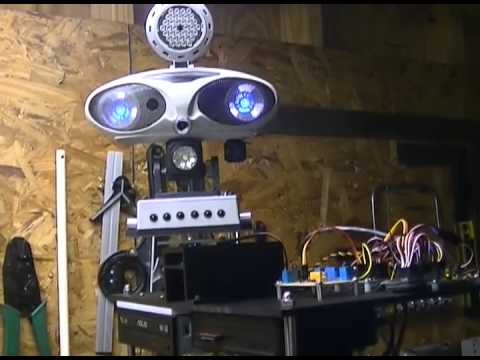
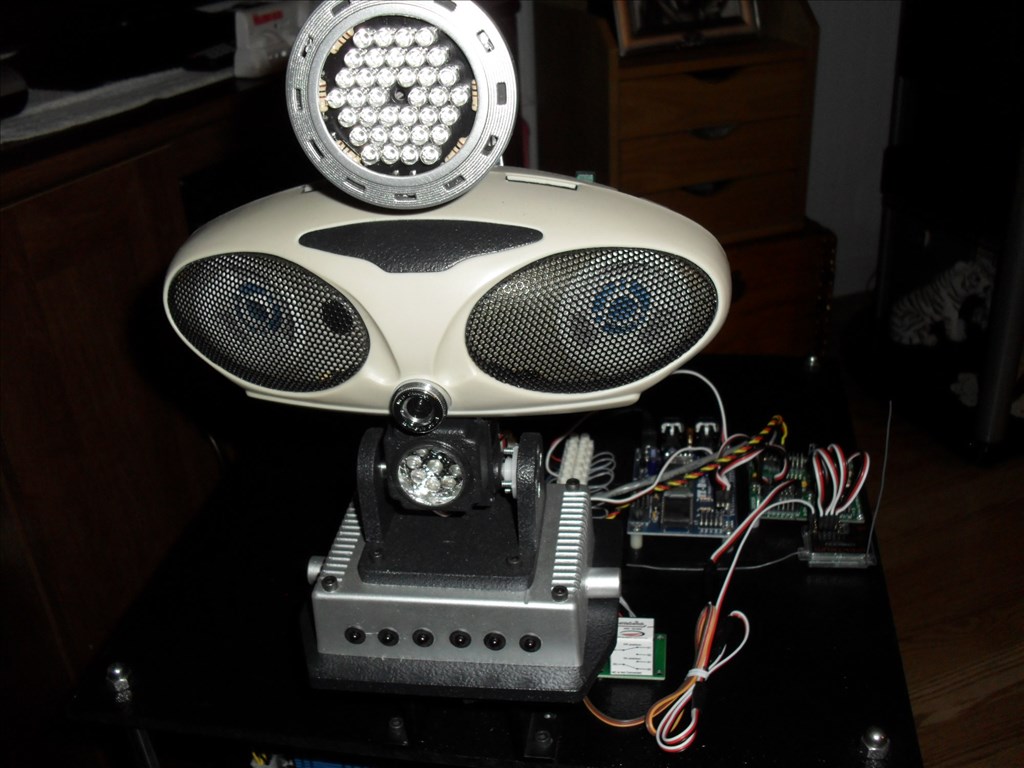
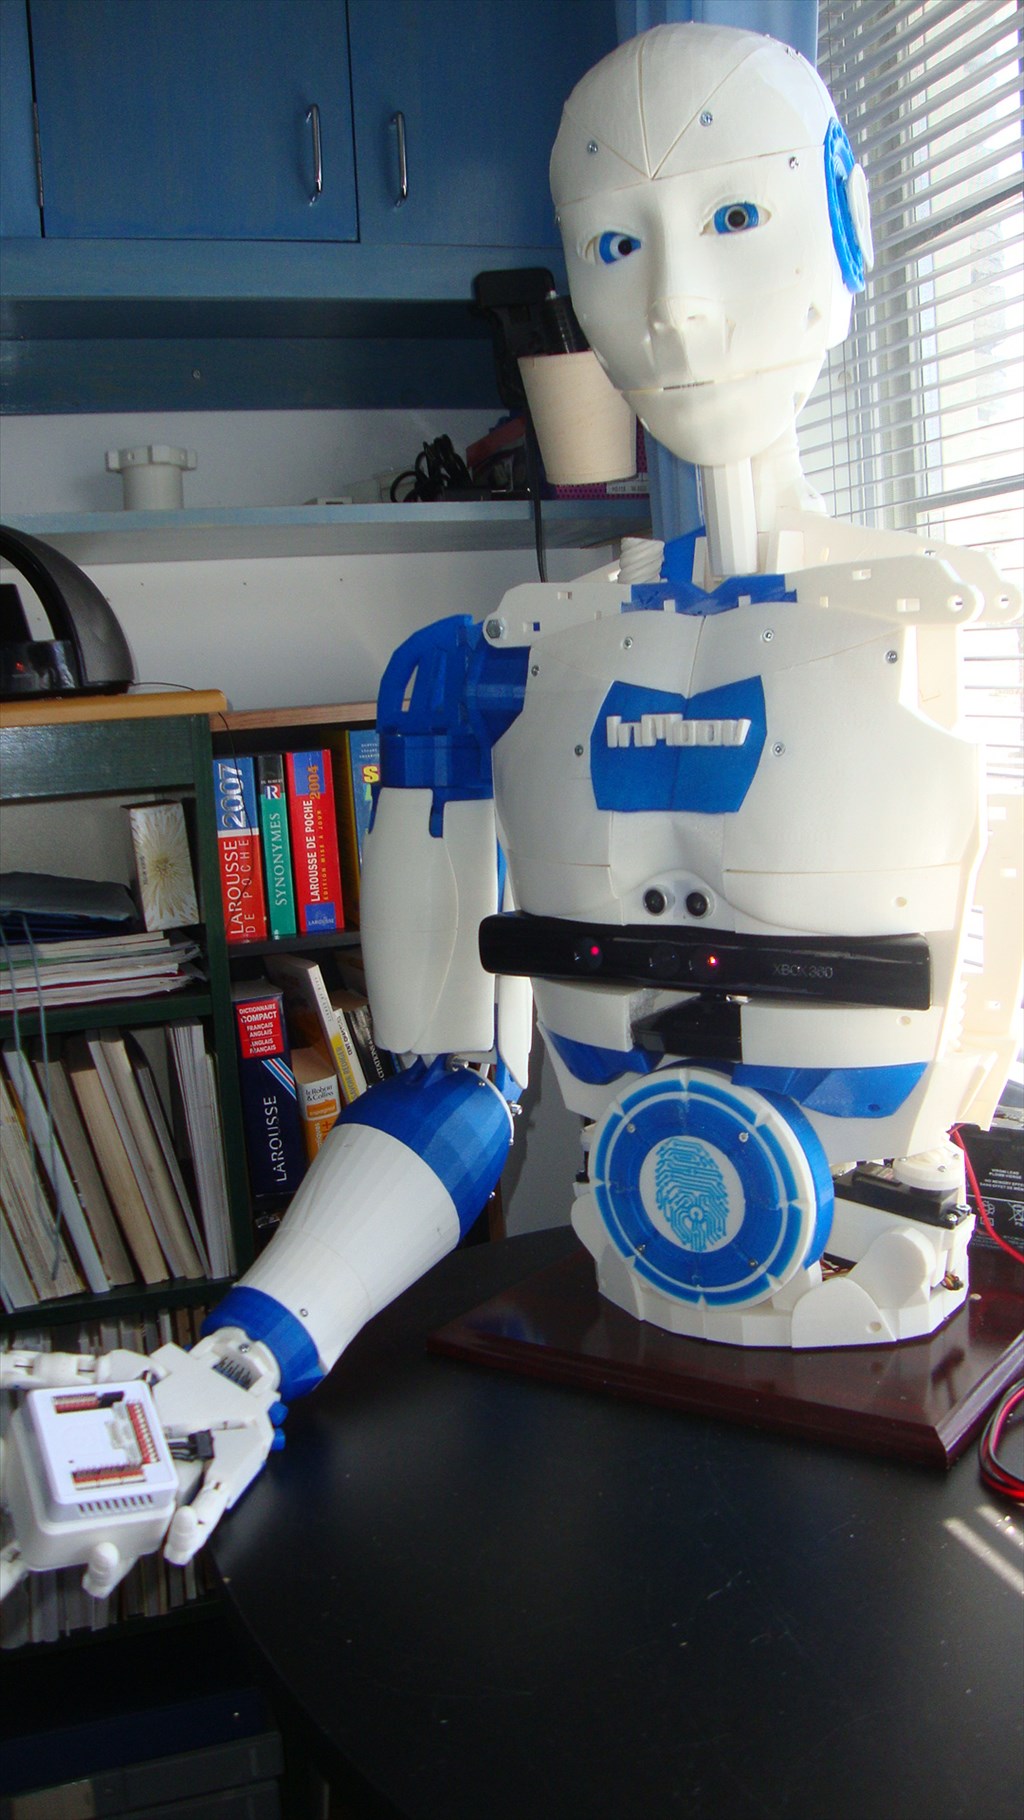
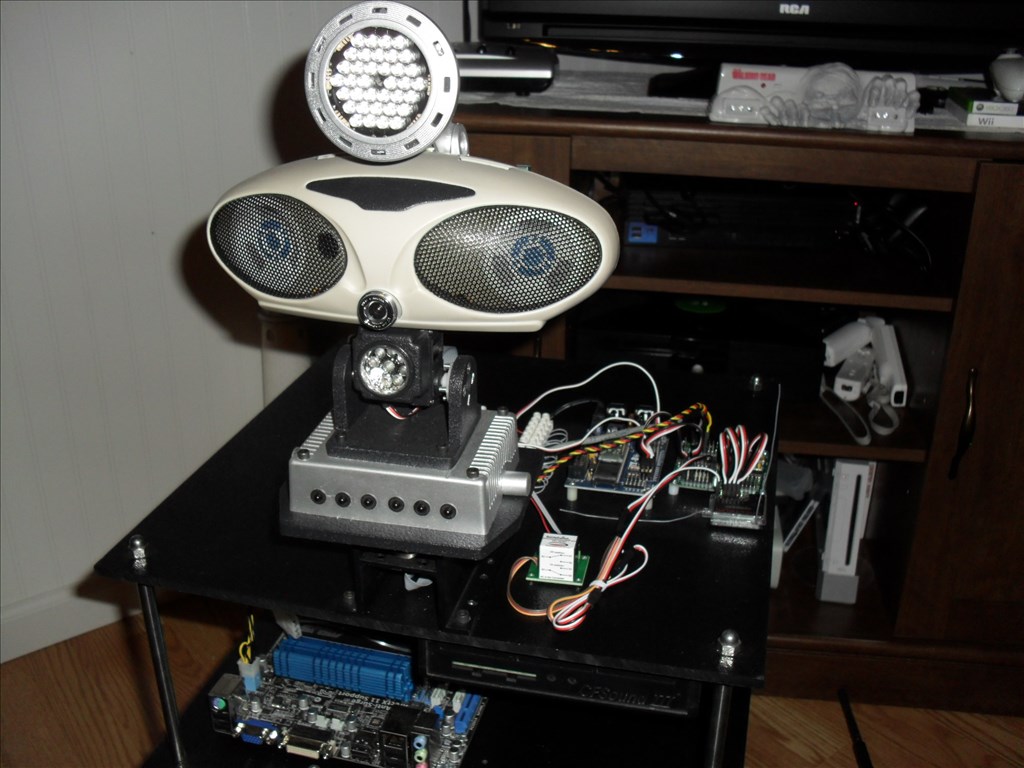 The head is made from a small boom box which I thought was neat because of the alien eye look. When illuminated they have a white border with blue eyes.
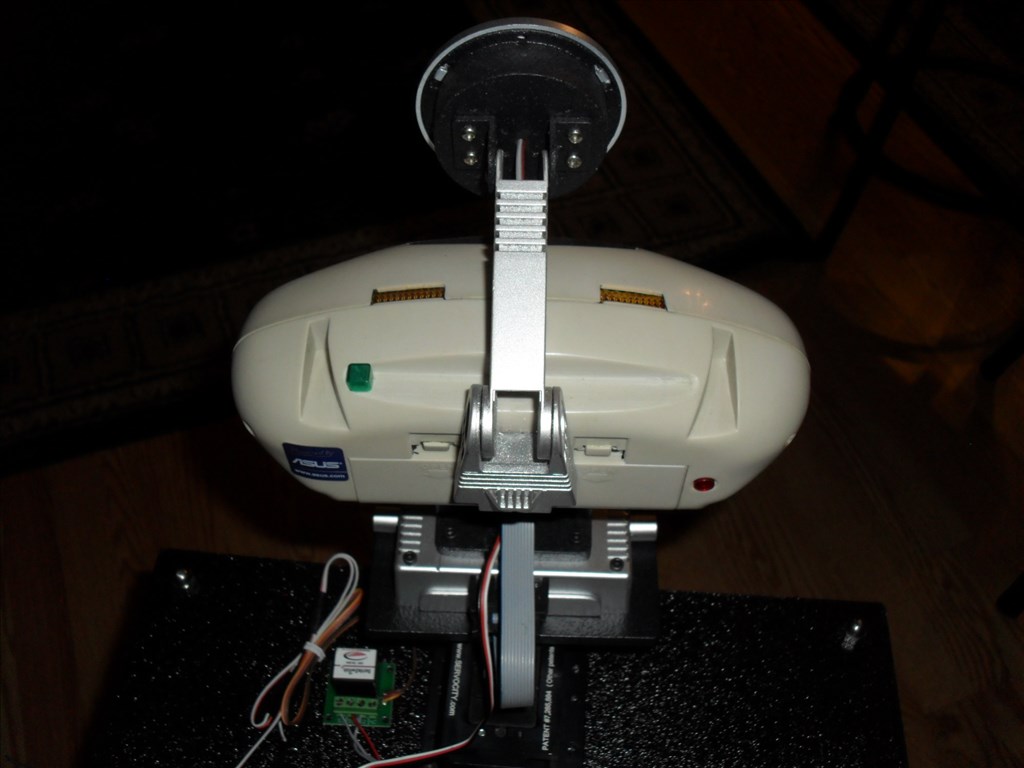
 His nose is the camera. Just below that is his voice lights made from an LED flashlight. I actually drilled a hole through the tilt servo case to pass the voice light wires through. The cluster of LEDs above his head are IR LEDs.
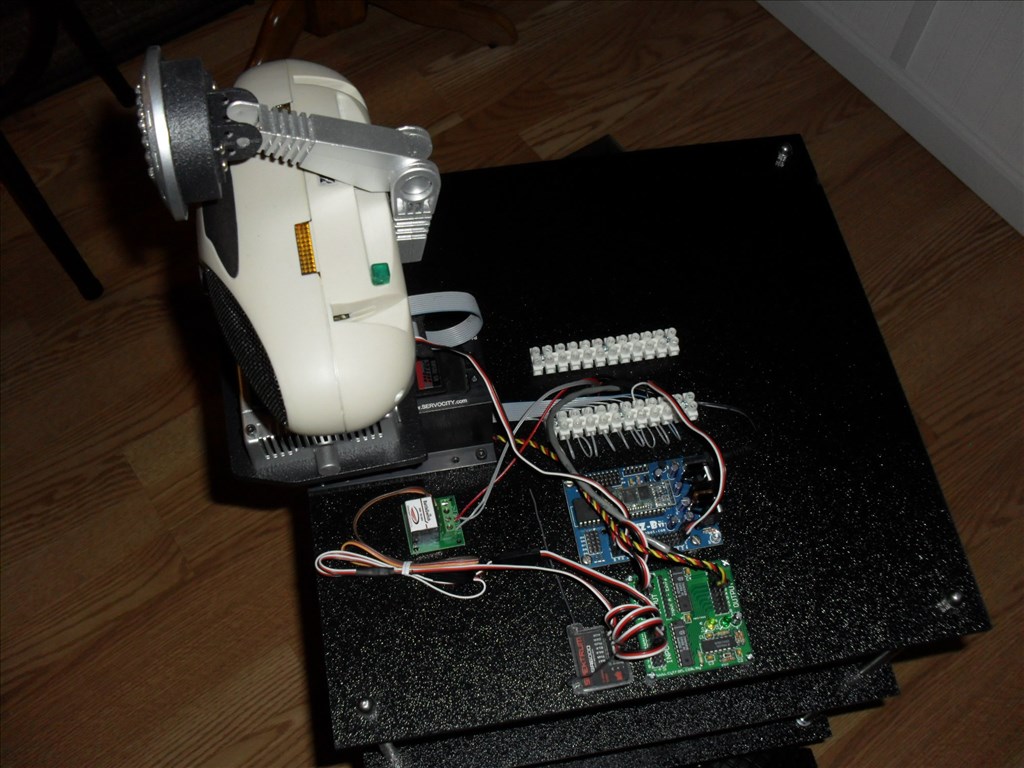
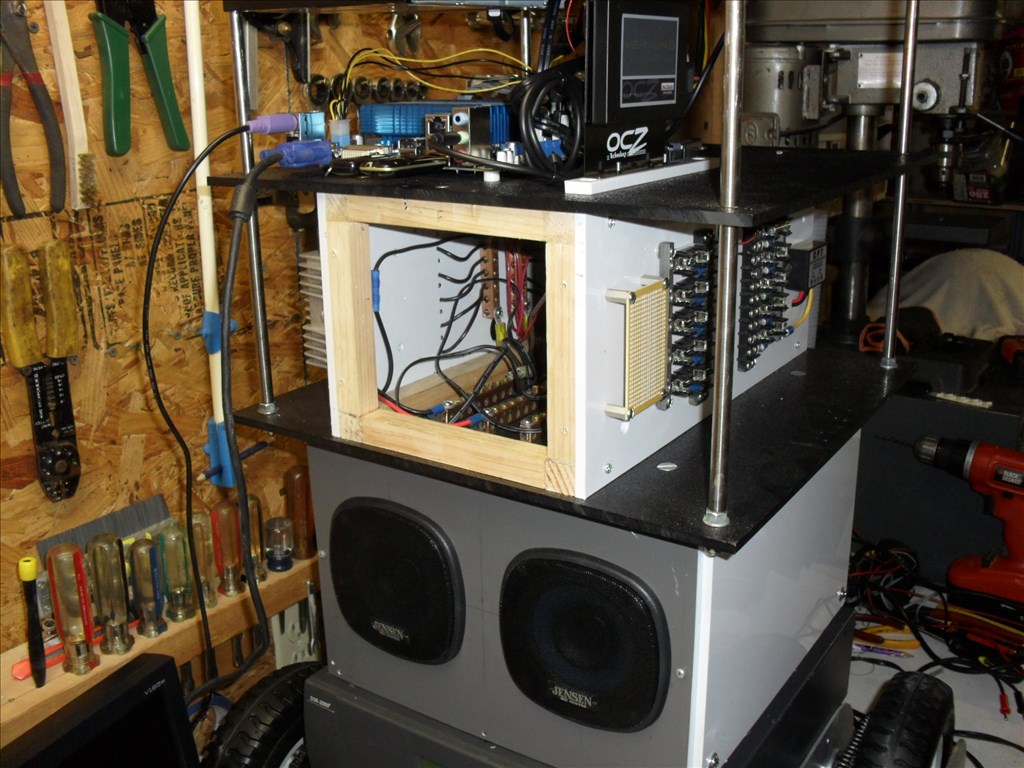
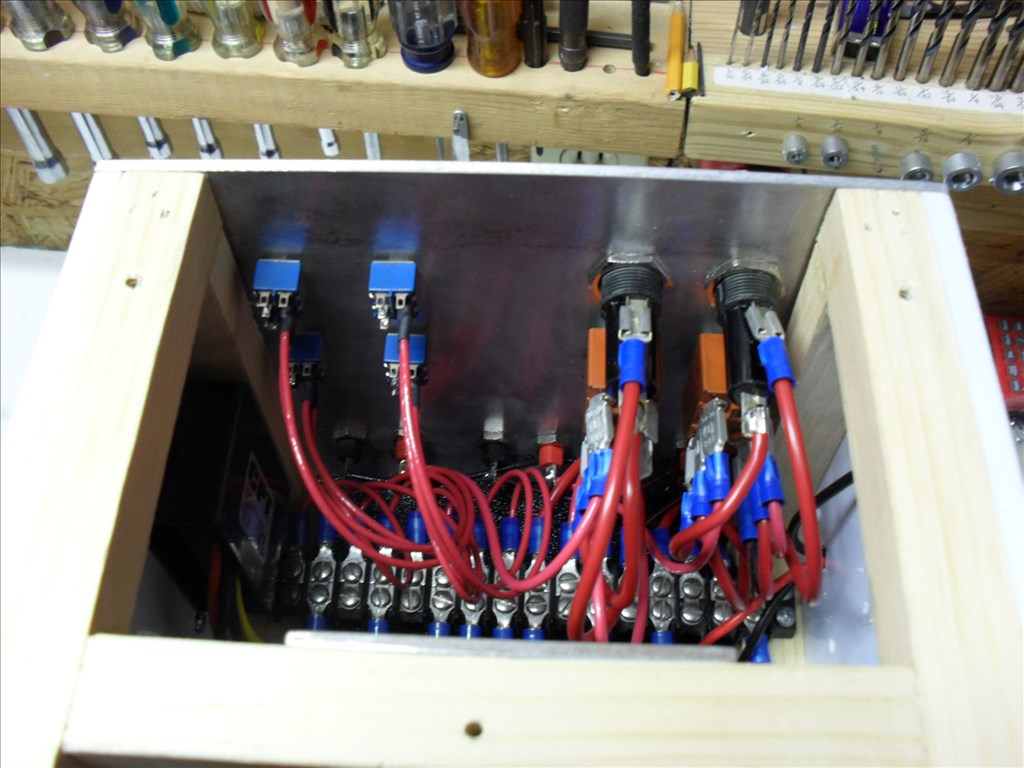
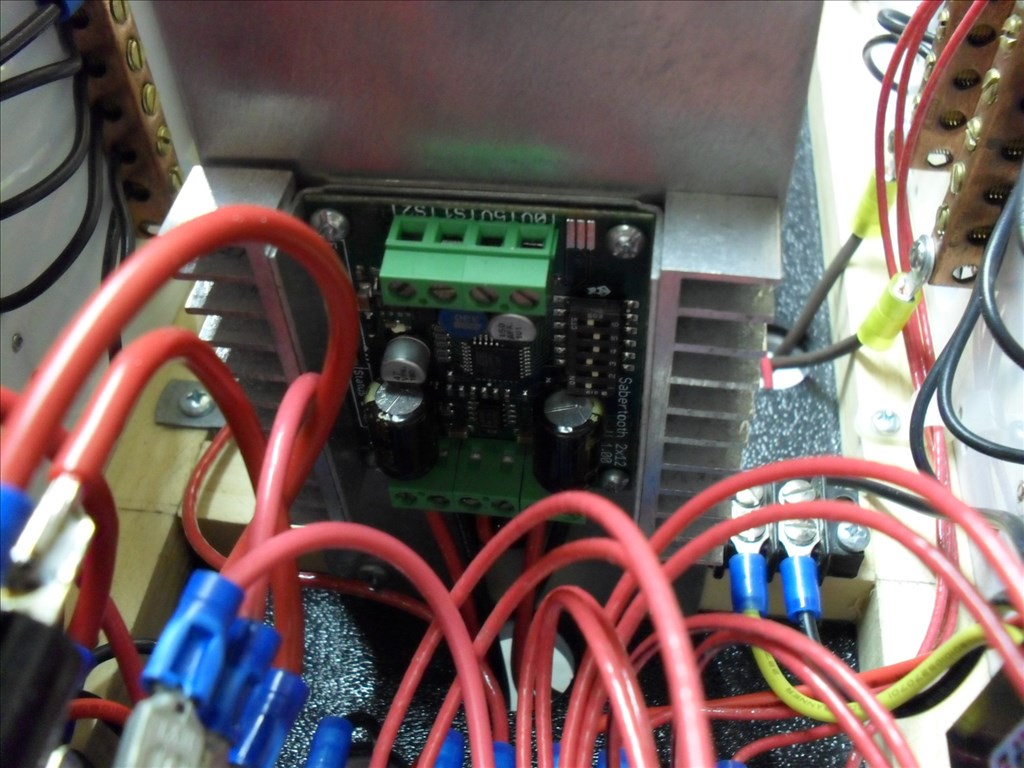
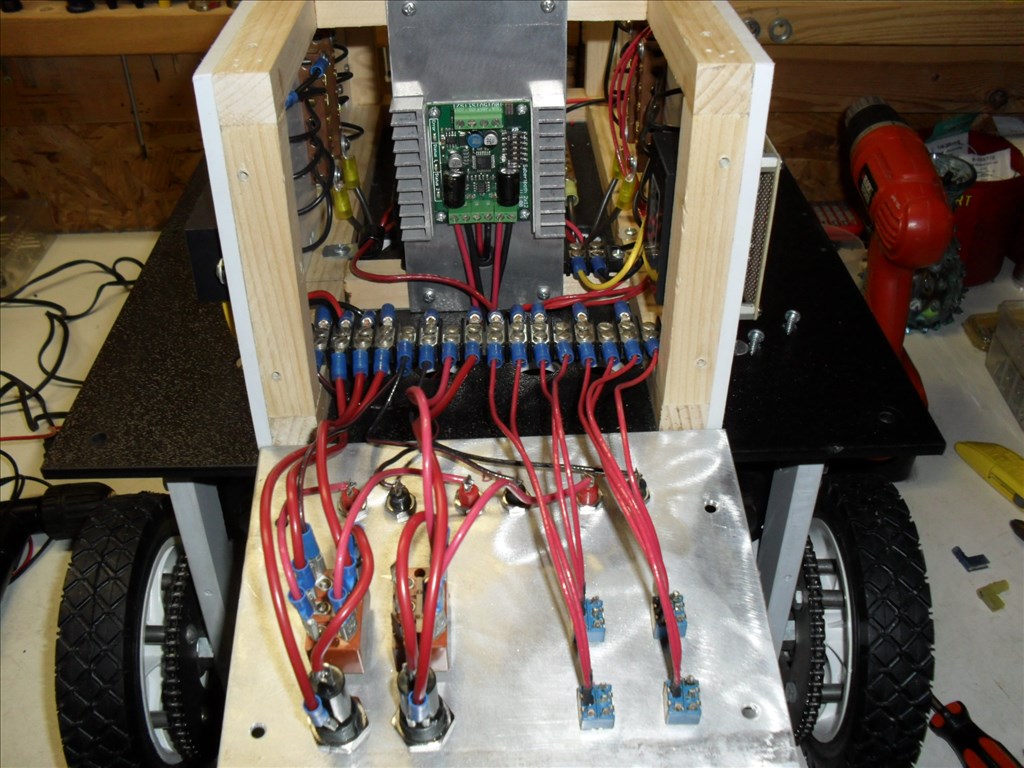
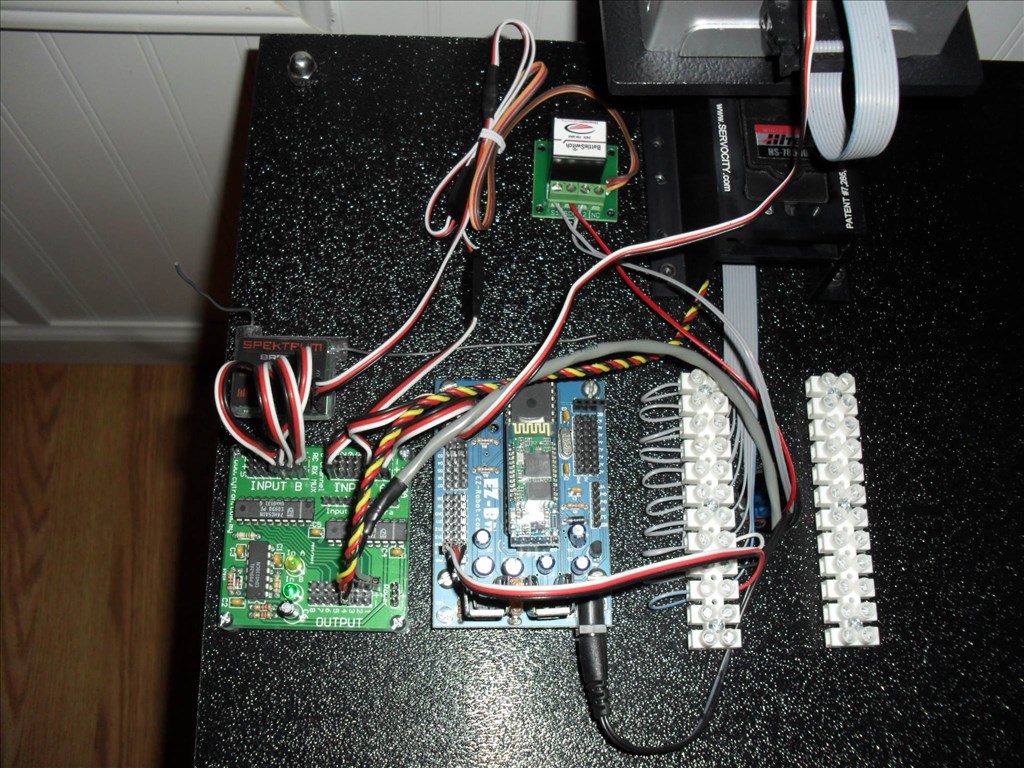 Here you can see the EZ-B and the R/C Mux and Battle Switch.
 The LEDs on the silver box are for effect only. They will flash sequentially back and forth.
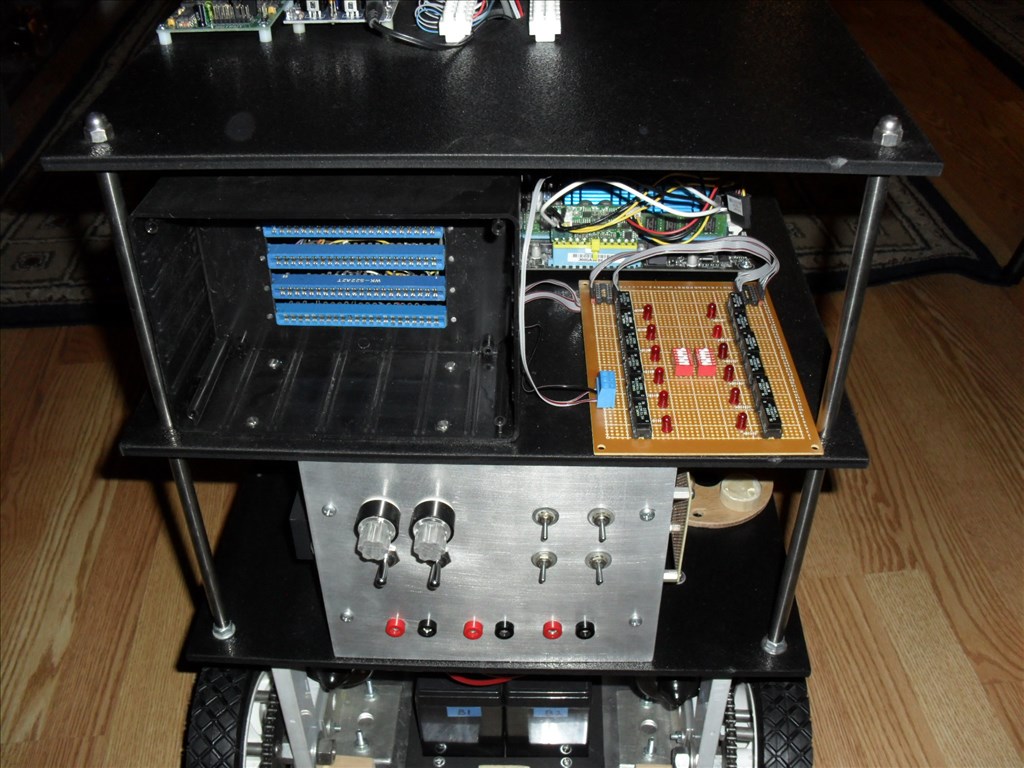
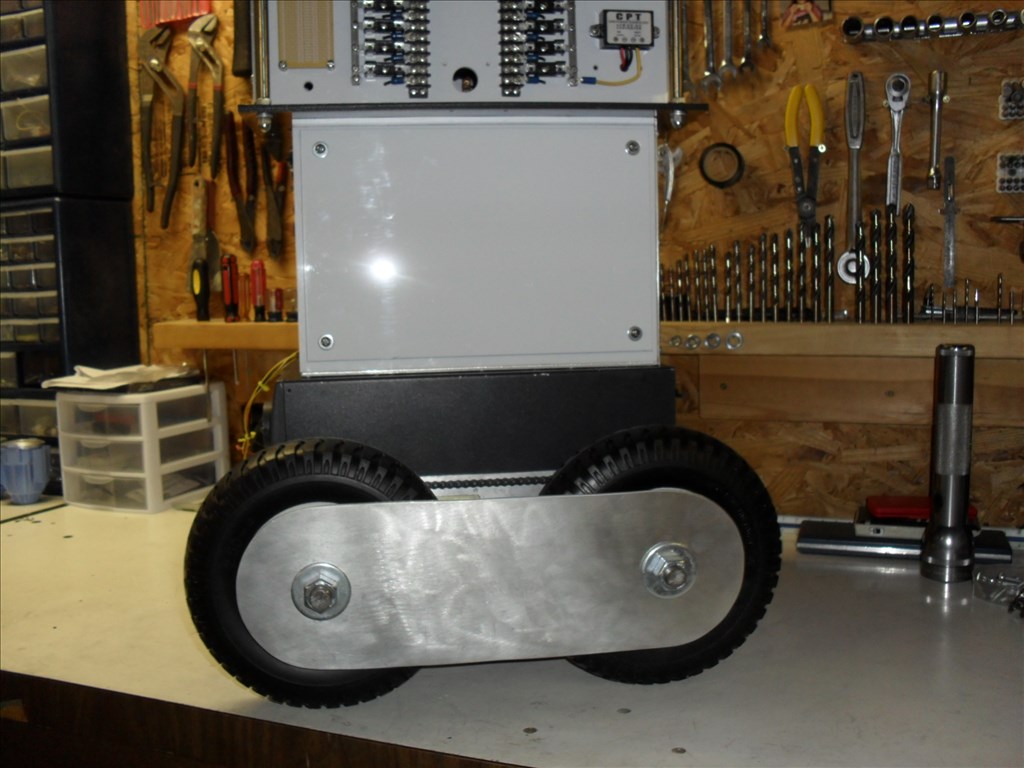
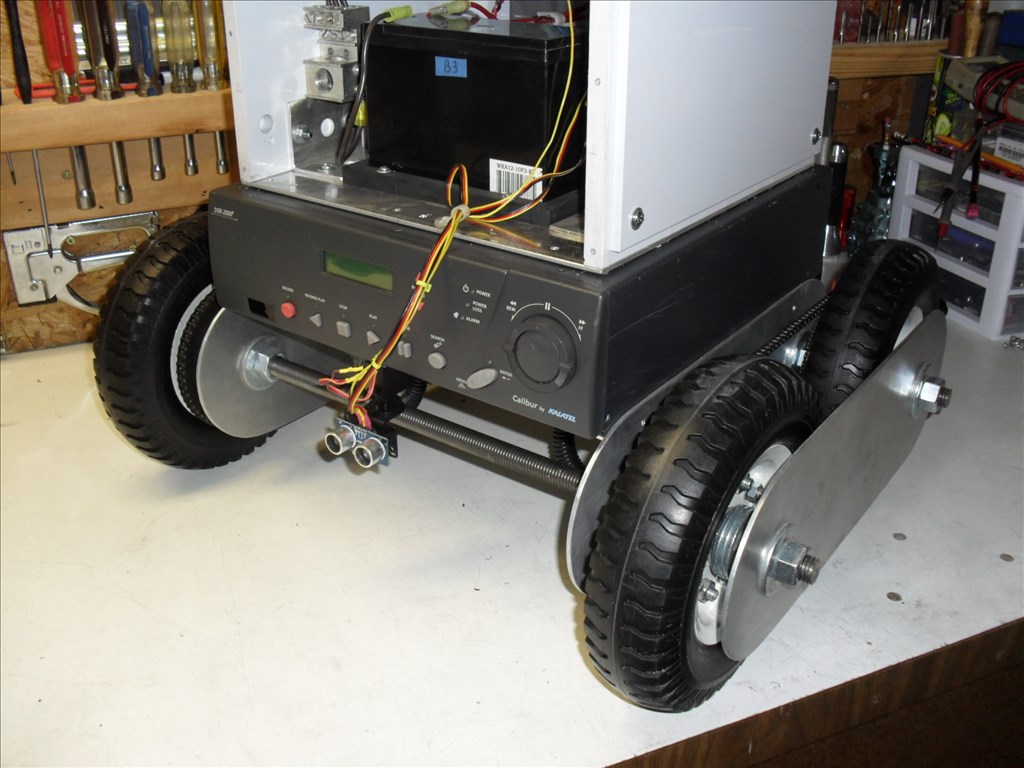
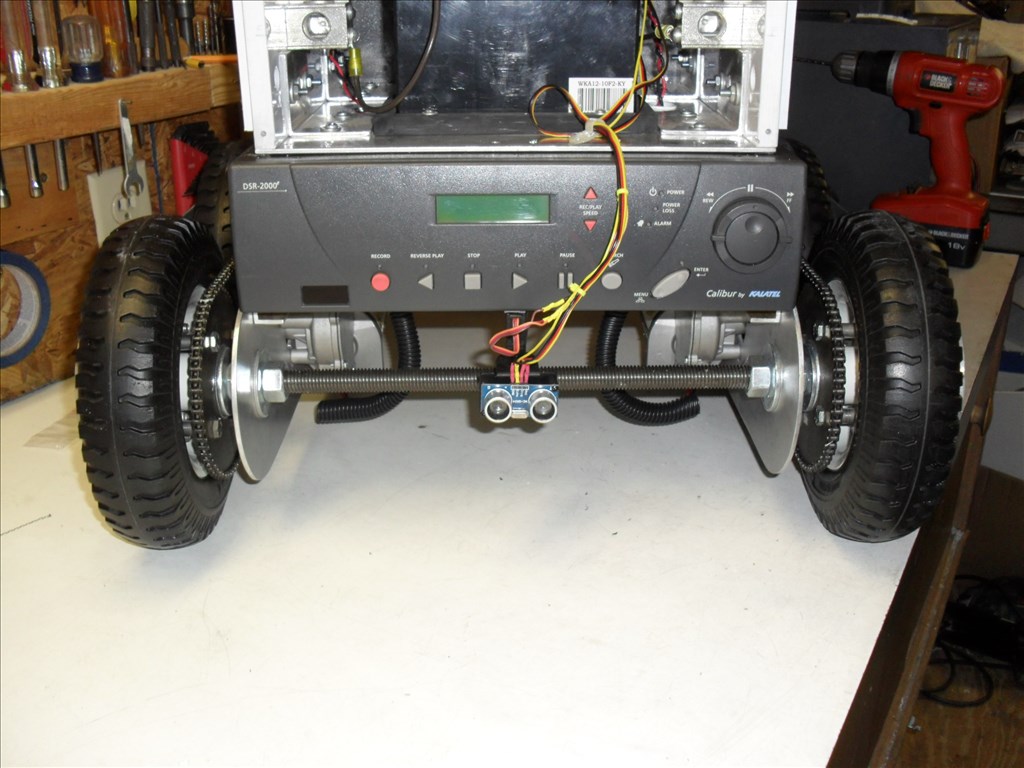
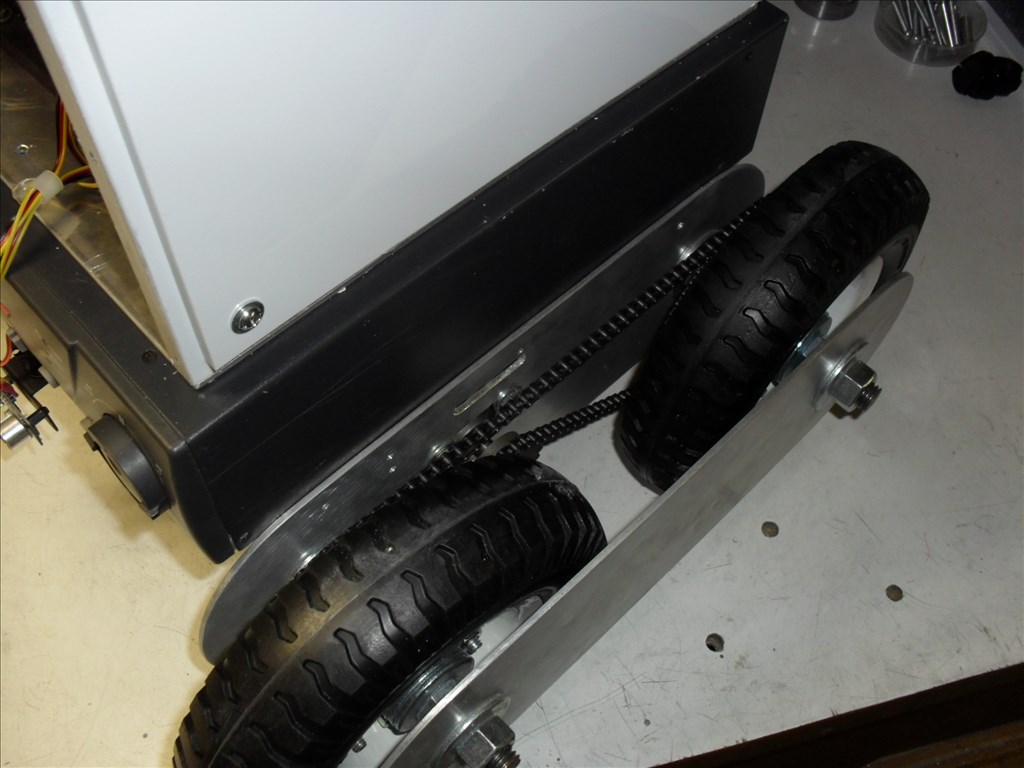
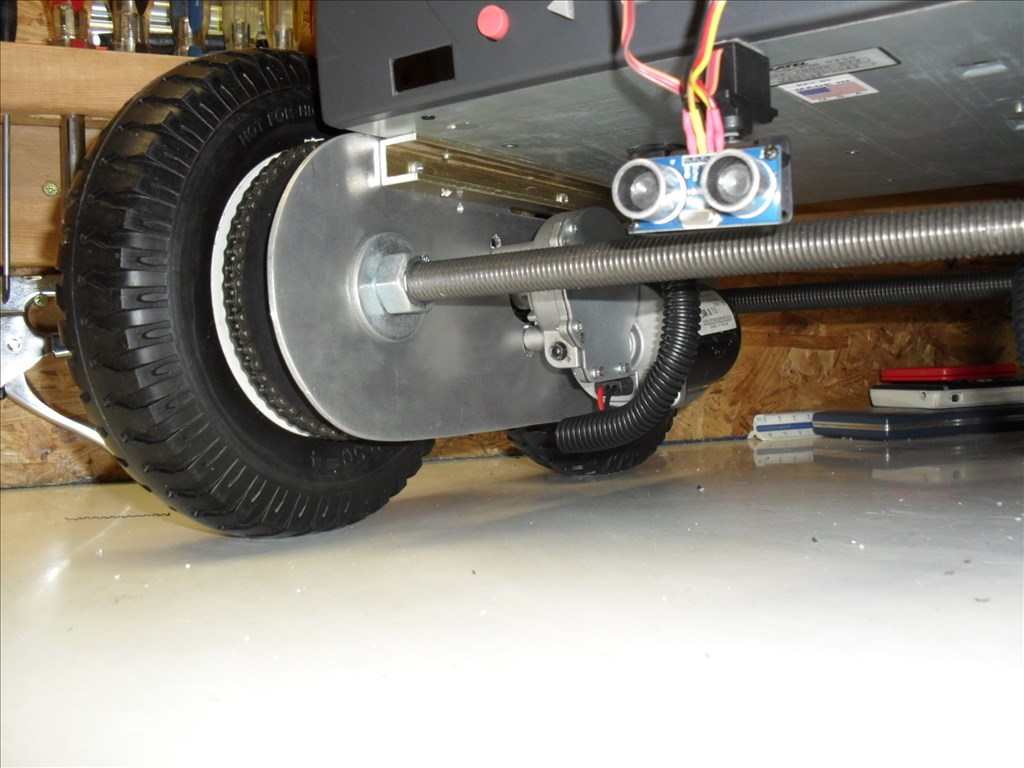
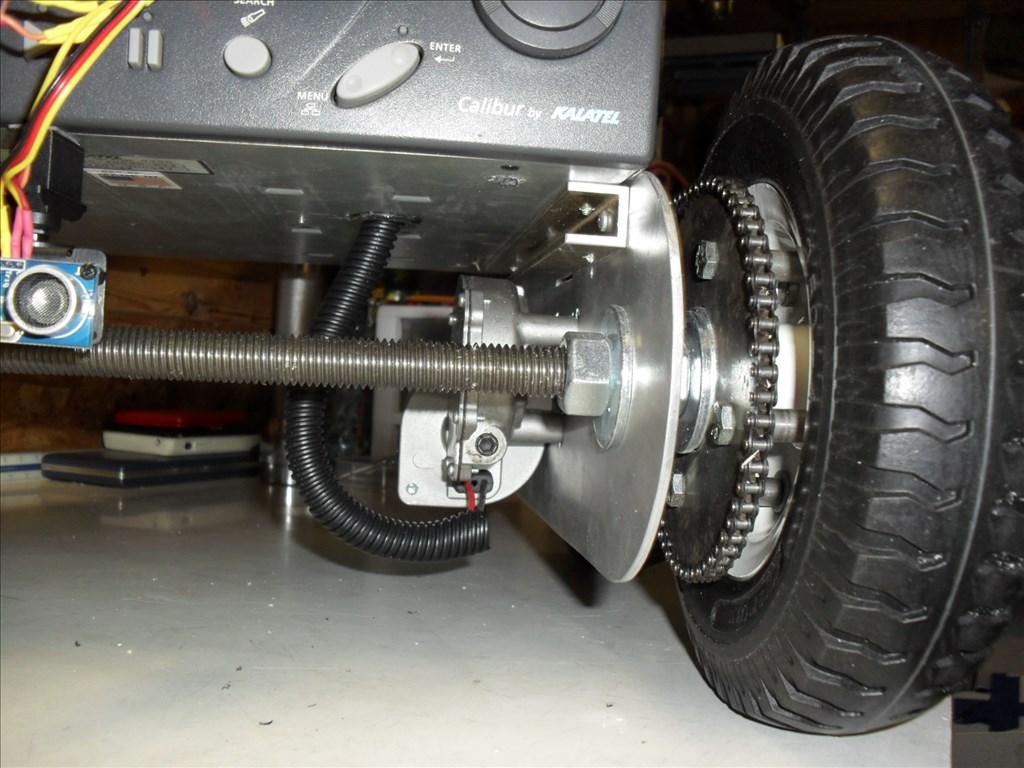
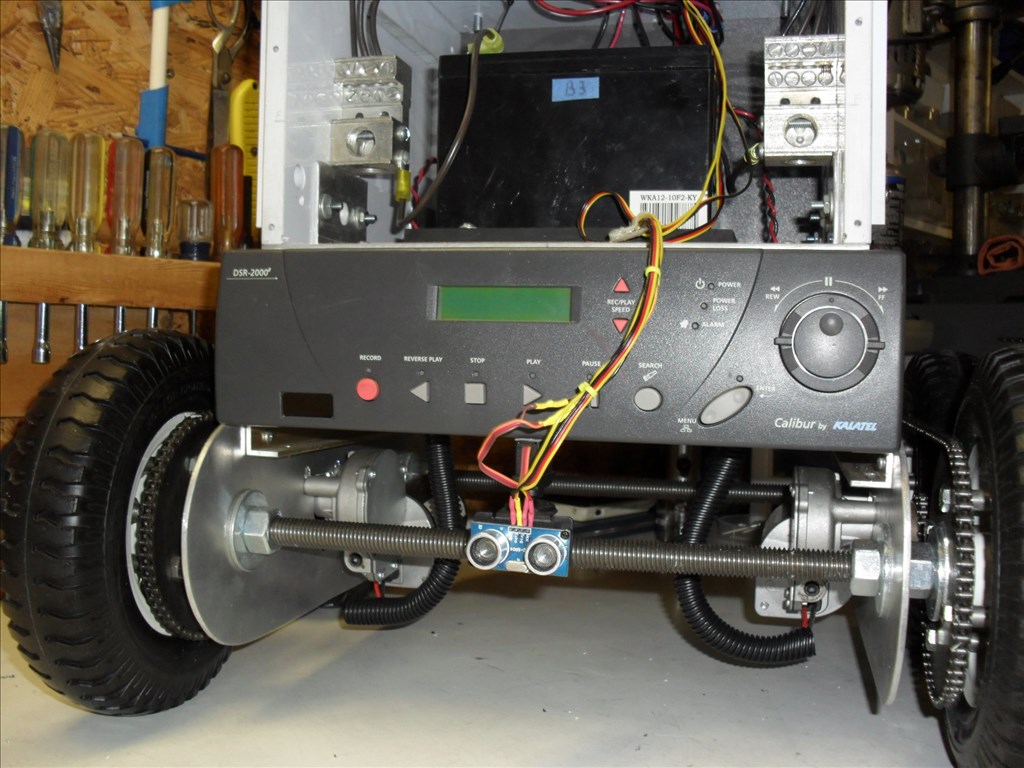
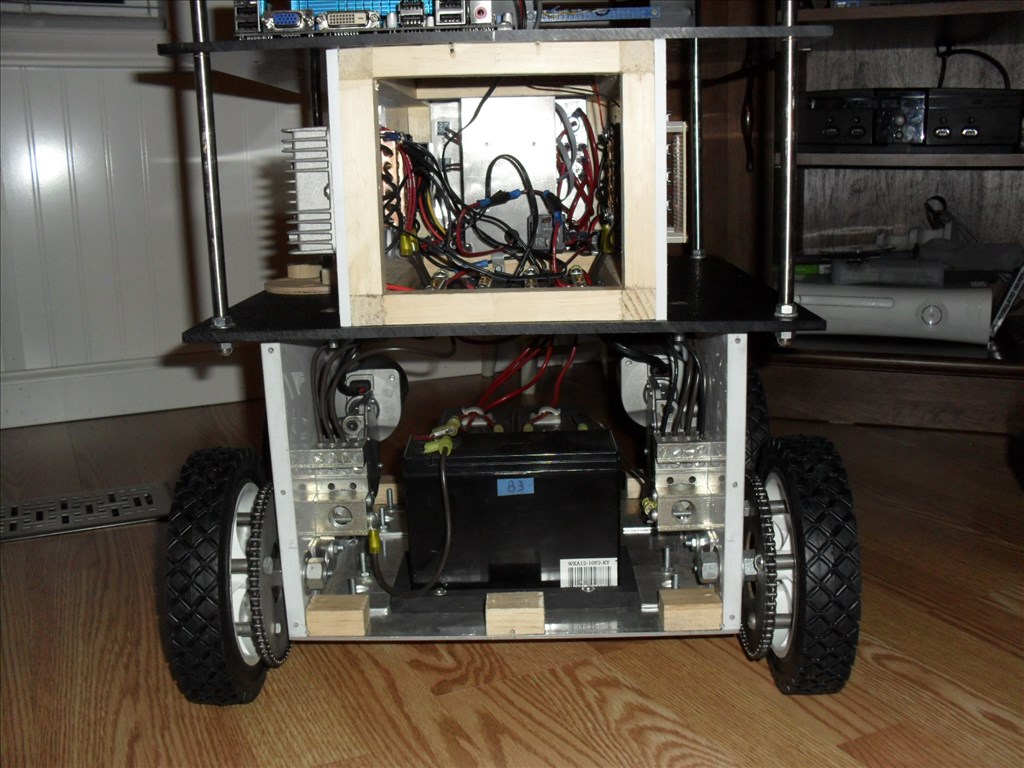
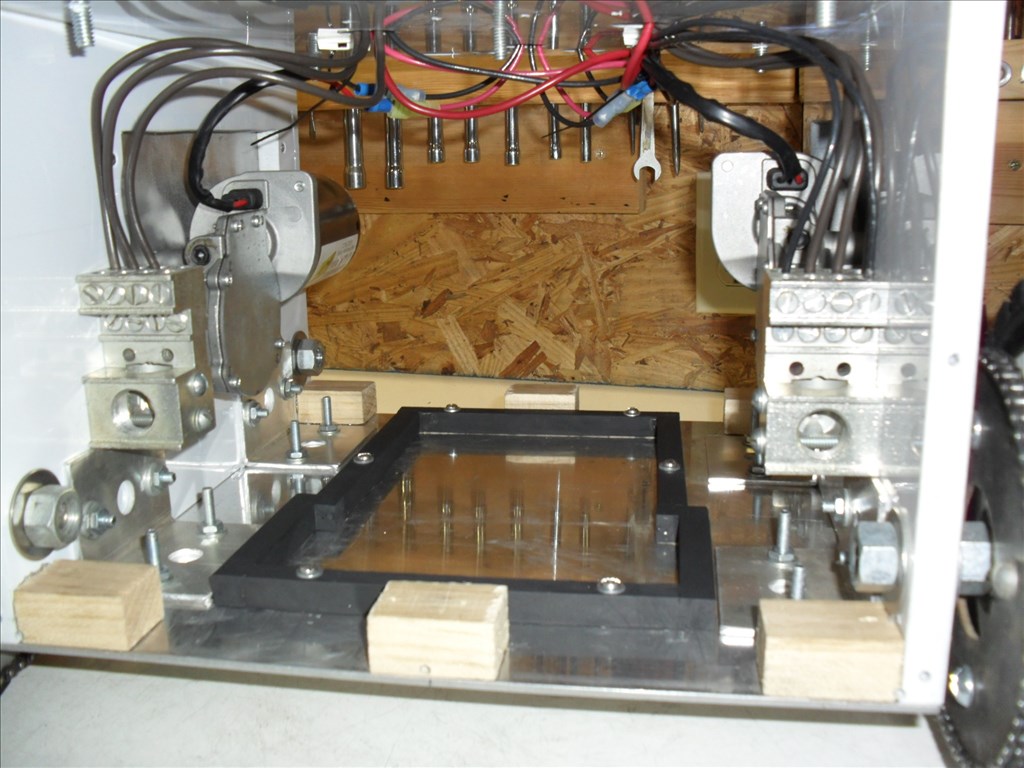 View of the motors and battery compartment area.
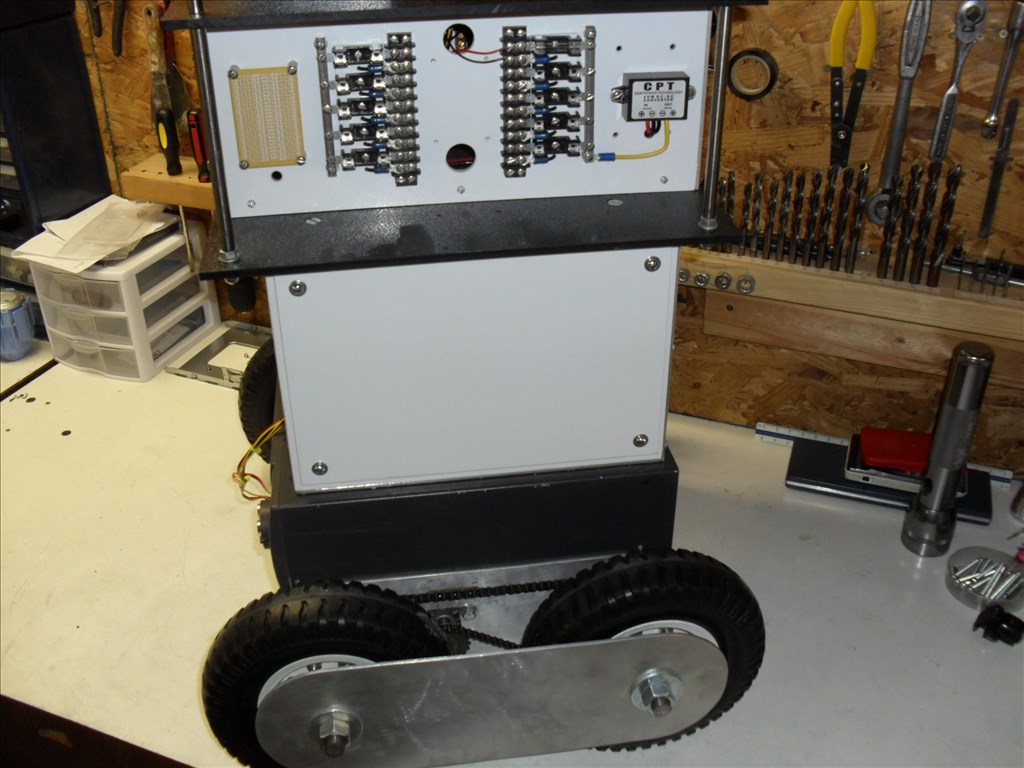
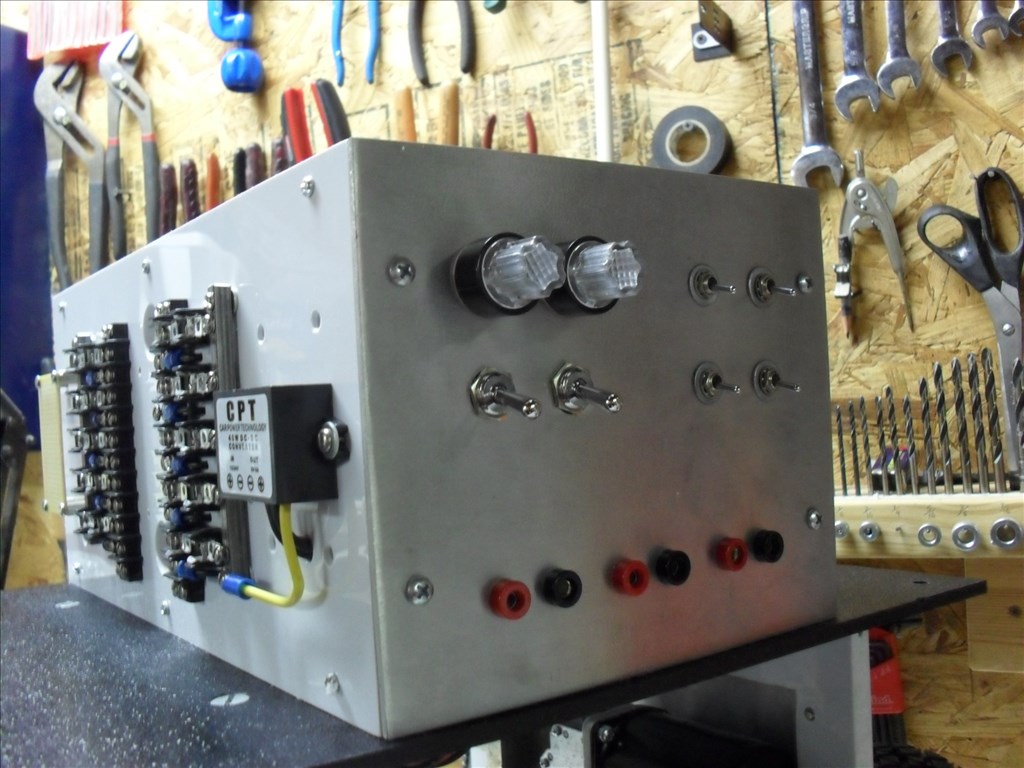
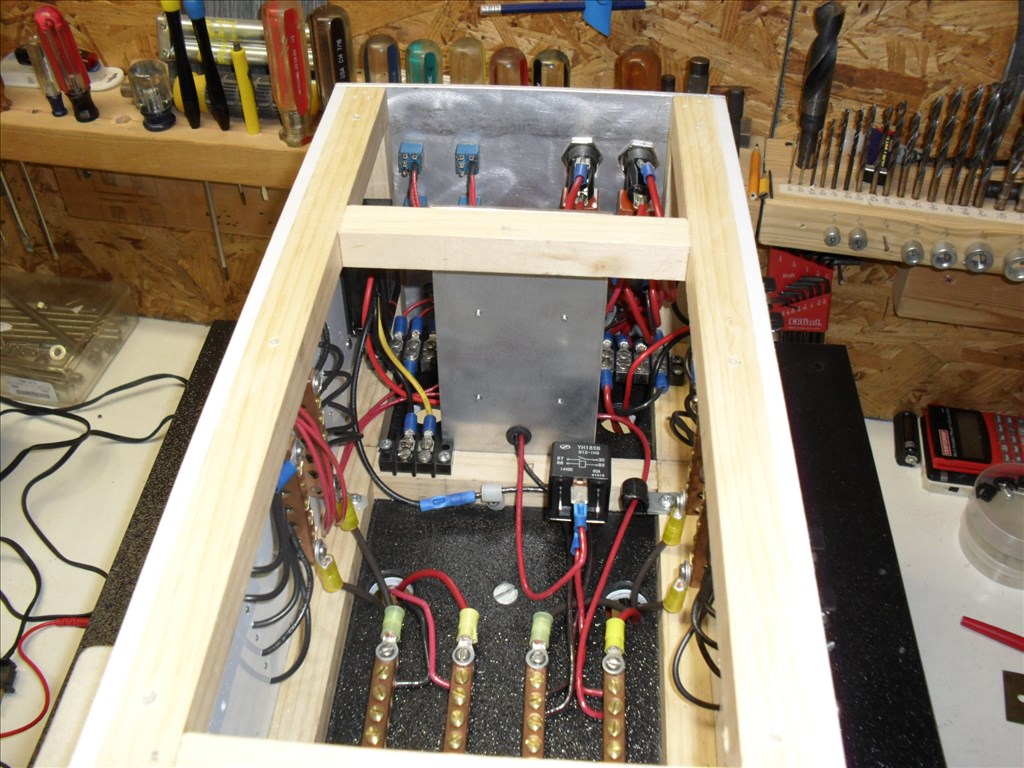
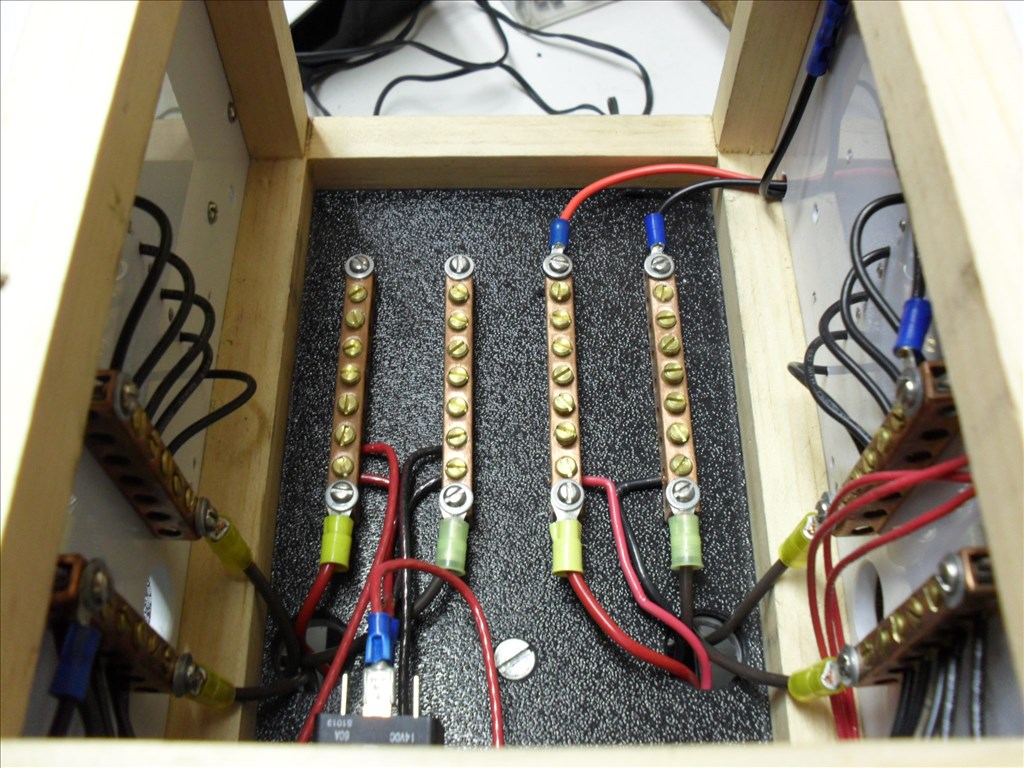
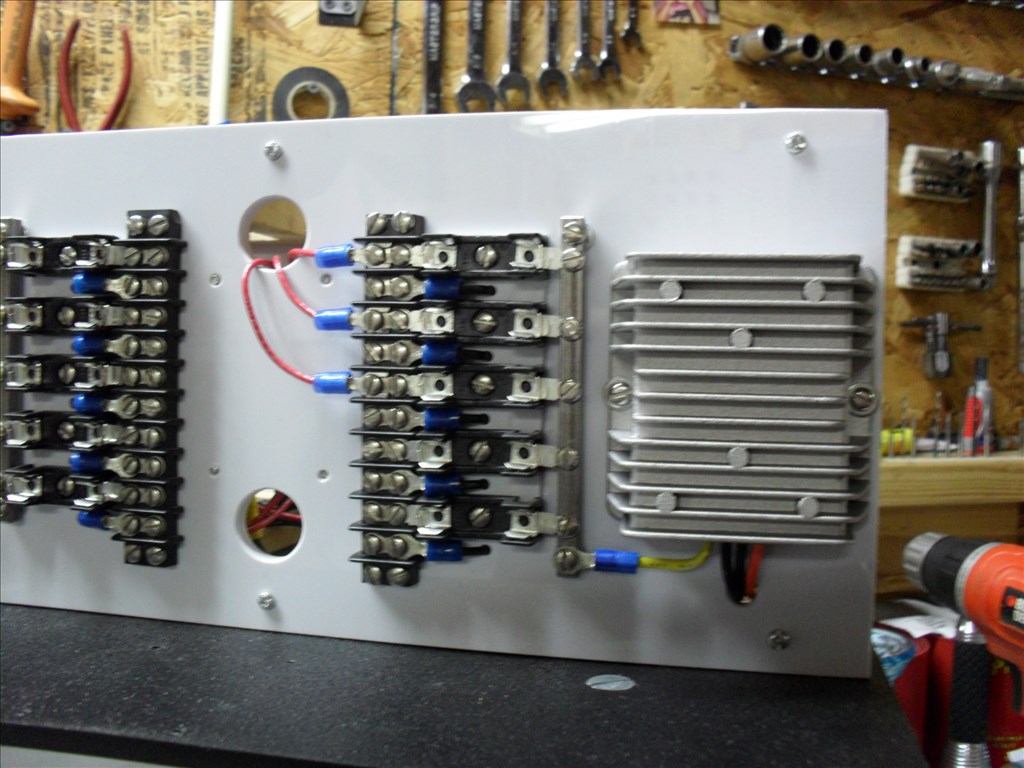
 The power system deck.


Weird....the pictures below [b]this line were not intended to be here in this first post. When I made the new post below, it saved the pictures in this post also. When I tried to go back and edit them out of this first post they don't show up on the thread so I can delete them. They belong in the post below....see details for the new wheels in the later post.[/b]
Other robots from Synthiam community

Bhouston's My Inmoov Running On Synthiam
Aerius's Inmoov Project

Wow, he is a beauty! Great job dude.
This is a serious looking robot.
Wow! Questor is awesome! I love the look and the ease of access. Very clean and professional looking.
Awesome work dude! Where you been hiding this guy , not in a breadbox I'm sure. I like the industrial heavy duty feel. Surely you will bring him/her to makerfaire!?
That is awesome. BTW the name Questor has a special place in my heart so maybe I'm a little bias. :)
rgordon, Your project is an excellent work. All of the different layers and features are well built. If that is your test platform, I can,t wait to see the final product! Steve S
Good Job! It is Tight!
Thanks for all the nice comments! I got the name from Gene Roddenberry's movie The Questor Tapes.
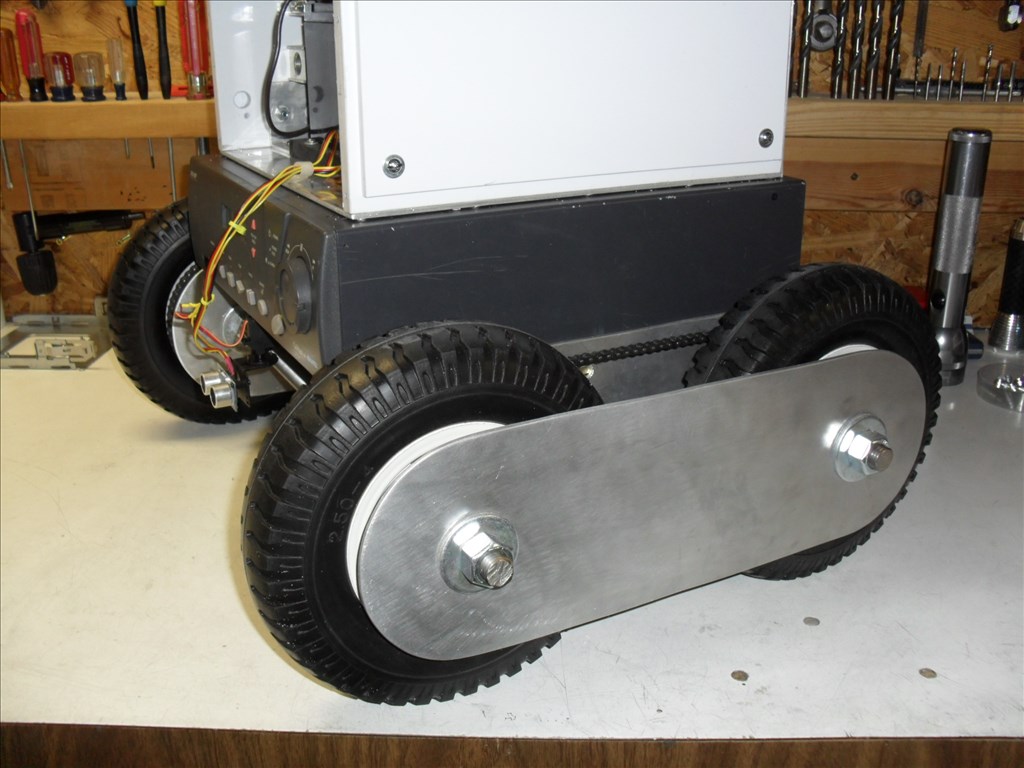
The original wheels I used were for a push mower. I added sprockets and chain so he would have skid steering. However, I soon found that the rubber tread had to much traction when trying to make turns or pivot when Questor was on a rug or carpet. Rugs would bunch up around the wheels and when pivoting on carpet amperage levels were too high for the Sabertooth.
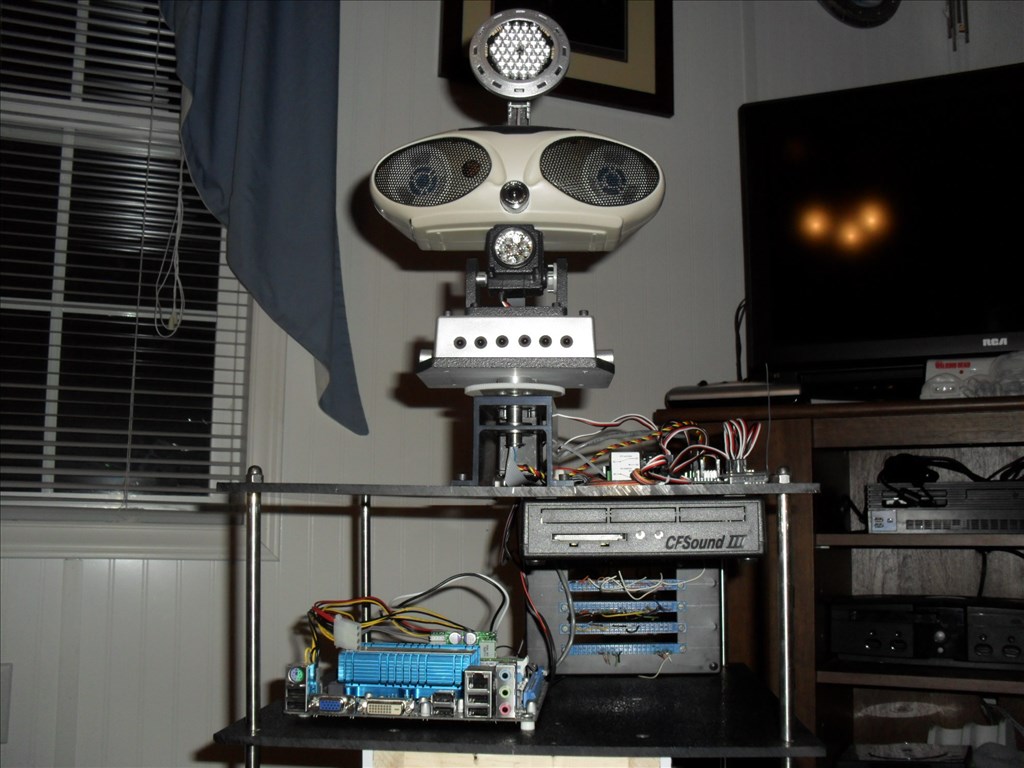
So I gave him a new set of 8" wheels with a slicker tread surface, moved the drive motors down beside the wheels and installed another deck. This deck use to be a video surveillance system used at my workplace. It went bad and they threw it out. So I gutted it and used the shell. I am hoping to hack the buttons on the front of it to control a music MP3 player.
The new wheels are great! They allow Questor to turn or pivot nicely on carpet....now for the unexpected and somewhat funny thing that happens now blush......when Questor travels on a wood or tile floor, the wheels make a sound that sounds like he is sick farting...LOL. It is especially bad when he executes a 360 turn.
Any ideas on how to make this stop would be appreciated :P
@Antron007 May I ask why the name Questor is dear to you?
@Josh
Yeah I'll bring Questor to the Maker Fair. Does he have to be registered for me to bring him?
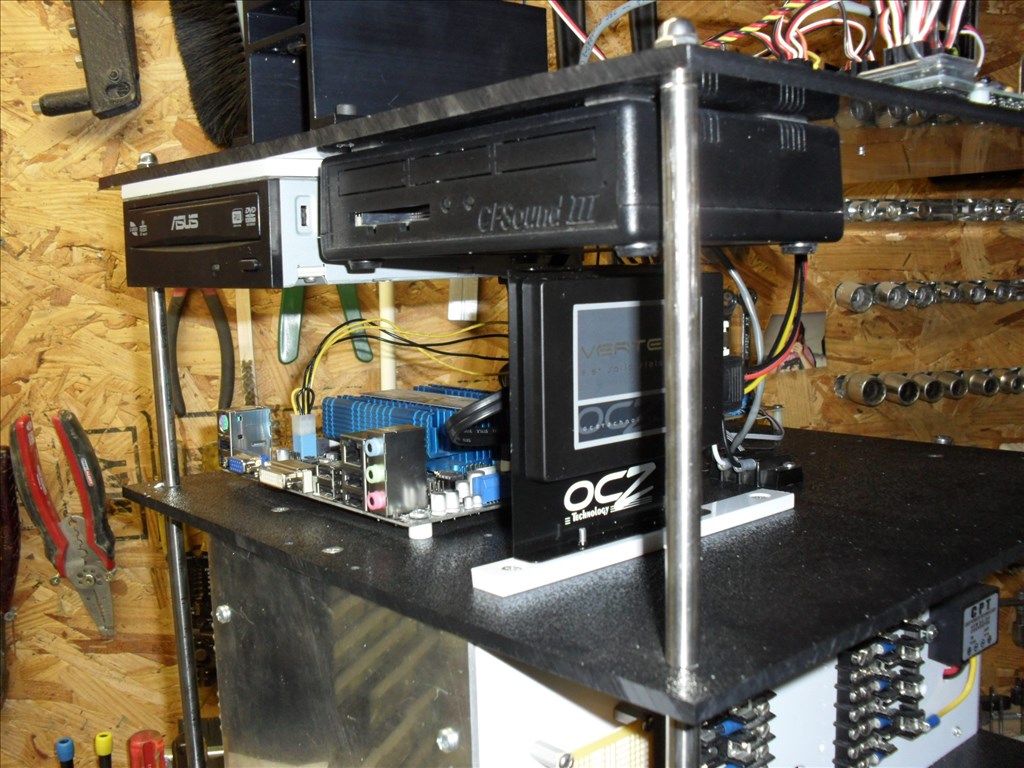
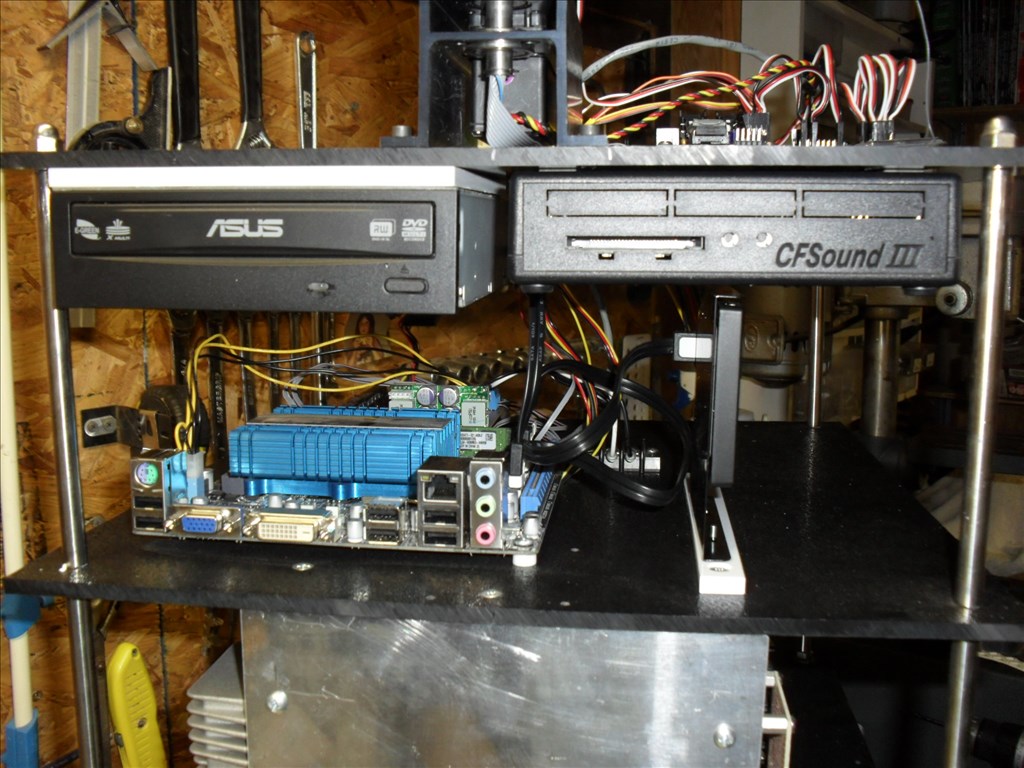
Here I have added the DVD drive and the 128GB solid state hard drive.
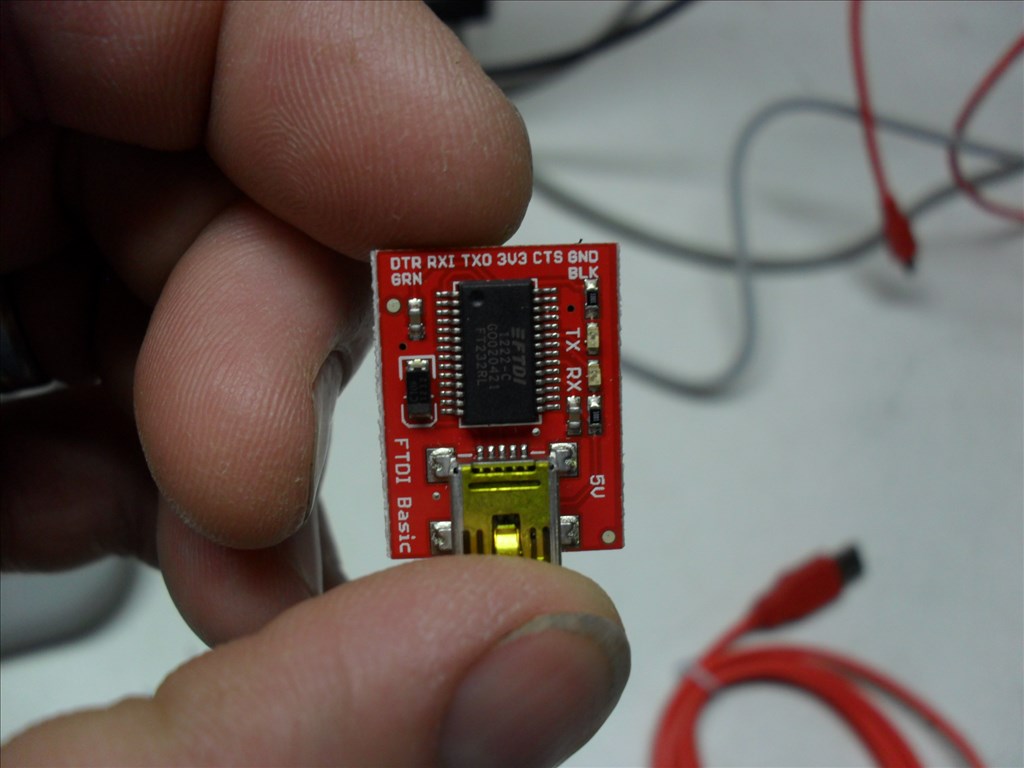
Waiting for more parts to arrive. I have ordered a Sparkfun FTDI Basic Breakout board as mentioned by Niek in
this thread to connect the EZ-B directly to the Mini ITX Mother Board.
Items on my list of things to do:
and on and on and on :P
@rgordon
Fantastic robot! great job.
Tony
Thanks Toymaker and to everyone else for the nice comments.
The following is from another thread but I wanted to move it to this one....
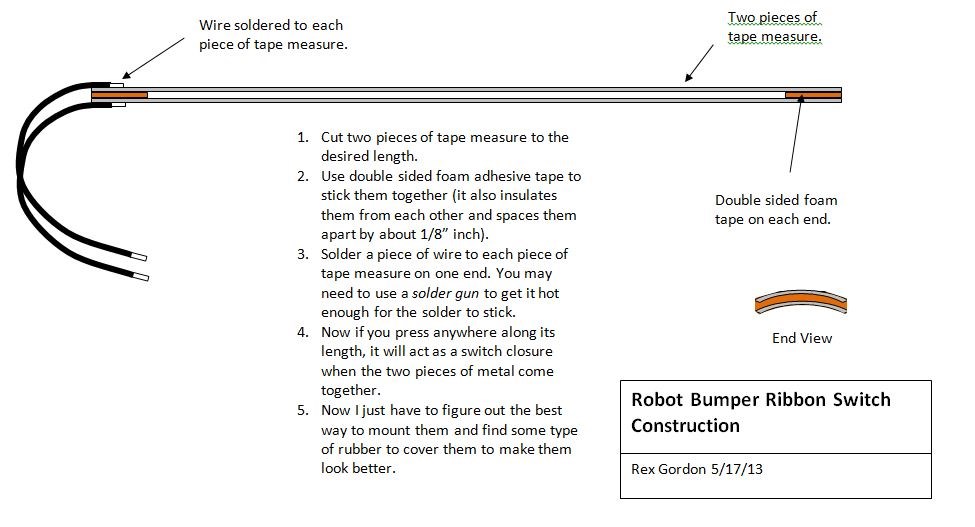
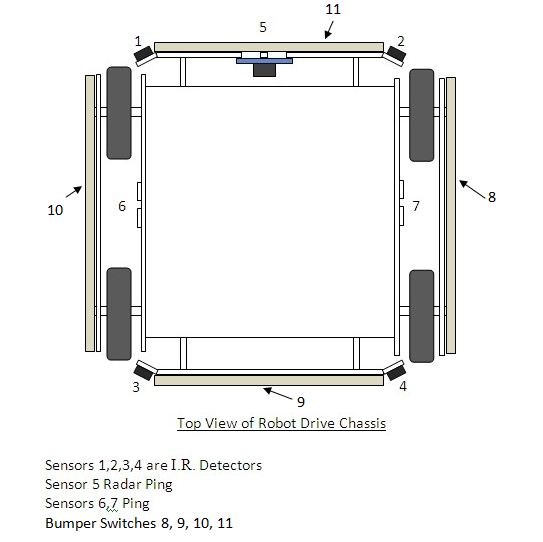
I am also in process of making bumpers for my robot Questor. Questor is large enough so that if his ping, ping radar or IR sensors fail to see an object in his path then considerable damage could occur to furniture or other items. Or, heaven forbid, if he bumps into a person, I want a switch to actuate and shut down the drive motors immediately. Then, based on which bumper switch is actuated, Questor would make a decision on which direction to move to get clear.
So, I searched the internet for ribbon switches, tape switches, etc. and found that they are very expensive (aprrox. $25.00 per foot). I decided to set about inventing my own but was unsure of what to use.
I had an old tape measure that would not lock any more. I was going to throw it out. Then I thought..hmmm.maybe I could cut off two pieces (what ever length I need) of the metal tape measure, strip the paint off of it and make a bumper switch out of it. The prototype I made functions as expected and it seems to perfect for this app. The only thing I may need to worry about is rust :P
The next step is to figure out what to use to cap the ends to make it better looking and for mounting. Also maybe some sort of rubber covering. Or I could just paint the top piece of tape measure.
The following is from another thread but I wanted to move it to this one....
I have poured over the forum and web trying to find a way to smoothly change from EZ-B control to R/C control and back again. From what I have read, it seemed others were having this issue as well. I have looked at all the tutorials and contacted Dimension Engineering, tried every possible combination of dip switch setting and EZ-B control but could only get it to work in one or the other but, not both...until now. :D
I decided what I needed was a way to electronically select between two dip switch settings. A sort of dip switch configurator (for lack of a better term). So I searched until... I think I found the end of the internet. :P
Maybe I missed something but there did not seem to be one available...so I did what any good robot nerd would do...I built my own.
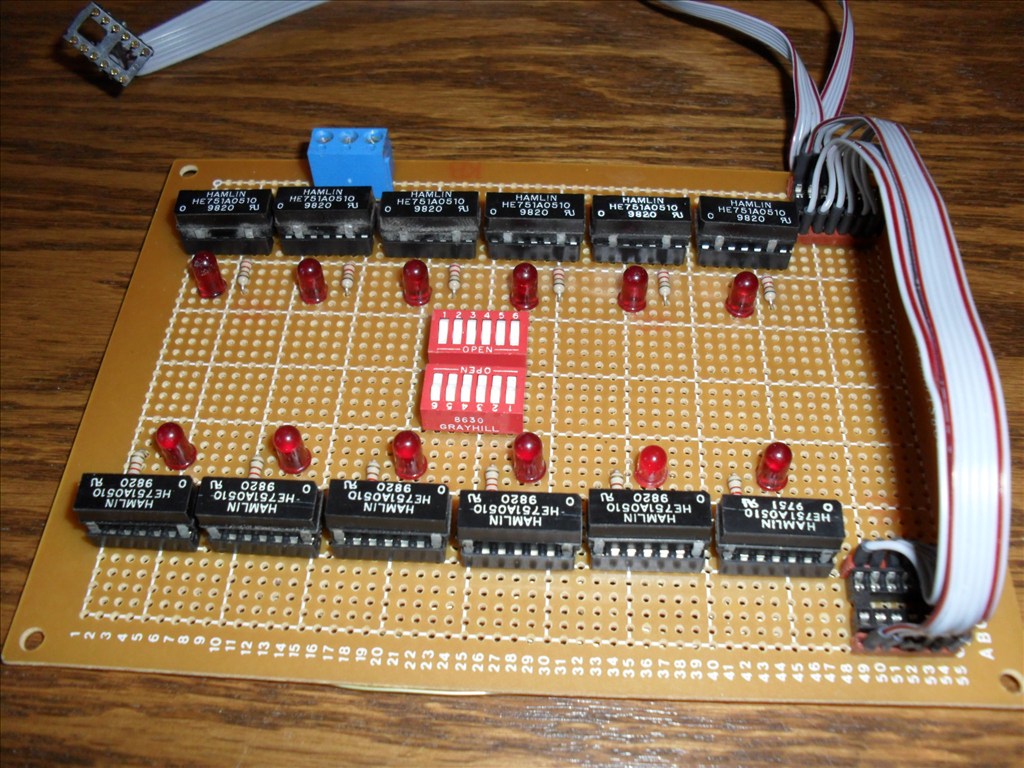
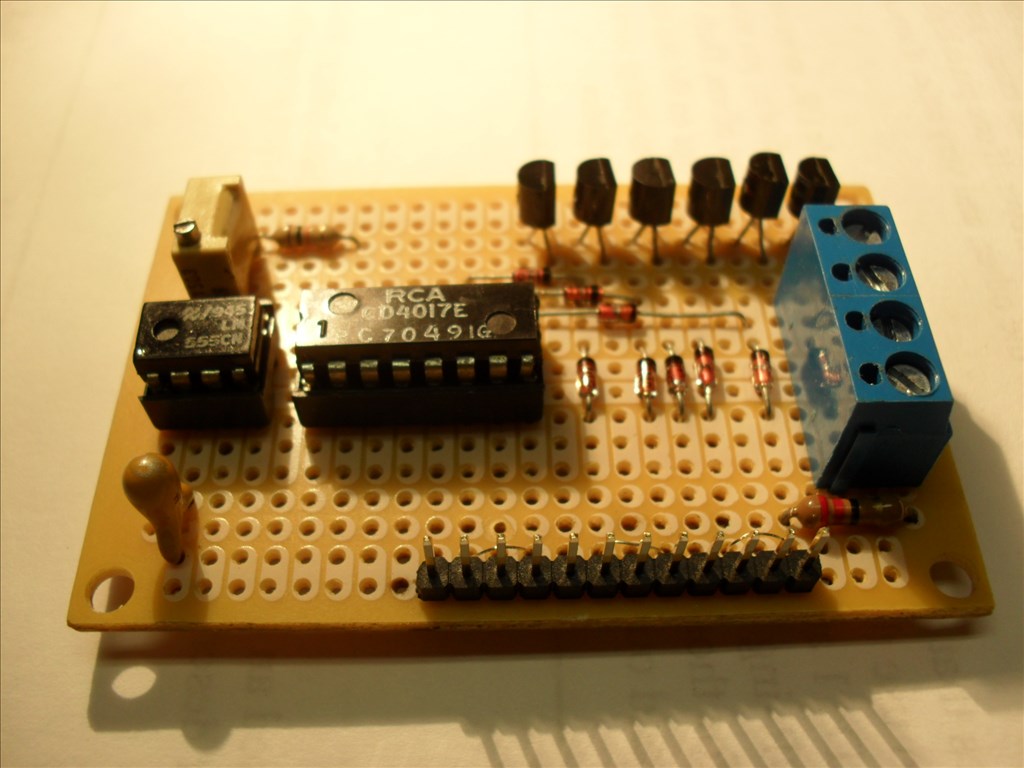
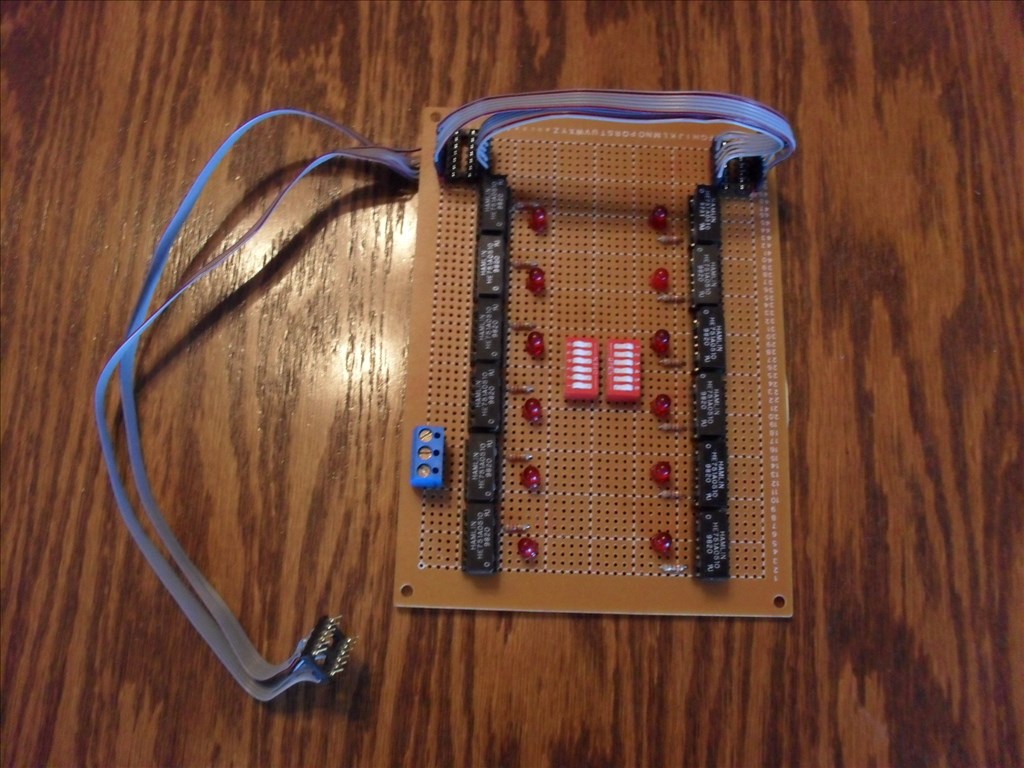
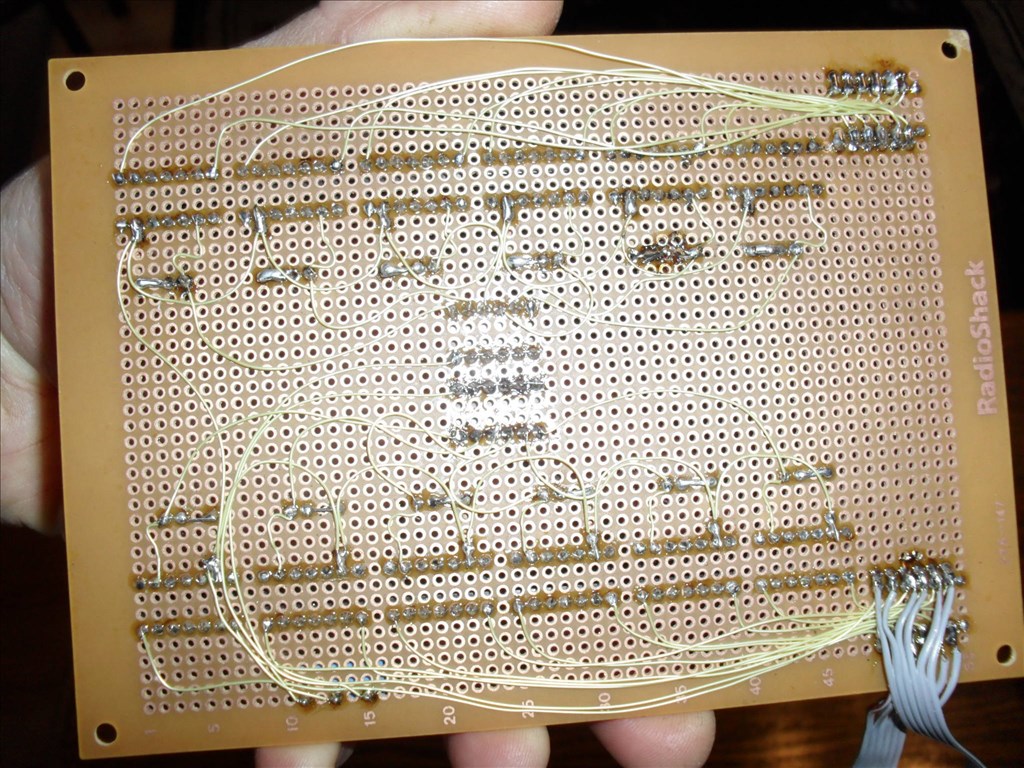
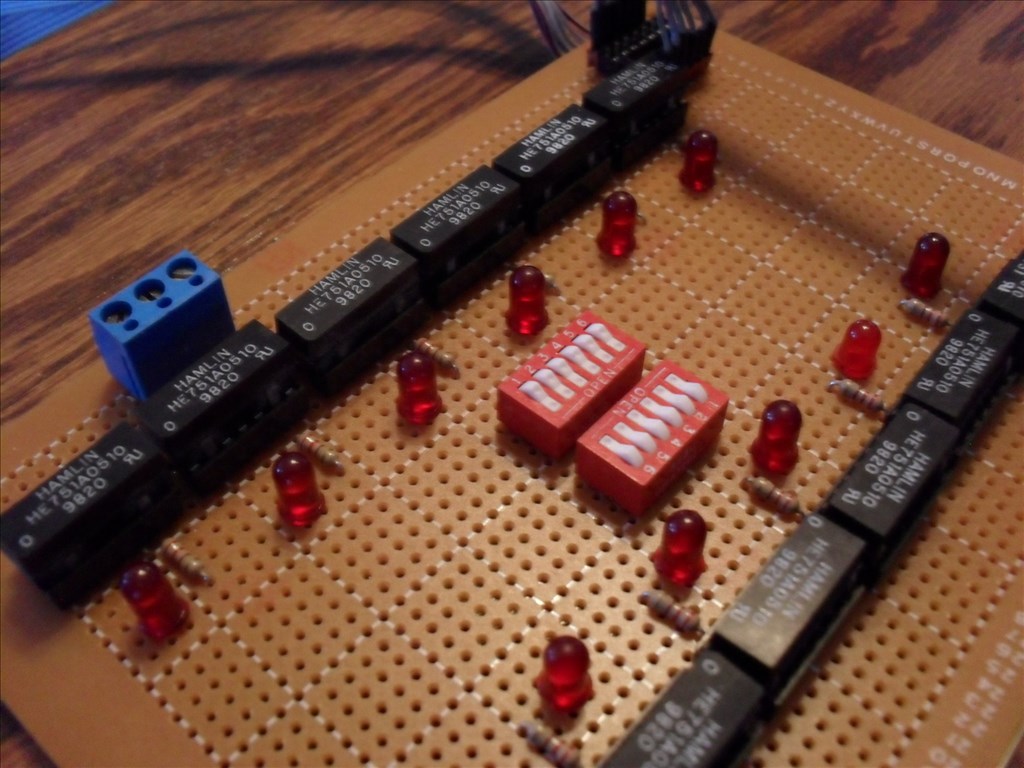
I used tiny HE751A0510 reed relays with normally open, SPST (ie. single contact). The ones I had on hand happened to have 5V coils with a suppression diode. For now, I constructed it on a perforated circuit board. Eventually I will try to miniaturize it further and etch my own board. There are two separate circuits. Each circuit has six relays and one six position dip switch. Each relay contact represents one dip switch position "on the Sabertooth". Each relay has its own L.E.D. to indicate when it is activated. The dip switch on the circuit board is used to energize a relay or can be left off if need be.
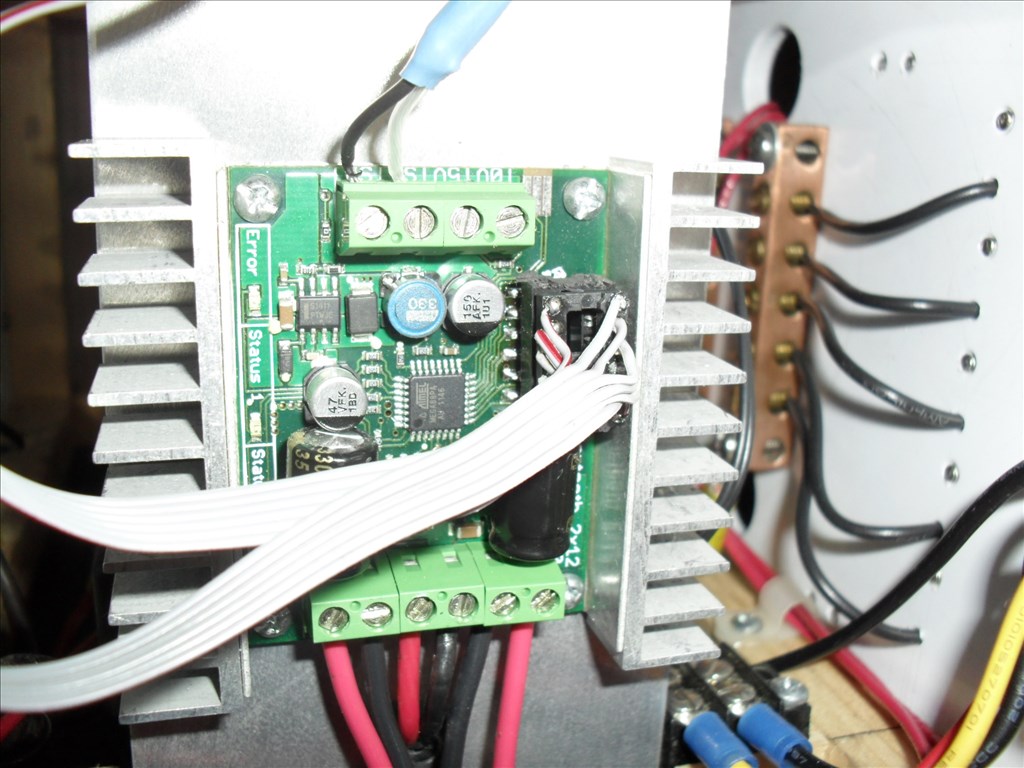
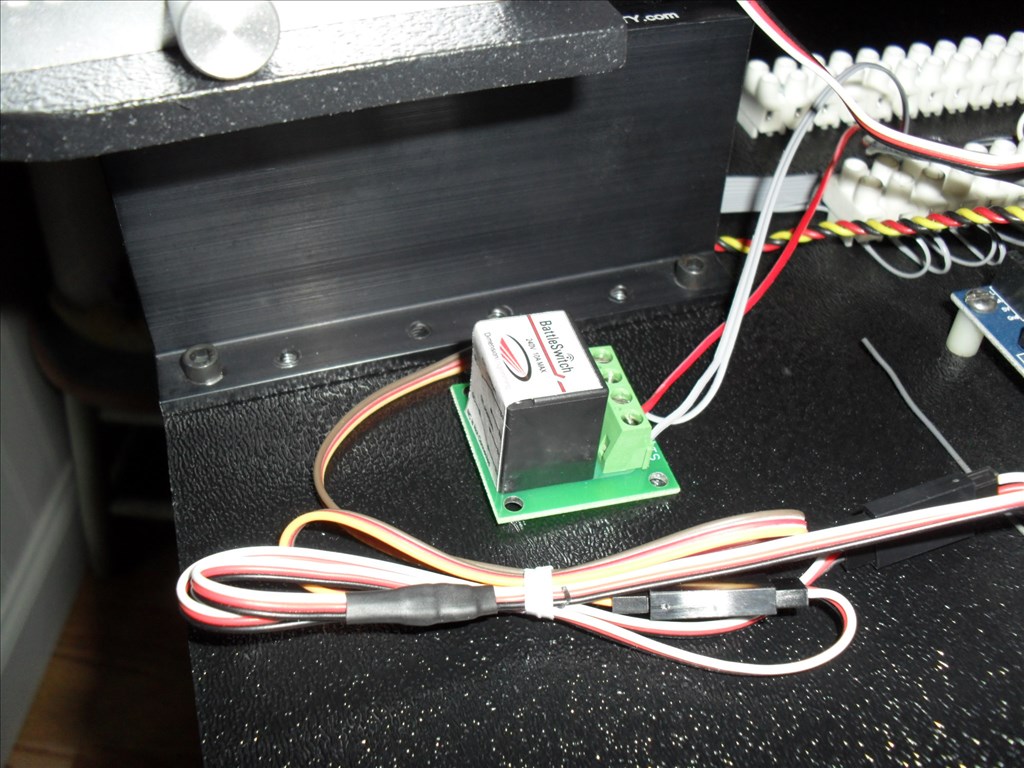
Now the tricky part. I had to de-solder the surface mount dip switch that is on the Sabertooth. I had quite a time to get it to come loose. I used solder wick to soak up the solder off of each tiny pad and finally it popped loose. None of the dip switch legs go through the board. I placed a small bit of fresh solder on each pad. I then took an IC chip socket and cut it down so it only had six pins on each side. I bent each leg so that it was shaped like a tiny foot. I pre-tinned each leg with solder. (This makes soldering easier and quicker). I placed the socket on the Sabertooth pads and proceeded to solder each leg in place. I used another IC socket and some ribbon cable to make a jumper from the board to the new Sabertooth socket. I needed a way to remotely switch between the two circuits so I purchased a Battle Switch from the Robot Market Place web site. It is an R/C controlled SPDT relay. You just hook it to one of your (on/off) R/C receiver channels. I chose the AUX channel that is normally used for R/C airplane flaps. The AUX channel is toggled on/off via a switch located on my Spektrum DX6 transmitter. I installed a three position terminal block on my dip switch configurator board. I hooked 5V to the common terminal on the Battle Switch relay and ran wires from its two contacts to the dip switch configurator board three position terminal block and hooked the two 5V wires to the outer terminals and GND (common) to the middle terminal. Each of the circuits share the GND connection.
Also I have installed a R/C Mux circuit from RobotShop.com. It has two 8 channel inputs and one 8 channel output that allows me to hook all of the R/C receiver channels to its "B" input terminals and the Digital out from the EZ-B that I am using for the Simplified serial to the Sabertooth and the Digital out(s) I am using for the Head pan and tilt servos to its "A" input channels. The 8th channel of the "A" input is used (defaulted by the manufacturer) to select which inputs go to the output. If no signal is detected on this channel all of the "A" inputs got to the outputs. The AUX channel from the R/C receiver that goes to the Battle Switch relay is also hooked to this channel 8 via a Y- cable.
So now with the flick of a single switch on the Spektrum DX6 it will smoothly set the Sabertooth dip switch setting to whichever I need for control; EZ-B control or Spektrum R/C control. BTW the Spektrum DX6 has an approximate range of 3000 ft. It does not have to be this model. You could use most any R/C transmitter as long as it has at least one on/off channel and a few other normal servo channels to drive and steer with.
I know all of this sounds complex when describing it but, it will make sense when you see the schematic and photos (and hopefully a video).
Dip Switch Configurator Board
@Rgordon anyone is welcome to bring a robot and individual robots do not need to be registered just the booth and us. I think this will be a cool addition. Are you OK with periodic demonstration of your robot?
Is your DVD drive and card reader double sided taped to the upper deck? I'm starting to understand the bumper arrangement you were trying to get me to understand. So its sections of tape measure with no paint as a mechanical switch.
Wow, this is a platform of awsomeness. As a matter of fact it is epic. Great job.
Yeah, I'd be OK with a periodic demo. Radar ping is functioning so he can avoid obstacles in his path. However, for now that is the only NAV sensor he has.
The CFSOUND III is double sided taped to the upper deck. The DVD drive I wanted to be able to remove if needed so I cut a piece of 1/4" thick (white)plastic, drilled and tapped holes in it so it could be mounted under the deck then used double stick tape to stick the drive to the piece of (white) plastic. Now just have to remove 4 screws and I can take it off. Don't know if the DVD drive will survive being mounted on the robot but, it was only $20 so worth a shot.
I have only made a prototype of the bumper switch using two pieces of tape measure with the paint stripped off. Basically it's just two pieces of flexible metal that make contact (continuity) wherever you press them together anywhere along their length. Then they snap back when you let go. Makes a great strip switch. Just got to figure out how to cover them and make them look good.
Thanks PJ_Dtechy.
Really nice work! I appreciate the work that goes into building a large scale robot. I've started construction of the next version of my ARMadeus series. Parts of the Mk. 8 will be completely different than any of its relatives. I'll be posting pictures of the build later this summer.
Thanks Jim, I appreciate that. I wish I had the time and money and tools to make robots as professional as you. Mine is just kinda thrown together. Hopefully, once I get it all working I can go back and clean up some of the wiring mess. But in the end this is just a test platform anyway.
BTW, Your robot is a work of art. Where do you live? I live near Buggs Island Lake (Kerr Reservoir)close to Clarksville, VA.
Rgordon, thanks. Building robots is part art and science. I do spend a lot of time planning and optimizing the arrangement of components. Using the 80/20 aluminum extrusions as the primary building material allows me the flexibility to fine tune the design and placement of the robot subsystems during construction. For me the process is highly iterative. I use off the shelf parts whenever possible. Any custom parts, such as mounting plates and brackets, are made with a band saw and a drill press. The end result is a robot with a rugged, industrial look.
I live in southern Maine, not yet a hotbed of technology. The growing number of FIRST Robotics teams in this area is helping to change that situation. I encourage robot builders of any skill level to check out a local FIRST team. It is a great way to share the passion and learn from the experience of others.
Hooked up and tested the CF Sound III yesterday. It has a 50 watt built in amplifier and can play up to 255 wav files. This thing is packed with all kinds of neat features. The CFSound III comes with two contact inputs built in, and one PTT(Push To Talk) output relay built in. You can add up to 48 contact inputs and/or up to 16 contact outputs by installing up to two I/O modules in the CFSound III. It sounds great. Now to figure out if ARC can control it via its serial port.
CF Sound III
CFSoundIII/CFSound_III_Users_Manual
@rgordon your quote "Questor was not intended to be a cool looking robot platform, just functional and very basic in appearance".
What are you talking about, Project Questor is a #1 excellent robot. I just hope my final robot is half the robot Questor is.
@rgordon I really like the voice lights and the fact you used a flash light. That would be prefect for my bot, care to share how you did it.
@Tymtravler Thanks so much for the kind words.
As for the voice lights, I removed the little circuit board out of the flash light and will be using a TIP122 Transistor circuit (see Rich's Tutorialon it). Then I can use the Sound servo control in ARC to modulate the LED's with Questor's voice. I'll keep you posted on how it works.
I look forward to seeing this bumper sensor your making, I just picked up supplies to start that area of mine but I would like to see one work :)
Josh,
I'll bring my prototype bumper switch to the Maker Fair. It is really simple. Just need to make it look nice.
Update: Hooked up a power switch for the motherboard and established a connection with ARC.
Encountered a problem with the motherboard. When I turned on the CFSound system, the motherboard turned off. If I turn on the CFSound system "first", then power up the motherboard, all is fine. I measured the power going to the motherboard and turned on the CFSound to see if it is causing the power to dip enough to cause the motherboard to power off. I only see it drop by 0.1 volt. Both are hooked to the main 12V regulator which is rated for 10 amps so I would not think there would be a problem here.
Any ideas anyone?
Also ----Rich I have a TIP31 transistor. Would this work with the Sound servo control to make Questor's voice lights flicker or is there something special about the TIP122 you used?
Rex
@rgordon I love this robot! You've done such a great job with all the placements of each part and the wiring looks very neat and well thought out. It all looks very professional.
Something that really stands out for me is the CFSound 3. I'm using this also in my B9 Robot (along with a MP3 Trigger) for the voice. I love the relays that are built into the CFSound 3. They let me not only trigger sound files, lights and motors when EZB is not active but I'm also using the relays to let switches and buttons activate scripts in ARC when EZB is active. I've got EZB ADC ports watching relays on the CF3 that are in turn attached to switches on B9. So when a button or switch fed with 5vdc is engaged, CF3 will activate its relay that's attached to it. Then the EZB ADC port that's attached to the relay will see the change in voltage and run any script I want. Very cool.
Another fun factoid; In Gene Rodenberry's The Questor Tapes clip you shared with us (thanks) the woman scientist you see is Gene Rodenberry's wife Major Barrett. She not only was the nurse on the first Star Trek series and aST few movies but was also the Enterprise's computer voice for almost all the different Star Trek TV shows. Also, the other male scientist is Mike Farrell of MAS*H fame (but I'm sure everyone knew that).
Thanks! Dave Schulpius
@rgordon The CFSound system may be pulling the supply down for a very short time (at switch on) and you probably will not be able to see that on a meter. Have you got access to a scope? if so you can look at the DC level on switch-on and see how bad the dip is. If this is the problem then possibly adding a large reservoir capacitor across the motherboard may help.
@Toymaker,
Thanks for responding....Yeah I was thinking that may be something to try. An Electrolytic cap. What do you think a good microfarad value would be?
It would need to be a large electrolytic cap, you could start with 2200uF but it may need a bigger value, its trial and error on these sort of things.
Thanks.....I'll give it a try. See what happens :)
TIP122 is a 100V 5A NPN Darlington with an Emitter-Base Voltage of 5V and Base Current (DC) of 120 mA.
TIP31 is a 40V 5A NPN. It has a Base Current (DC) of 1 Amp. This may making it unsuitable to drive with an EZB pin. I don't think it would hurt anything to try it though. Only thing that may happen is it wont operate. Set it up on a bread board or on the bench top with alligator jumpers first.
As far as the motherboard shutting down. It may have a watchdog circuit that shuts it down or reboots it if the voltage gets below 5V. You may have a quick voltage drop that you cant see happen with your meter but the motherboard senses. I have this problem sometimes with some of my Solid State pinball games. If the supply voltage drops to mush they will reboot. Another cause may be your wiring or connections. You will lose voltage if the wireto small or the run is to long. Also you will have voltage loss if you have poor or bad connection or solder joint somewhere.
Dave Schulpius
Dave, I'm going to try upping the wire size first then if that doesn't get it I'll try placing a capacitor across the power terminal.
Update:
-Downloaded the latest ARC and got it working on the laptop so I'll be ready for Maker Fair Saturday.
-Tried out the TIP31 circuit with the SoundServo control but could not get it to work. The LED's stay on all the time with no change in brightness. I did try using the PWM control and with that control I could vary the voice light intensity from nothing to full brightness so it appears the TIP31 is working. Any ideas on how to get SoundServo control to work wold be appreciated.
You could use the variable set by Sound servo in a script that will enable/disable the LEDs if the sound goes over a certain level. I posted an example in another topic about sound servos the other day.
Have a look at this topic for some ideas
Thanks Rich. I'll try that.
Small Update:
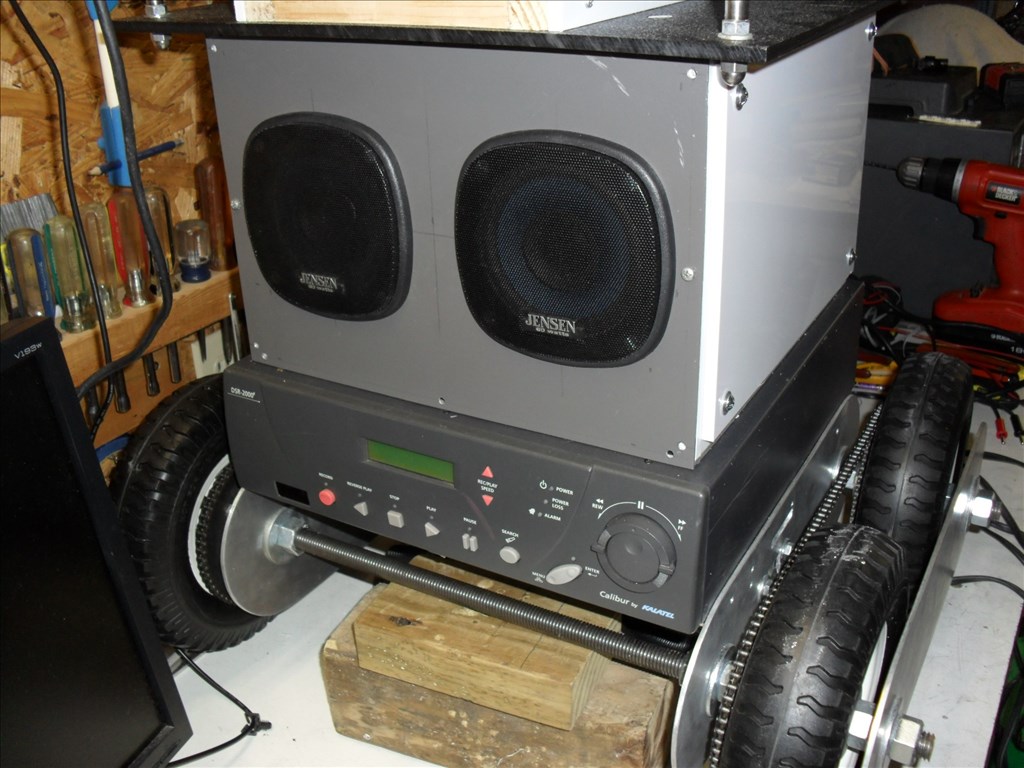
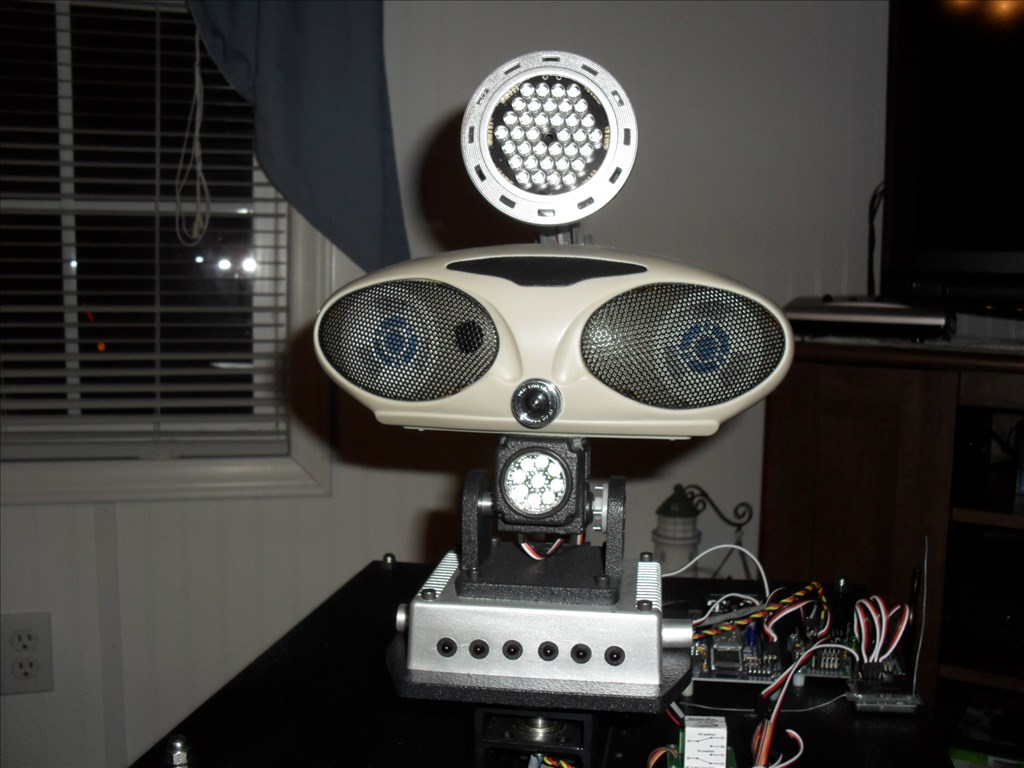
Questor gets his new speakers.
Tested at full volume.....it's LOUD :D
Don't know if I'll be able to get the speaker plate panel painted before the Maker Fair...sooo much to do.....sooo little time.
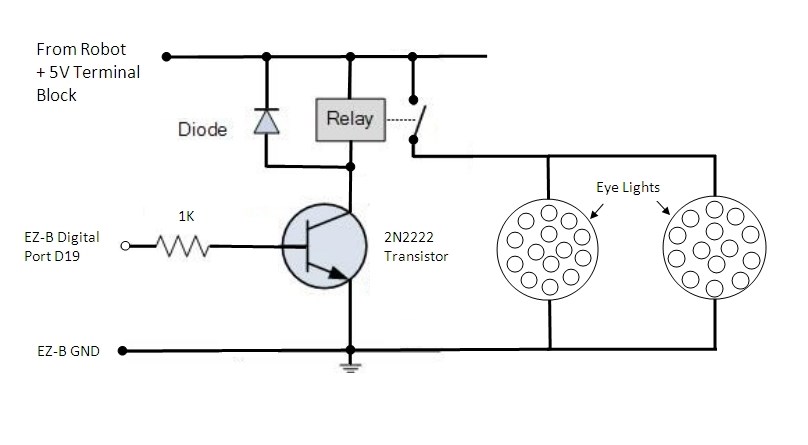
Update: Built and installed a relay circuit to activate Questor's eyes using an EZ-B digital port. Tested and working great. Hope to get my video camera charged up and start making some videos of this little guy.
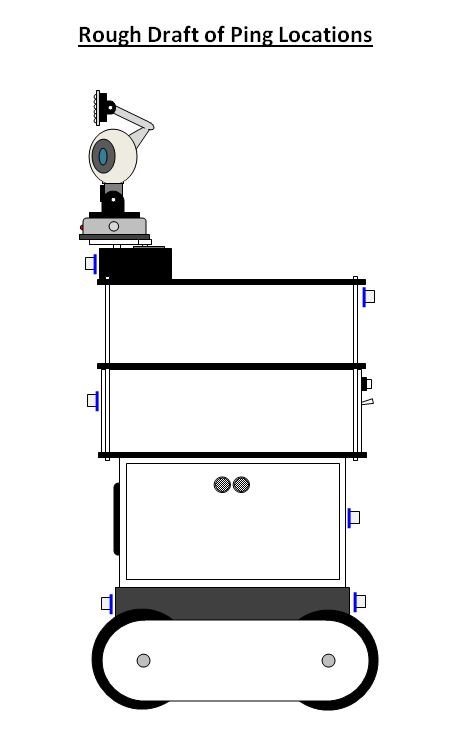
*NOTE :This drawing was edited to correct a mistake
Cant wait to see the vids!
Did you get the Motherboard shutdown issue wored out?
Hey Rex, on those wheels, are they hard plastic? Also, when initiating a hard turn or full rotation does one set of tires move forward while the other moves in reverse, or is it just one side that is moving and the other is simply powered down? Where did you get those tires and how much weight do you think they can take?
Thats like a boom box on wheels lol . They look like a standard sized lawnmower wheels. Usually those are hard plastics or hard rubber.
But in this case the voice light will be ON OFF based on the digital port level that will activate the relay thru the transistor. So, what is the nature of the EZB digital port on off or what ? Why do you need a relay ? Why you did not use transistor or MOSFET to control the voice light ?
@Dave ....I will work on the Motherboard issue after the Maker Fair. Right now trying to get Questor presentable. I think there may be an issue with the (old) toggle switch I used. Once when I turned it on and nothing happened I checked and there was no voltage at the power terminal strip. I wiggled the switch a little and the voltage was restored. I also want to increase the gauge of the wires that feed the motherboard.
@Bret ....The wheels are a hard plastic with just a little tread on the outside edges. I had to change from the rubber push mower wheels to the plastic ones so Questor could make turns on rugs and carpet better (see earlier post). They are 8" diameter wheels from Tractor Supply. They have ball bearings for the axles which is something else I wanted because Questor is getting so heavy. They were about $10 a piece. I'm sure they could withstand over one hundred pounds of load weight just by the looks of them. I will check to see if I can find out for you. When initiating a hard turn or full rotation one set of tires move forward while the other set moves in reverse. However, I could try the other method you mentioned.
...The unforeseen problem (LOL) is that now whenever Questor rolls across hard wood or tile floors the tires make a (for lack of a better term) ...a farting noise. sick :D
@hhammoud ...I will use the EZ-B digital port to turn the eyes on or off via a script later (for now I just click the button on the ARC window for the digital control. I used the small transistor and relay because I did not have a proper transistor. The voice light has about 15 LEDs in it.
Rolls over in the floor laughing at the farting wheels
Suggestion, 2N2222A can take up to 800mA so by limiting total current to .5 A wich is almost 25mA per led you can take out the relay from the circuit and can use Pwm signal to make diming effects with your LEDs and even you can use RGB led for more effects.
Ohhh...my bad....I'm getting the two mixed up in my posts....I meant the relay circuit is for the eyes on/off.
I already have a TIP-31 transistor for controlling the voice lights. Although, I could not get it to work with the SoundServo control. The voice lights stayed on all the time. Got to go back and experiment some more with that. I tried using the PWM Control for that port and it did vary the LEDs from off all the way to full brightness. So that may be what I need to use based on what Rich was saying.
Sorry for the confusion. That's what I get for trying to sneak and update my posts while I am at work. :D
OK...any ideas on how to remedy the farting wheel sound....anyone? confused stress
GasX :P
Really though, you could try a silicone spray of some type. Something like this: www.amazon.com/Sno-Seal-Silicone-Water-Guard-Aerosol/dp/B0018QIYDK
Yeah, stop blaming the robot for your gas. :D
:P
 LOL
LOL
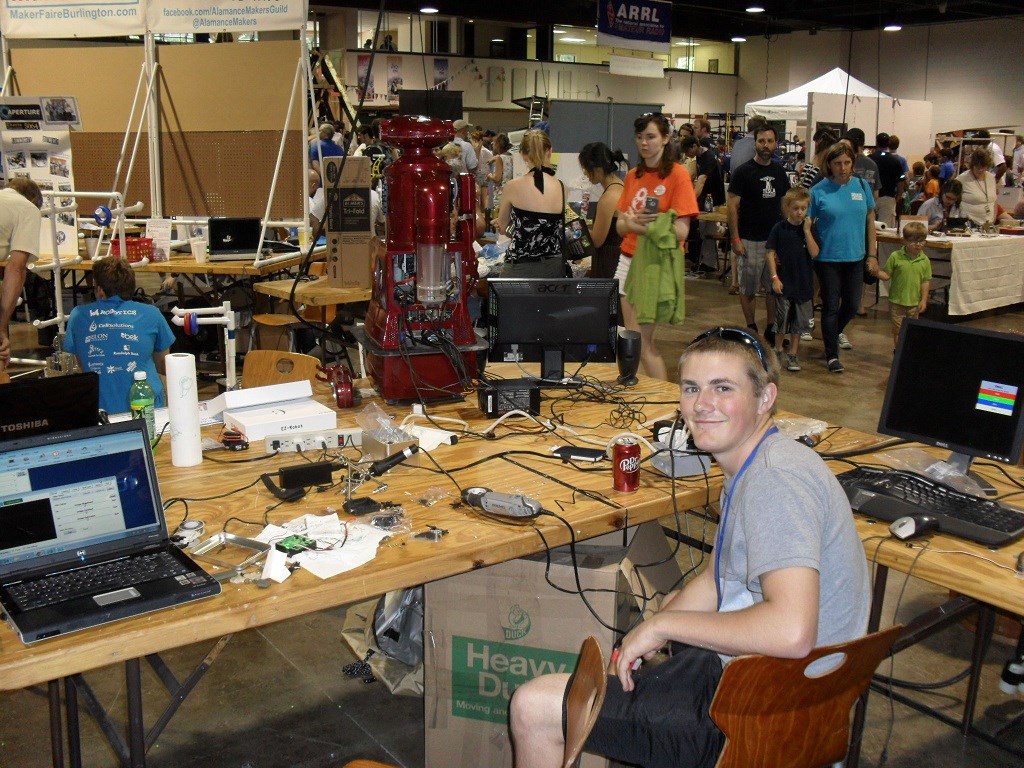
@Rgordon - it was awesome to see questor in person , its nice to be able to "walk" your robot to the booth instead of carry him!
@jstarne1 - Thanks Josh! Just need a mini crane to lift him :D
I enjoyed meeting you and your brother. It sure was a lot of people there. The noise level was stressful. Just wished DJ could have given us posters and banners, and also flyers to pass out.... :(
It was frustrating that we encountered so much interference and noise that our bots could not function to their full potential. mad
I was really impressed with the level of detail on and in your robot "Jarvis". That was good choice for paint color also. I really like that deep red. I will be continuing to follow your thread with great interest. I look forward to future videos of this robot in action! The Air Soft robots were very cool. You and your brother have a good talent for painting.
I'm proud to know you and your brother... and my life is better for it....
Rex
@RGordon thank you Rex , I appreciate your kind words and participating in the fair. It was a lot of fun and I look forward to seeing more developments on questor and your future robots. Maybe next time I will use a class 1 Bluetooth with a little more juice perhaps that will hold a connection better in a harsh ref environment like we experienced.
Also a rule of thumb for selecting capacitor is 1000 mfd per 1000ma,thats what all engineers use in designing circuits.
Also any scope can tell you how much ripple voltage there is ,you want it as low as possible.
Another idea that helps is SPG single point ground ,thats all ground wires going to a single connection or tie point.
@robotmaker
Thanks Fred for the nice comments. Thanks for the advice on the capacitor. I would like to try it. Got to replace the faulty power switch for the motherboard first though. I think that is the whole problem. When I checked the switch with my Ohm Meter I caught it reading approximately 4 ohms at one point (should be less than 1 ohm), when I toggled it. Once or twice it did not work at all...it read infinity in both positions when I toggled it. That's what I get for using stuff out of my junk bins instead of buying a new one I am also going increase my wire gauge size when I replace the switch.
Yes I do know about SPG and that is the way all of the items on Questor are wired.
@jstarne1 - Yeah Josh I would like to try that class 1 Bluetooth also. Have you got a source for it yet?
Thanks for posting the picture BTW.
Also Josh I would like to start posting videos. I have never done this before. How do you go about it? Can you give me a short tutorial? When I copy the videos from my camera they are .mts files. Will I need to convert them to .flv or some other type file to be able to post it on Youetube?
You may know this but others may be not,good to keep signal wires away from power wires and at the same time twist the power wire to block eddy current to block hum and interference. Sometimes you can hunt for days for reset and power interference problems
ANOTHER idea on the large cap add .1 mfd across it ,it helps too (its called a bypass cap)
AT my old work that one of my main jobs to wire up my testers,and AC is a lot harder to block interference
JOSH is that your brother in the orange shirt ,doesnt look too much like you,but hope he does good job building robots. MY brother is a semi-pro football player not into robots.
@robot maker no the dude with the tan is a random spectator. I posted a pic of my brother sitting by Jarvis the other day.
OH it look like your brother using a remote or some control in his hands.
No Fred, this is Josh's brother... He has an Indian name. I will let Josh spell it. I don't want to get the spelling wrong.
THAT one i just seen in another photo of him sitting across from REX,NOW he looks like you but better.
Short clip of Questor at the Maker Fair. My first video on EZ Robot
Almost doesn't make any sense going to a fair to show off your design ,with all that noise.
Questor just looks so regal sitting there like that. I love him. That is a lot of noise, but that just means a lot of people going thru.
@bret.tallent
Thanks Bret! Sure wish you could have made it to the the fair. Are you getting much time to work on your robots?
Not yet, just moved into our house this past weekend and haven't got my robot room set up yet. Hope to be back working on bots by the end of the month though. I sure wish I had been able to make there as well. Next time!
BAD news about too much noise,very hard for others to hear what your robot is doing and ask questions.
BEEN to faire's like that and it was hard to understand anyone talking,thinking the set the tables too close together is one reason, ANOTHER is if inside its a lot harder to hear anyone,most of the MAKER FAIRE'S on the site are outside and use a much bigger grounds to set up in.
You can't really expect a faire to be quiet though, if it was then something is wrong.
The "noise" does add to the energy and excitement! ...It's almost like being there! ...and Questor IS looking regal!
The noise is non stop and after hearing it for several hours it is very stressful. But, I had a great time anyway and enjoyed meeting Josh and his brother.
I hope soon to get back to TENN ,i got a few zoo's i didn't get a chance to see more of,and my favorite place to eat country food,plus to see some country stars and stop to see JOSH
REX hope to see many more good changes to QUESTOR,i did a lot of work on my projects but dont want to post photos for only a few people to see.
Now trying to figure out how to add music to the video I will be uploading soon.
Upcoming items: -Replace the defective power switch for the motherboard and increase the wire gauge to it. Also if needed I will install a
capacitor across the power terminals to help with any voltage sags as other items are powered on. -Bumper switches all around Questor for better collision protection. -More Ping sensors all around to help with collision avoidance and navigation also. -Build and install a 3 channel audio mixer. -Install the Sparkfun FTDI USB to TTL converter and cable to get rid of the Bluetooth connection and connect the motherboard directly to the EZ-B.
REX i have so many bumper switches with springs for free if you need any,small contact switches used on neato xv-11 robotic vacuum cleaner,may be 100 of them or more
here is what they look like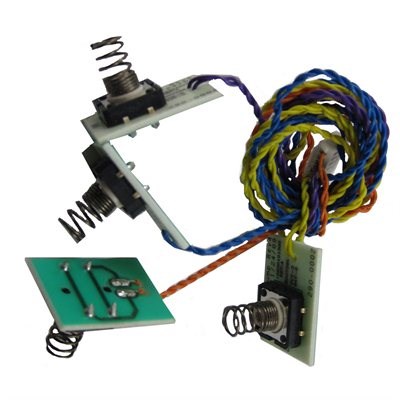
i have over 10,000 type of parts for robots (not kidding) any type you can think of.
Fred, I would be interested in getting 16 of these switches. If that is to many to get for free then, let me know a price for them and I will gladly pay you if they don't cost too much. You are very generous.
Also, how much for shipping to Clarksville, Virginia 23927.....?
I am working on a bumper switch design (see post number 17 of this thread) I made that uses two strips of a "tape measure" that were cut to length then I stripped the paint off and sandwiched them together with double stick tape on each end. Now when you press anywhere along the strips the two pieces of metal come together and make continuity. Because of the way the tape measure is made it springs back into shape nicely when you let go. So no matter where you press on it along its entire length, it makes continuity.
However, these switches that you have may work better and be a quicker install for me.
SEND me your email ,the switches are free my friend,if you can help in postage great,one main reason is in paypal if you send me money i can easy print from the site and drop it in a mail box. I think well under $5 for shipping, can put 16 together and get it ready
my paypal address is jamericanfreddy@hotmail.com wish i can take photos of my parts ,but it will take up much space,if you need any part no problem ONLY parts i mostly keep or buy are servo's,sensors and circuit boards
SAME for JOSH and others who need bumper switches are always free or other parts
If I pop over $5 via PayPal to you will that will be enough?
Thanks Fred
yes,will be enough,send it by goods,so i can print a label
Fred, I have sent the $5.00 My shipping address is:
Rex Gordon 204 Cogen Drive Clarksville, VA 23927 rex.j.gordon(at)dom(dot)com
This is my work address. It is where I get most of my orders sent to.
Thanks so very much!
Rex I have for many years now been using low cost Piezo discs as a very sensitive (impact) touch bar that goes around a robots base, it works incredibly well.
These are the type of Piezo discs I use
cpc.farnell.com/murata/7bb-12-9/sounder-9khz-12mm-ext-drive/dp/LS03788?in_merch=Products%20From%20This%20Range
You can find more info on this at
www.robotoid.com/appnotes/sensors-piezo-disc-touch-bar.html
Hope this is of some use.
PIEZO disks are great touch sensors,we use that same type at work,i think we get them from farnell.com
BUT like all sensors there are drawbacks ,they are very fragile ,the substrate material inside can break under pressure.
Looking at the circuit toymaker has a link too,i do see it needs a analog input and there is only a few on EZB to make it like a switch is very simple comparator circuit with a high/low output
Using a analog circuit it great for measuring weights,not the best but it works.
@robotmaker
You must be back in the forum as I have show ghost users not ticked yet I am now seeing your posts?
Anyway, I have been using Piezo discs on robots (and designing them into volume manufactured products) for over 20 years and I have never seen a broken disc. On a touch bumper you cover the disc with a material like rubber which absorbs any impact but still passes the resonance pulse to the disc, I have made hundreds of Piezo touch bumpers and never yet seen one fail.
AT work i see a lot break ,but then we use over 1000 per day and in that design you have a link it shouldn't break.
@Toymaker Thanks for the links. I will consider using this method if the switches do not work out.
Thanks to @everyone who is providing input on my build!
@toymaker can you post one of your robots using that design it will help other who want to build it. ON using PIEZO i am using it for a different idea i add planned awhile back for my designs, ONE is a touch sensor with analog output to detect how much touch pressure
PIEZO sensors can be used for a lot of designs ,touch,pressure and speaker,microphone
I GUESS most don't think it will work as a microphone,that the type we design and sell as a piece of test equipment at work,just depends on how you use it and mount it
For Piezo touch bumpers (I personally) do not use analogue but use digital input. I use a single transistor buffer with protection diodes. If there is enough interest here and when I have time, I will post the circuit.
I know the circuit it fairly easy,just a few parts Circuits are very easy,hopping to see how you have it on a robot like other would like too.
@toymaker Can you post a design of your robot using the peizo,very cool to see it
Fred, did you get the $ I sent you? And my shipping address?
YES will ship it friday or saterday
Some time soon my go up to see you ,since i almost travel more then i build robots.
Where are you located Fred? Are you close to where I live? My address:
Rex Gordon 583 Barlow Road Virgilina, VA 24598
Virgilina is right on the Virginia - North Carolina border.
Sunny florida in hallandale between miami and fort lauderdale. I travel alot ,so getting there is easy for me.
Well if you are ever up this way look me up. Be nice to meet you. Cell Number 434-738-8210 Home Number 434-374-5881 (Leave a message if no one is home.)
ALSO added some magnetic switches from the neato xv-11 machine in case you can use them,since i have more then 50 of them.
Thanks Fred...
They could be reed switches or ? ,since the have 3 wires might have a analog output. Haven't had a chance to test them ,very tiny will put in a few so you can have a extra one to take apart. Another idea it could be is a reed switch but spdt with 5 volts and gnd out .
Update: I am once again trying to get Questor's voice lights working. I am now using the transistor that Rich recommended, the TIP-120. I tried the SoundServo control and it sorta kinda works but not very well. One problem is that the L.E.D.s stay on all the time even when there is no voice or sound.
I'll post you a solution to that later Rex I have some ideas of how to make it work better.
Thanks Rich. We know we can always count on you.
I also tried the PWM control to test the output. By moving the slider I could get the L.E.D.s to go from full off at (0%) to full brightness at (15%). Not sure why it only takes 15% to get to full brightness but, anyway, it will do I guess. So I know the transistor is working. Now if we could just get it to modulate with Questor's voice when he speaks. The other thing that is a problem is I need the voice lights to only flicker when he is speaking and not when there are any other sounds.
When you solve these two items, you will answer the wishes of a lot of people here and elsewhere.
It just needs a script to take the sound value and use that to vary the PWM, which is pretty much what sound servo control does but there are spots where it doesn't work too well. The plan is to get the variable made by the sound servo control (sound servo control set up to a virtual port so it doesn't interfere with anything) and use it in a script with Ifs to set the PWM to specific levels depending on the range the sound variable is in... if that makes sense.
Basically something along the lines of
That (or something similar, PWMs and sound values will probably need tweaking) should allow low volume (background noise, hiss etc) to pass by without turning on the LEDs and have a better variance in it's range with sharp noticeable changes rather than blended/faded changes.
Wonderful...I will try it when I get home today. Thanks for the fast response.
Rich- I could not get the code example to work properly. I tried making adjustments as you said but just never could achieve a satisfactory result.
It was still problematic in that any sound would still cause the L.E.D.s to flicker. I just want only Questor's voice to cause them to flicker. So I set about experimenting with my first attempt at scripting and I got it to perform the way I want. Here is the short video:
Please pardon the bugs you see flying around in the video. It was getting late out in my shop and the bugs were everywhere!
First I needed to figure out how to get them to flicker. My Voice Lights are on port D15. So I came up with a loop script and named it Voice Lights:
Sleep(200) # Delay loop for 200ms to give the SayWait (in the other script) time to start speaking :LOOP SleepRandom(1,90) PWM(D15,1) SleepRandom(1,90) PWM(D15,0) SleepRandom(1,90) PWM(D15,0) SleepRandom(1,90) PWM(D15,0) Goto(LOOP)
Don't know why but a value of 1 is enough to illuminate the L.E.D's to the desired brightness. Then I played around with the SleepRandom settings and the arrangement of things until I got it to flicker the way I wanted.
Then I had to figure out how to make the loop script only run while Questor was speaking and ensure the L.E.D.s turned off when he finished. Had to scratch my head for a while to figure out how to do this.
ControlCommand("Voice Lights", ScriptStart) SayWait(Quesstor is online) ControlCommand("Voice Lights", ScriptStop) PWM(D15,0) # Turns off the Voice Lights Sleep(1000) ControlCommand("Voice Lights", ScriptStart) SayWait(How may I be of service) ControlCommand("Voice Lights", ScriptStop) PWM(D15,0) # Turns off the Voice Lights
The first line starts the Voice Light flicker script. The SayWait line causes the rest of the script to pause until he finishes speaking. The third line executes the moment when he stops speaking and stops the Voice Lights script. The forth line ensures that the Voice Lights are turned off. The fifth line gives a slight pause between phrases.
Then, just to add to the video drama, I added a couple of more lines to make Questor's head "wake up" and turn to face the camera while speaking. Now the L.E.D.s are on only when he is speaking.....yay! :P
ServoSpeed(D2,4) # set tilt servo speed to slow it down some Servo(D1,59) # rotate the head pan servo toward the camera Servo(D2,50) # bring the head tilt servo up so his head is straight up Sleep(2000) # pause 2 seconds Set(D19,on) # turn on the eye lights ControlCommand("Voice Lights", ScriptStart) SayWait(Quesstor is online) ControlCommand("Voice Lights", ScriptStop) PWM(D15,0) Sleep(1000) ControlCommand("Voice Lights", ScriptStart) SayWait(How may I be of service) ControlCommand("Voice Lights", ScriptStop) PWM(D15,0)
Here is the shut down script: (I found out you can have more than one statement in a Say or SayWait line. and also that you don't need the quote marks )
)
ControlCommand("Voice Lights", ScriptStart) SayWait(Goodbye) (Don't forget to charge my batteries) ControlCommand("Voice Lights", ScriptStop) PWM(D15,0) ServoSpeed(D2,4) #slows down tilt servo speed Servo(D1,50) # rotate head pan servo to front and center position Sleep(2000) # give 2 sec delay Servo(D2,23) # tilt head down to sleep position Sleep(2000) # give 2 sec delay Set(D19,off) # turn off eye lights ControlCommand("Connection", Disconnect0) # disconnect EZ-B
I know the code probably looks like a mess but, I hope you will help me to clean it up.
Rex
Very cool , it doesn't look bad when he talks. I believe the switching transistors are all on or all off, I don't believe they operate partially. Good job :)
Can I ask you why you use SayWait instead of Say?
Thanks Josh! Yeah I'm still tweaking the script.
@Antron007 There are three scripts:
The ControlCommand("Voice Lights", ScriptStart) starts the Voice Lights loop script so lights are flickering. The script is continuing to loop in the background. Meanwhile the SayWait allows him to speak the text and it also pauses the script until he is finished speaking. Then the next line ControlCommand("Voice Lights", ScriptStop) is executed and stops the voice lights script. Using the SayWait was the only way to I could find to do this. If yo use the Say ("text") the script would not stop while he is speaking and the rest of the script would run and the voice light script would be shut down before he could finish what he was saying. I hope this is clear to everyone. I'm not to good at explaining things.
Now his voice lights only flicker while he is speaking and no other sounds trigger it.
To be clear, I wasn't trying to make a suggestion in the form of a question, I genuinely want to know. I've noticed a need to "stall" commands and I can't remember what command I was using before but I had a lag in my response time on keyboard controls I made for my Pan/Tilt. I remember I started using Sleep to cause the "stall" instead of what ever I was using and my lag went away. It ultimately came down to me over complicating things.
And now for something completely different.... I love that head on Questor. That's super cool! I look forward to the next update.
Thanks buddy...
That was a good enough explanation for me. SayWait isn't as much as wait to say but more of wait till i'm done saying. Thanks for the breakdown. I'm still pretty new to EZ script and have not touched much beyond ControlCommand() and servo controls. I've been in the I just want to build robots phase. I'm just now starting to get into the I want to build robots with a goal or purpose in mind phase. I have 2 HD servos on the way so I'm hoping to have my first objectified robot complete in a few weeks.
Thanks again
I love that voice!
@Rex Thats awesome! The script is very helpful and ditto Dave " I love that voice" very cool project! :)
Thanks guys....it is comments like these that inspire me to keep plodding along.
@Rich - When you get the time could you help me with the voice lights script I posted. It is my first attempt so I know it looks kinda crude. I am sure I could, for instance, put the voice lights loop script in with the wake up script as a sub routine and maybe there is a better way of doing this. But at least for now it works well enough to use and only flashes the voice lights while he is speaking and no other sounds trigger it. However, I am needing a small tutorial to understand the script commands: GOTO, RETURN, IF, ELSEIF, ELSE, and ENDIF.
What I am unsure of is how they cause the script to jump from one place to another and whether they pause the script or not. Maybe some examples tracing out what lines or directions in the script these commands take and come back to would help.
Sorry, I was ill Friday evening and ended up having to help sort out my nephews Christening over the weekend. Hopefully tonight if not tomorrow.
Thanks...take your time...hope you feel better.
HI REX your goodie package on the way,second i put in 2 sharp optical sensors ,something like the ones we use only a short range ,i think 8 inches
DATA SHEET kinda hard to find,buy i asked neato company and they gave me the full part # i mostly sell them about $6 but free to my buddy
I have about 60 of them
RICH one day becomes my buddy might send him some free stuff too.
Thanks very much Fred. I can't wait to experiment with them!
Thanks BTW for posting pictures of your robots. I have enjoyed looking through all of the photos. I like the built from scratch version.
HERE is a good example ,in google search put in (turtlebot) they sell open source robot using a irobot create ,laptop with LINUX ROS and a kinect,i made the same one in my robot photos and works very good.
Sorry Rex, I totally forgot about this until 5 minutes ago... but here we go :)
First add the Sound servo control and set it up as below.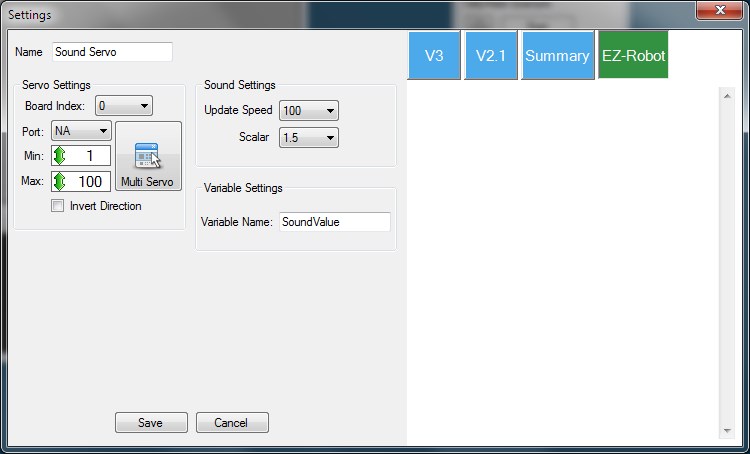
Then add a new script control or new script to a script manager...
Change the port on the PWM command line if needed, I used D7 but any port will work. Duplicate that line with a different port number if you need 2 (or more) ports to react.
You may also need to adjust the PWM values in the if/elseif part to suit your robot.
If, ElseIf, Else, Goto and Return... Let's see if I can describe them (I guess I'll copy this to another topic as a tutorial once it's done).
An if command requires a condition, this is the part in brackets after it. Think of it logically, it's the same as you think when you decide IF you want to do something or not. So, for instance, you go to the supermarket, you walk past the apples and need to decide IF you need any. You check how many you have at home (not sure how, I didn't think this through well but we will carry on as it's unimportant), how many you need and decide.
This says, if you have less than the amount of apples you need at home then you need to buy some apples. Otherwise do nothing. Basically, whatever is between the IF and the EndIf lines is only executed IF the condition is met or true. Otherwise it is ignored.
ElseIf works in a similar way but is part of a bigger condition. Say you wanted to know IF you needed to buy a lot apples or needed to buy just a few apples.
You could change it so it works out how many apples to buy with some arithmetic functions but I will save that for another time. One function at a time is easiest to learn.
You can have as many ElseIfs as you need. It's only the part between the first ElseIf and the next ElseIf line or EndIf (if it's last) that is executed, the rest is ignored.
Now say only needed apples provided you had no bananas, this is where the AND and OR conditions come in to play. Again, think logically. If I have no bananas and have no apples then I need some apples...
Only if both parts of the condition are met will the command between the IF and EndIf be executed.
Or is another condition that can be used. For instance, you now look at the pears, but you only need to buy pears IF you have no apples or have no bananas.
All of the AND, OR, <, >, =, <=, >= and <> conditions can be used in all IF statements and all ElseIf statements. You can also mix and match the ANDs and ORs. Phrase the condition correctly, in the order you would phrase it to a person or in your head...
In this example, if you have no bananas or apples and less than 5 pears you will buy some pears. If you have no apples and no bananas, or no apples and less than 2 pears you will buy a mango. Otherwise you buy nothing.
Else is slightly different, else doesn't have a condition. Think of the last example and when you buy nothing. Else fills in this gap. Rather than buying nothing, or executing nothing, if no condition is met something else can be executed or bought.
In this example, if you have no bananas or apples and less than 5 pears you will buy some pears. If you have no apples and no bananas, or no apples and less than 2 pears you will buy a mango. Otherwise you buy beer.
As for goto and return. These are two parts of a very similar command. One will jump to a label (goto) the other will jump back to where it come from (return).
Following on the same examples. Your wife tells you to GOTO the shop
So you go to the shop. Or in the script, jump to the label called shop.
You then carry on following whatever instructions are after that label. Let's say it's the above IFs. You keep following line by line ignoring anything that any IF conditions are not met.
At the end of it you need to RETURN home. So a return command is used.
This command will go back to the line after the last Goto command which was executed is, and then you carry on following instructions line by line.
So, an example with line numbers;
In this example code, if it's a Monday it will execute the lines of code in this order; 1, 2, 3, 12, 13, 14, 10, 11
If it's a Friday it will execute in this order; 1, 2, 4, 5, 15, 16, 17, 10, 11
If it's a weekend; 1, 2, 4, 6, 7, 18, 19, 20, 10, 11
If it's any other day; 1, 2, 4, 6, 8, 9, 21, 22, 23
Hopefully that is clear enough but if you have any questions or if anything doesn't quite make sense to you please ask.
Thanks so much Rich! This really helps me. It is very similar to BASIC. It has been about 34 years since I tried writing any BASIC programs. I'm showing my age here...in college I had FORTRAN...we used IBM punch cards to load our programs for crying out loud! eek
You have a great way of explaining things BTW. Have you ever considered a teaching job?
I had considered it but always felt that I couldn't explain things to make sense and make it easy. I guess I was too hard on myself going by the comments I receive here.
REX your design getting better keep up the good work,i might look at making the same design for big robot family.
Should get your package by friday.
Also teaching is not a fun job,designing and building it a lot more fun then teaching electronics to a bunch of kids old or young.
Thanks Fred. Looking forward to the goodies you sent!
Teaching is fun. It gives a feeling that you just can't get any other way. To know you have helped someone achieve something they couldn't do, to be part of something like that or to be partly responsible for someone creating something potentially world changing, it's just pretty damn awesome. But each to their own, some like to help others don't I guess.
Fred I got the package. I really appreciate it! I think these will be perfect for the bumpers. Who sells them? Just encase someone wants to know where to buy them. Also thanks for the extra goodies!
Questor Update:
Brain Surgery Completed.
I have successfully transferred Questor to the 128 GB SS Hard Drive on the robot body. The Asus Mini ITX running Windows 7 (64) Bit Home Edition is now his brain. I had purchased Windows 7 from NEWEGG.COM awhile back and it installed fine and I was able to hook to the internet through an external USB Dongle for computers without an internal network card. I loaded ARC and transferred my current project from my laptop to the robot. I had to add EZ Robot as a new device and enter the pairing code. All was looking great. Then Windows started giving error messages that it "May not be a legitimate copy of Windows". I had the Activation Key number and I tried entering it again but, it would not recognize it for some reason. Anyway it gave me a toll free number to call Microsoft and manually activate it. This worked. I hope it stays that way.
I then installed the Cepstral voice I had purchased. I had some difficulty at first getting his voice back to working but it is fine now and working through the CFSound 50 watt amplifier. Then another setback was ARC voice recognition stopped working for some reason....I ended up having to remove EZ Robot from the device list then add it back and enter the pairing code again.
Then my microphone quit working when I accidentally disabled it and then could not find it in the list anymore. I finally found out that in Windows CONTROL PANEL- Manage Audio Devices I had to right click on Speakers and choose Properties then enable it there.
All seems fine now and Questor is working once again.
I sell them,or can get them from neato robotics company
Really i give them away,first i dont need that many,second dont need money and 3rd i like to be very generous person
Questor Update:
Ordered more parts:
Second EZ-B (I had run out of ports on the first one :)) Second arm (the one from the EZ Robot Store) Now Questor will have two arms....Yay! Seven more Ping sensors Six more servo extension cables Purchased Ultra-Hal A.I. Software (not to happy with it yet)
My list of things to make or install is still pretty long. I'll be so glad when I finally get the hardware side to a point where I am satisfied. Even this small robot is taking a long time to finish.
That just goes to show: Never let a perfectionist build a robot, he will never finish it . :D
Anyone else tried the Ultra-Hal A.I. Software from Zabware.com?
Yea you never finish , you just abandon the improvements.
Yeah...you are so right :D
I believe it was Leonardo DiVinci who said "No work of art is ever completed, only abandoned." Some things I guess, never change I'm loving Questor Rgordon! Keep it up.
@Antron007- Thanks. A rolling robot gathers no moss. :D
Don't let grass grow under your feet ... Or wheels lol
Questor Update: My time is limited, so I make do with what I have. I try very hard to get something accomplished on Questor each day no matter how small. The stress of everyday life takes its toll but, I plod forward with grim determination. I don't know why building a robot is so important to me but it consumes my thoughts during the day and my dreams at night. I have had this....this....fever since I was 10 years old. One day my older brother showed me a sketch of a robot that he had drawn and wanted to know what I thought about it. It had springs, motors, gears and linkages and was the coolest thing I had ever seen. "Could we build this?" he asked. "I don't know how," I said...."not yet." The spark was kindled. My future was cast out like a net in the ocean. Back then I had all the time in the world...and no money. Now I have money and no time...go figure. Like a river, 42 years have flowed by and now I think it has become a mid-life crisis. I must finish this dream, no matter what it takes or how small the moves. Seize the day while you are still young! Make it count. Never let anyone tell you that you can't follow your dream.
"Small moves Ellie....small moves" Quote from the movie Contact
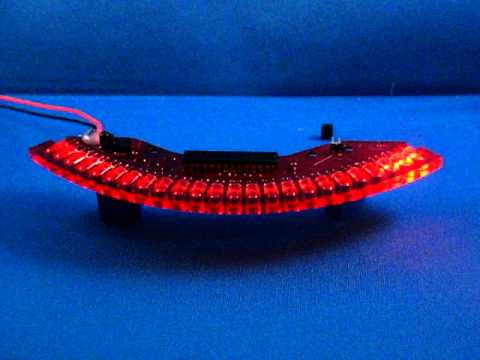
If you wanted a different take on it, you could try the Evil Mad Scientist Larson scanner like I had in Melvin's mouth before the head change. Open source circuit or bought as a kit.
Yeah, I have one but it is to big to fit where I needed it. So just built one from scratch. I also have one of these from www.jupiterstore.com
www.jupiterstore.com/servlet/the-119/Battlestar-Galactica-BSG-CYLON/Detail
@rgordon. I was going through the thread and saw that you asked a question I never answered.
Questor is dear to me because it was one of my first handles. My father and I went by questorz and questor respectively way back in the 600bps, bbs days.
And your questor is pretty awesome. ;)
Thanks for the kind words. Please feel free to call me by my name.....Rex. I consider everyone here as my new friends. People who understand my world... :D
I am following your thread also with great interest. Are you into building circuits on solder-less breadboards? It is very fun and rewarding. I still use the "Engineer's Work Book" by Forrest Mims. There are some great Youtube videos about using solder-less breadboards.
Questor Update:
Finished transferring the LED sequencer circuit to the proto board and tested it. Next step is to mount it on Questor.
Drawings
Looks great! Like the drawing.
@Rex, I'm not into building circuits just yet but, it is an inevitable skill I'll be acquiring. Also, thanks for mentioning the title of that book. I'll work on getting that. I DO however have the Electronic Playground but have not had much time with it. Thanks for watching my thread. That reminds me I need to put an update on it.
Questor just keeps getting better and better. I admire your work my friend :)
@Anton
email me at rex.j.gordon(at)dom(dot)com I have something you might want.
Questor Update:
Got in my second EZ-B board. Updated the firmware and tested a few of the ports with a servo. All seems fine so far. I got my EZ-B through www.aprohobbies.com. Next step is to mount it on Questor. My other order for the arm and pings is finally being processed through EZ-Robot. I hope it comes soon.
I finished the sequential LED cirrcuit and installed it on Questor. It looks great. I will post video when I can.
I bought my EZ Complete from APro. I was very happy because they're in the US so I didn't get hammered for shipping.
Yeah and it was a fast delivery also. I got the last one they had in stock.
I had a minor set back this evening. I am now operating Questor with the on board Mini ITX I installed so everything is running off of his batteries. After I got the new EZ-B firmware downloaded I tested the EZ-B and everything appeared OK. I had to go so I went ahead and shut down Windows. Windows pops up the message saying "Do not shut down Windows until all Windows updates have finished installing". I had forgot to set Windows so it would only allow updates if I chose to do it. It had 468 MB of updates! The install had gone on for 1 hour and it still was just on update 2 of 5. I thought maybe that it would finish soon and the batteries would last long enough....well....they didn't....and it shut down in the middle of the install. I charged the batteries for several hours and tried to start Windows and it said it could not start and that I needed to click on Repair Windows. So I did and it said it could not repair it. Long story short, I shut it down again and rebooted and it all seems to have come back. I tried ARC and it seems to run OK. So do you or anyone else reading this think it will be Ok? Or will it come back and haunt me? Once I get the batteries fully charged should I attempt to let it do the updates again?
Windows has a mysterious way of healing it's self. It may want to do a reinstall of the updates soon. Make sure you have a way to keep the batteries charged. Is there any way you can hook him into a AC to DC converter instead of a battery and have him plugged in to a wall outlet when things like this happen?
If things do "come back to haunt you" You can always do a system restore to a last known good "Restore Point". It's amazing how well that works. It's saved my butt a few times.
Funny, as the same thing happened to me just 2 nights ago. Not with updates though. Worked and worked on scripts, everything was going real smooth and very happy with myself for what I accomplished and then all of a sudden everything just locked up. Nothing I did could get the puter back up and running. After shut down, the puter would not reboot, I then realized the battery was dead. Not as bad as your problem but still lost all my work that evening.
Of course with that I then realized that the robot needed another circuit, LOL, a switch and plug that would let it run on battery or wallwart. I also make sure now that I save a copy of EZB on a zip drive before shutting down.
You would think by now after messing with puters so long I would have learned. LOL
@rgordon.. You should be good. I suggest booting up in safe mode once then reboot as normal. Like Dave said, windows has a way of healing itself somehow and just booting up into safemode has solved alot of issues for me in the past. It's sort of my "go to" when I'm helping others out with their computers. Btw I sent you an email. Im excited to hear from you.
@rgordon, you may want to set up a battery monitor so that questor could tell you if his battery's low and later on make an ir beacon base for him to return to on low battery.
Questor Update:
Good news. Windows seems to be fine now considering the problem mentioned in the last few posts.
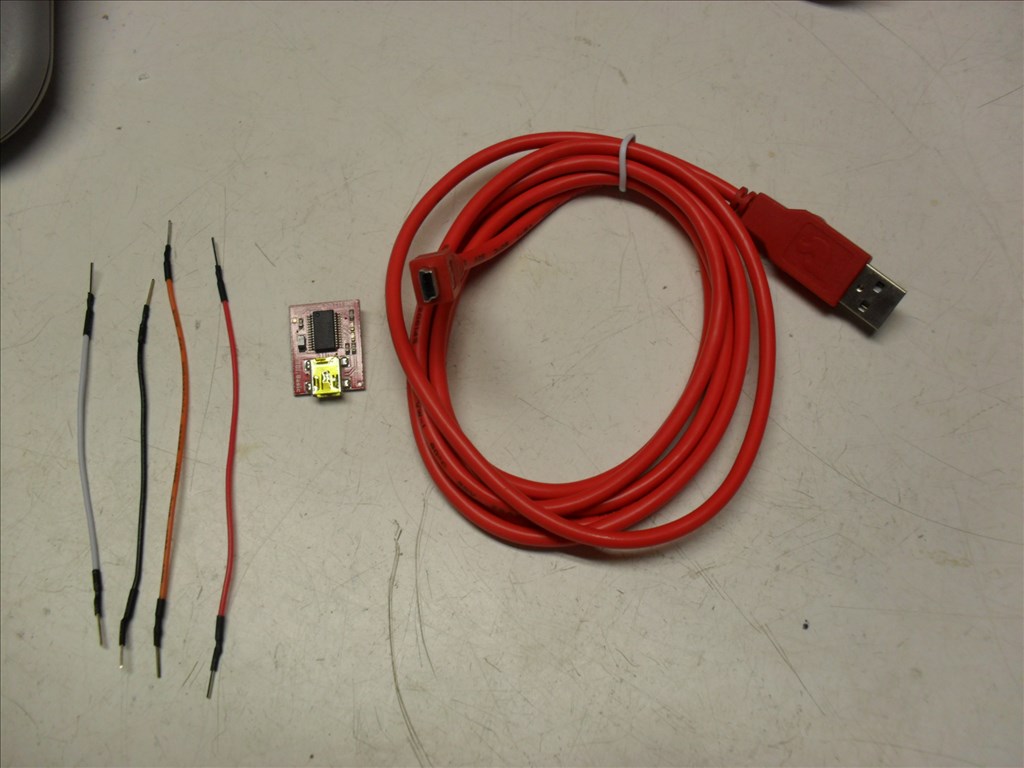
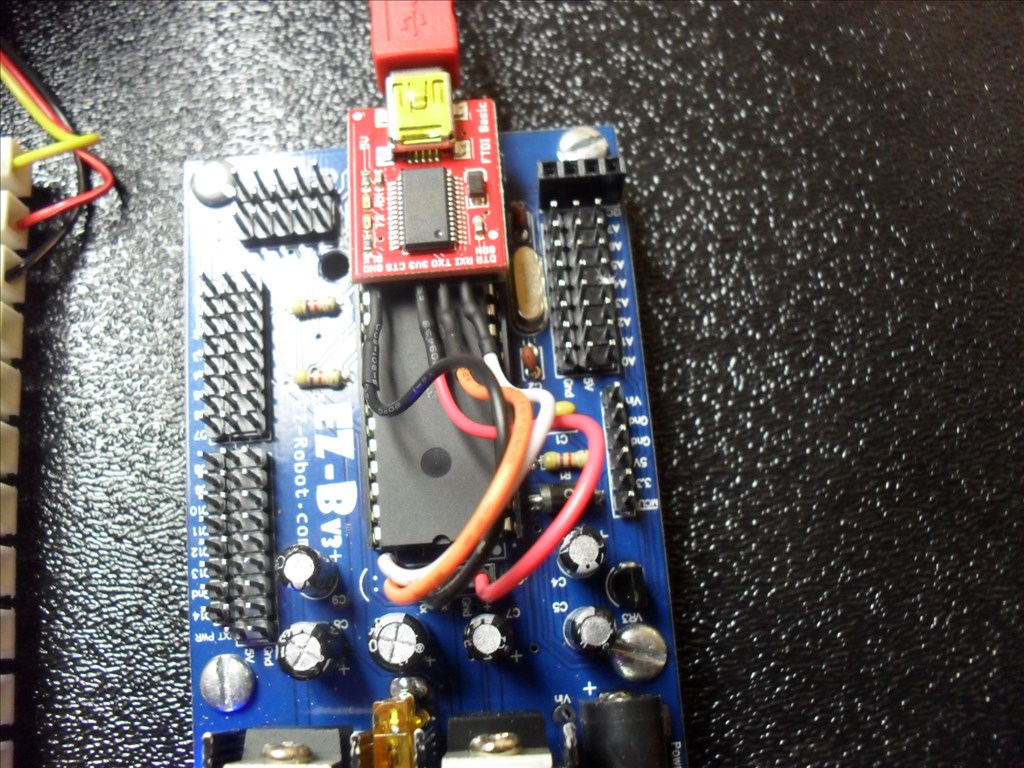
Also, I decided to use the new EZ-B I just got to test the SparkFun FTDI (USB to TTL) Adapter in place of the Bluetooth module that sits on top of the EZ-B. I was eventually successful. Here are the steps I went through:
I very carefully removed the Bluetooth module from the EZ-B by using a small flat blade screw driver to pry it up.
The double sided tape eventually let loose from the IC Chip and I pulled the module free from the EZ-B header .
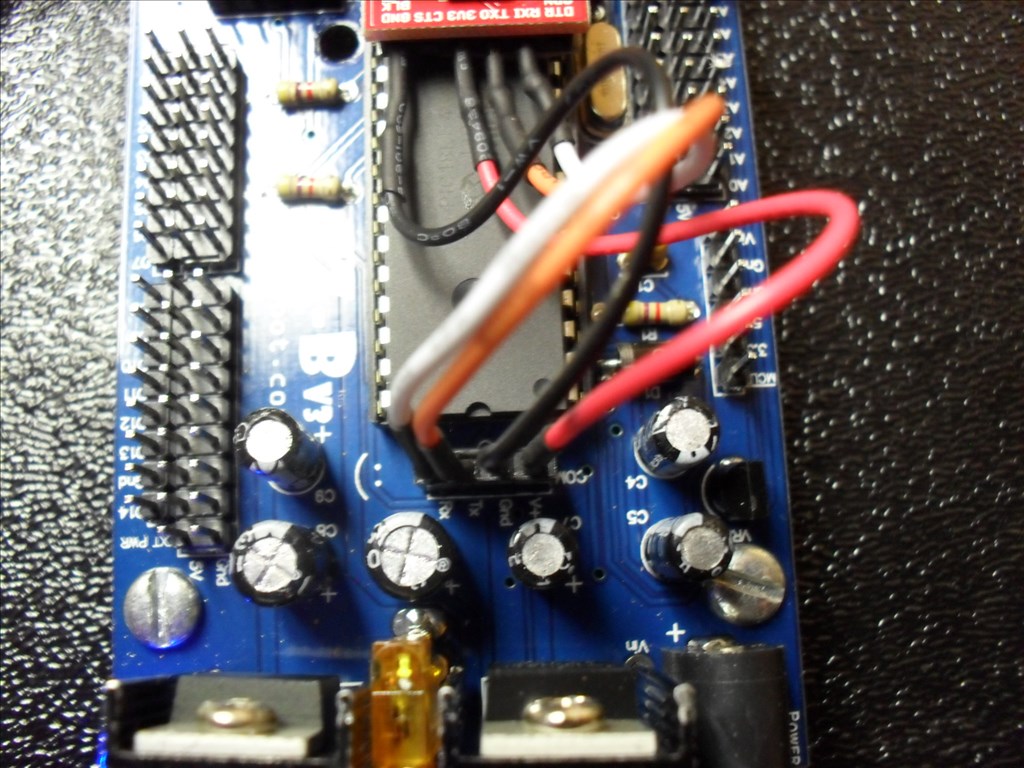
I used the male jumpers that I got from the EZ Robot Store to hook up the FTDI header to the EZ-B header. VCC to VCC <- EDIT: Found out this connection is not needed. GND to GND Tx to Tx Rx to Rx (Yes that's right Tx to Tx and Rx to Rx. I thought it should be Tx to Rx and Rx to Tx but that did not work.)


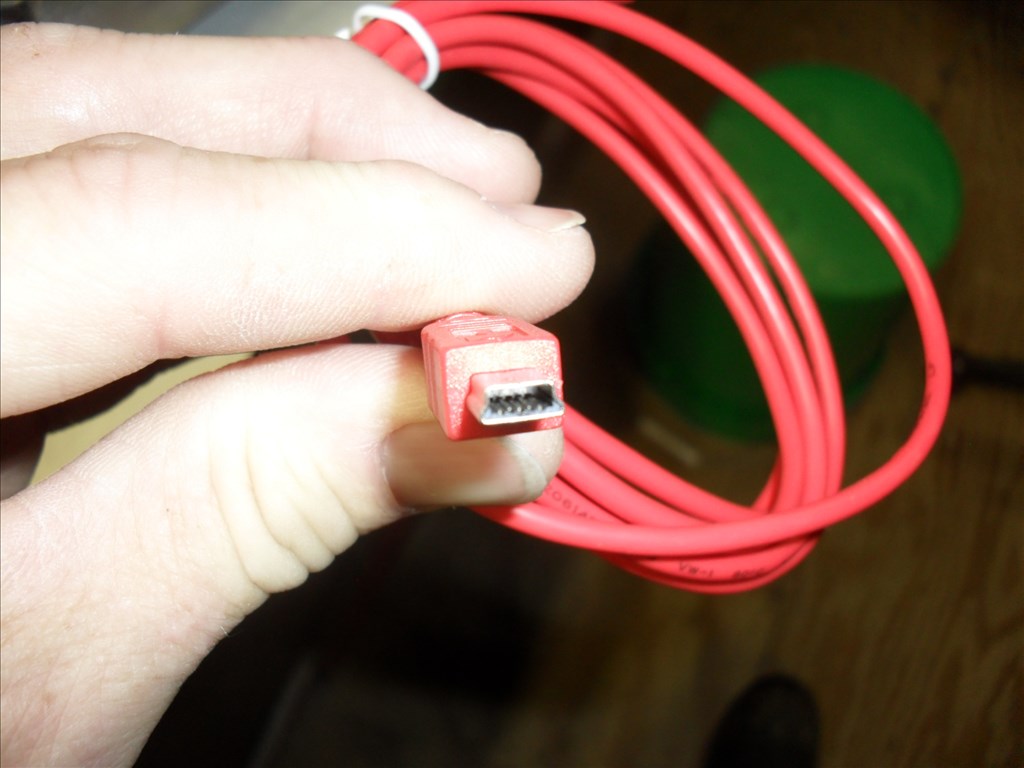
I hooked the SparkFun Mini-B cable from the FTDI board to the ASUS Mini ITX motherboard.
I powered up the EZ-B using a battery pack and then powered up the ASUS Mini ITX motherboard.
Windows 7 Home Edition (64 Bit) informed me that it could not find a driver so I let it search the internet.
It eventually found, loaded and installed a "FT232 USB UART" diver and assigned it to COM 7.
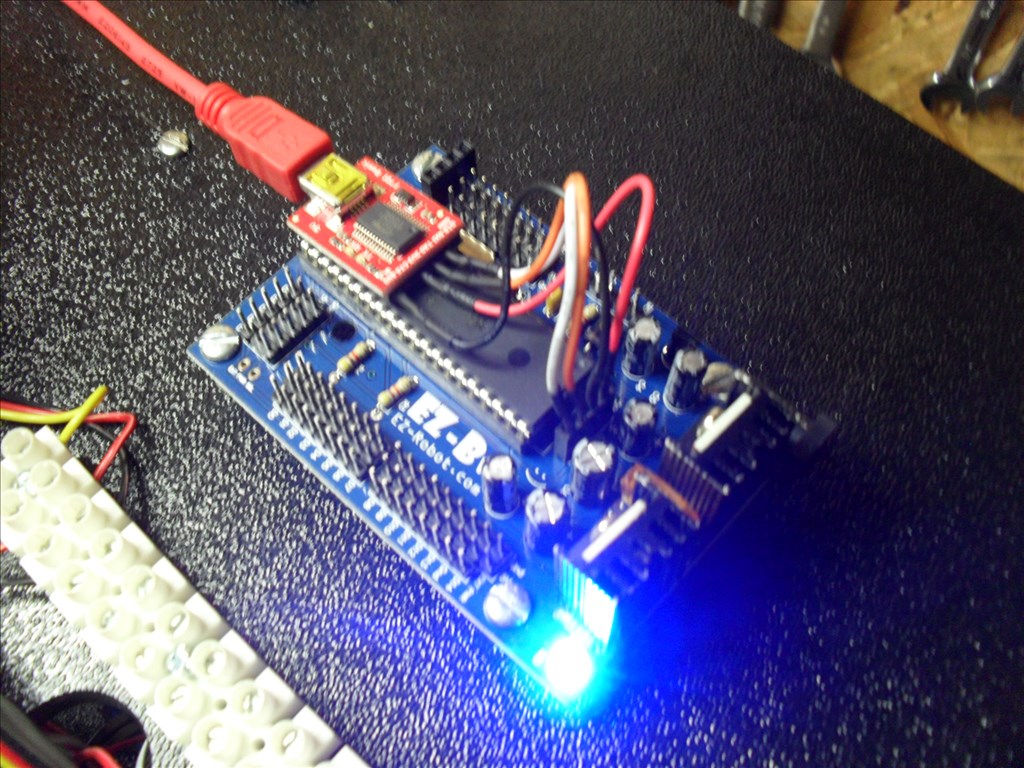
I started ARC, chose COM 7 and clicked on Connect. The EZ-B blue LED went from blinking to solid blue and all looked good. I hooked a servo to D0 and tested its operation with good results.
Notice anything interesting in the picture above?..... When I unhooked the battery pack from the EZ-B the EZ-B remained on. It was being powered from the Mini ITX. Connection was not lost. The blue LED remained on. However, I found that the servo would not work anymore until I hooked the EZ-B battery pack back up. EDIT: Found out the VCC to VCC connection is not needed.
Note: I posted this as a Tutorial under the Hardware Tab for others who might find it useful so they would not have to find it buried here under this topic.
Awesome tutorial! I had a bit of advice that I shared in the other thread.
Great work rgordon! I will order one of these when I decide to embed a board.
Questor looks cool. Hope you and your robot building buddy get time to work on Questor.
@mcsdaver Thanks. I thought Questor 1.0 turned out pretty good. It helped me answer a lot of questions before I move on to the next phase...........Questor 2.0. Which has its good and bad properties. Being that parts, servos, sensors, etc. cost so much and there is no room in our house for two robots, I have taken Questor apart. He will be reborn into Questor 2.0 a larger version. I am in the preliminary stages of doing this and will create a build thread soon.
Happy Building!