


Day 1 (4th August 2015)
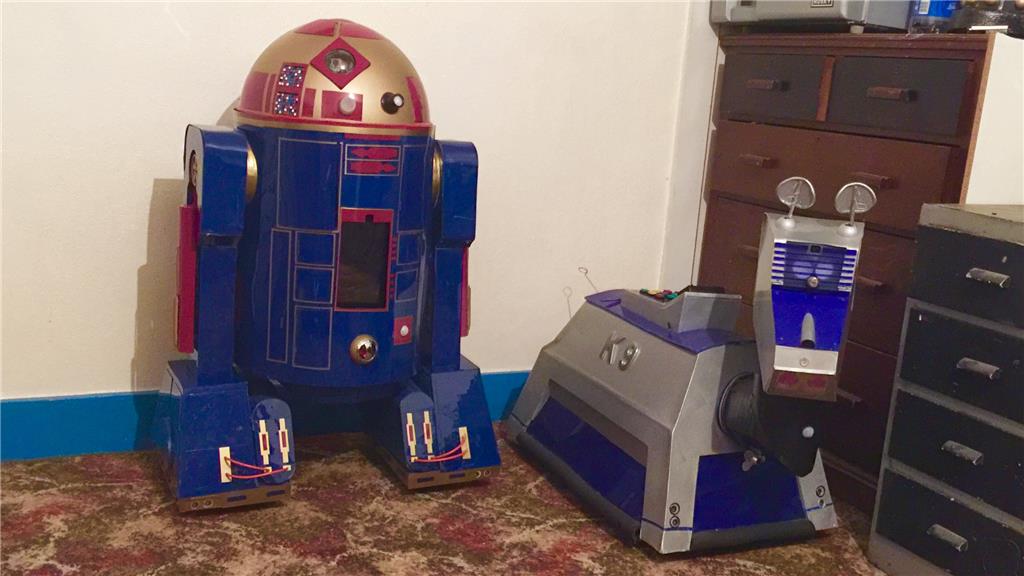
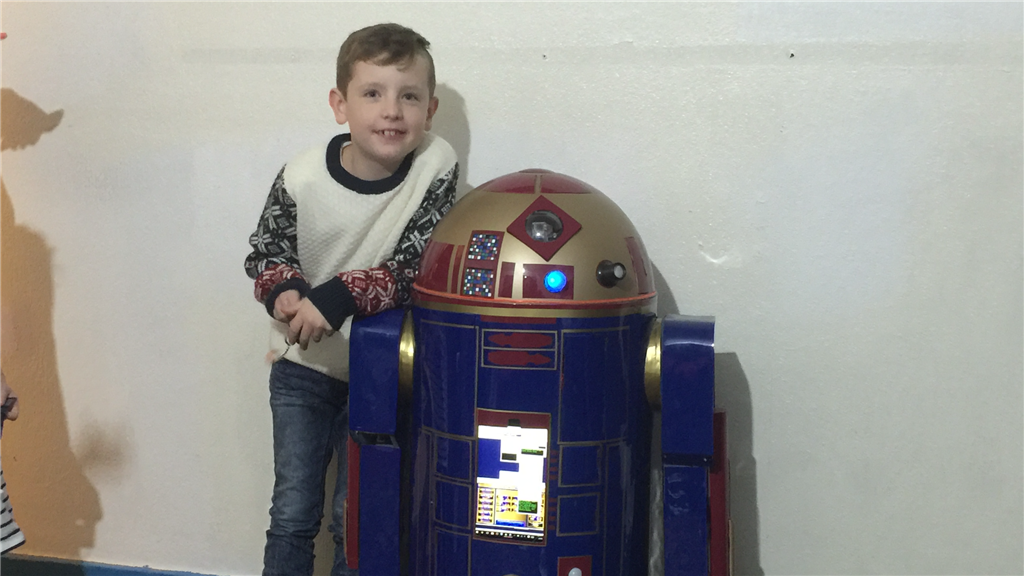
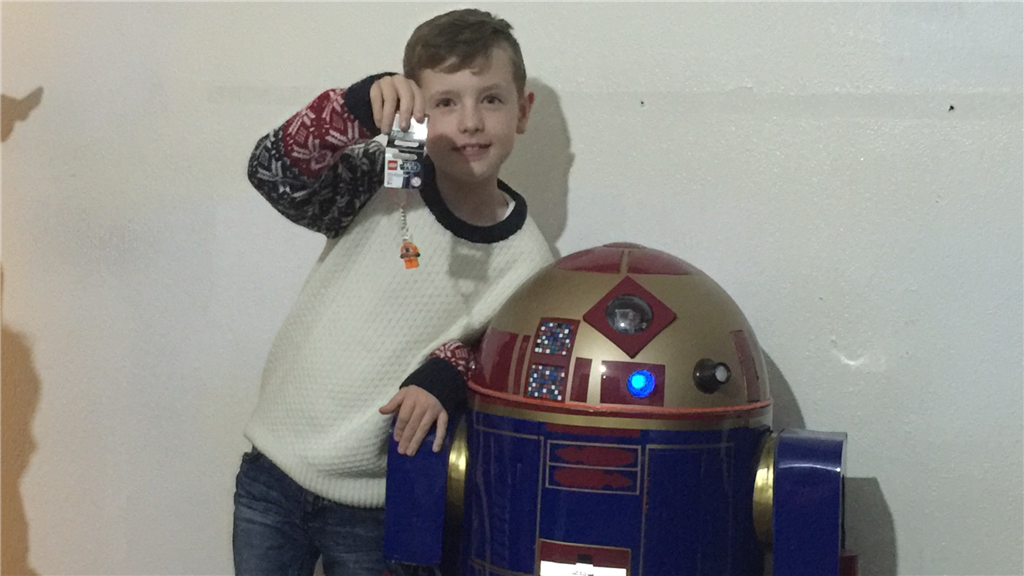
So after throwing around a few ideas for a new project to sink my teeth in to, I decided to go ahead and do my own version of an Astromech Droid, rather an Astromech "Smartdroid". With K-9 being one of my all time favourite on-screen robots, R2-D2 was (and still is) just as much of an all time favourite of mine so building one of my own droids is a logical step for me. As my other robot showcases where posted when the majority of the work was done, this will be a build diary of sorts, with updates throughout the build.
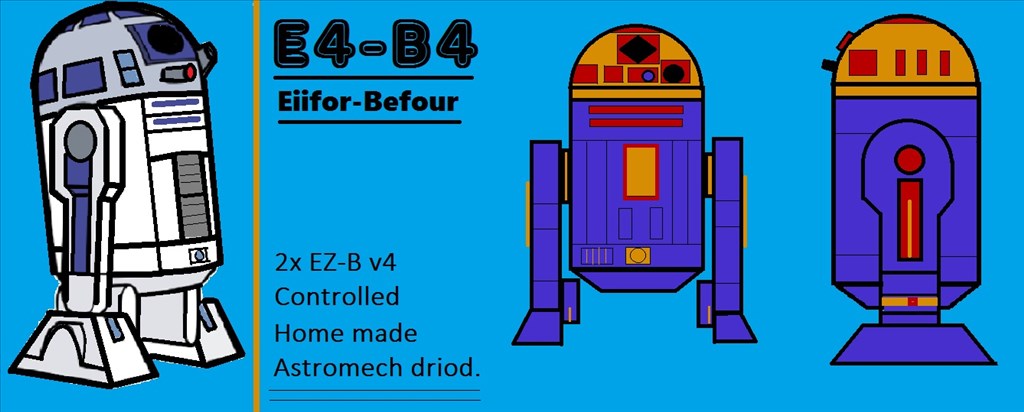
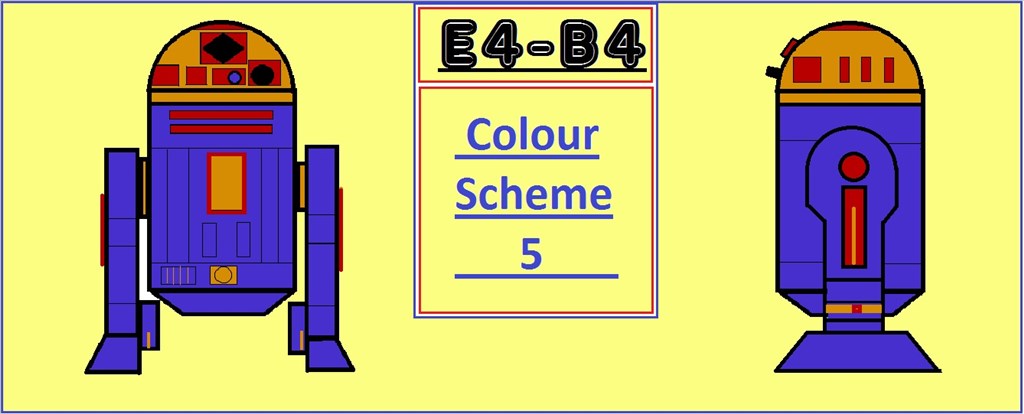
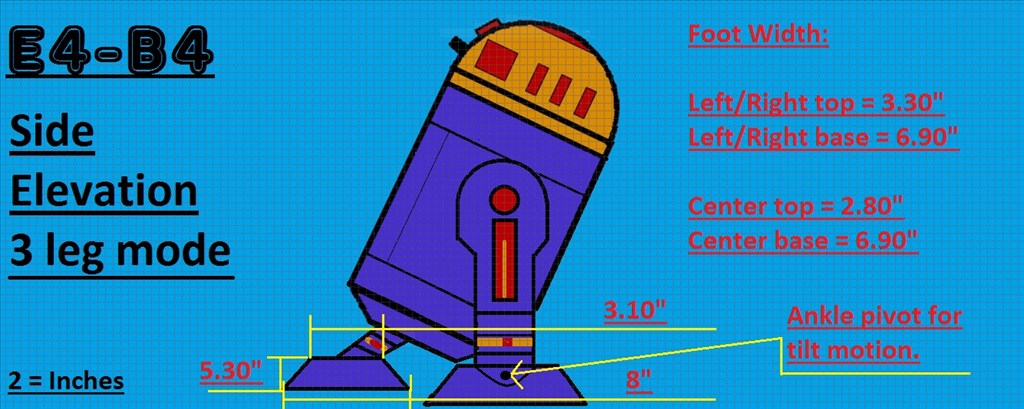
So wanting to get back to building, I had a few ideas floating around for my next BIG project and the thought about doing an R2 style robot came up a few times in the past (the blueprints I drew up that I've posted are 3 years old and was for an R/C version), and after encountering a few design issues for a large custom robot (which I will get back to one day), it was @Robot56's fantastic Astromech Droid project that was the final push for me to decide what direction I should go. There are so many great scale replica Astromech builds around that people have done, but much like my K-9 2.0 build, I want to stay away from doing an exact prop replica build and do a custom build with custom paint job (as seen in the blueprints) while still keeping with the overall original design.
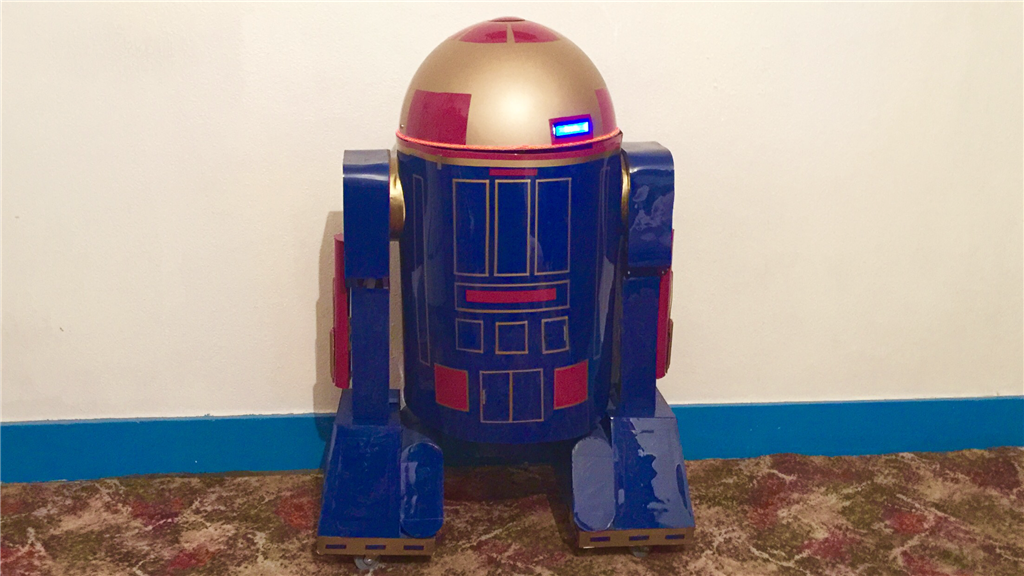
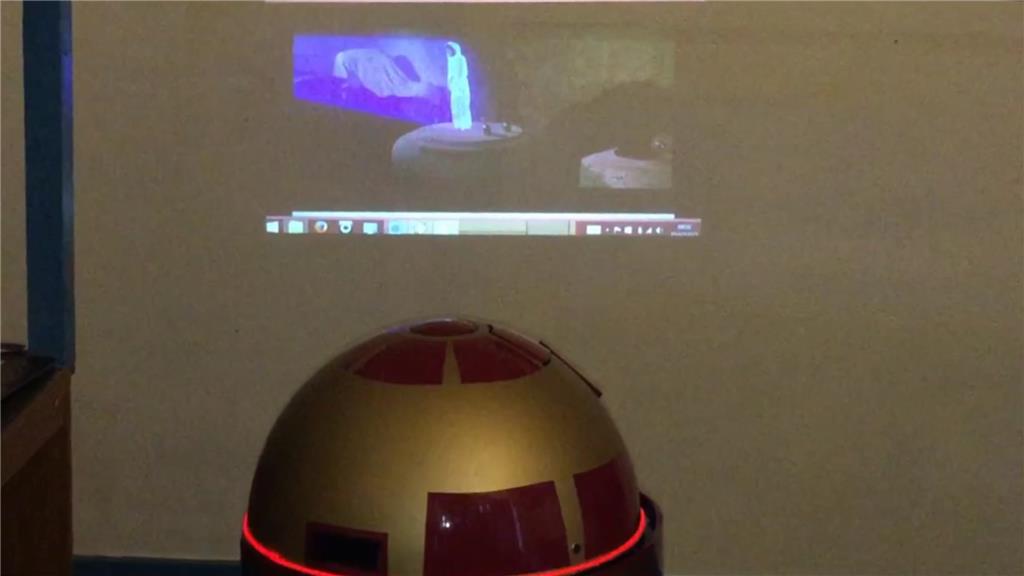
So what's with the name E4-B4 (Eiifor-Befour)? Well its kinda based on the EZ-B 4, of which this little'ish guy will have two of them. One master v4 to control motor controllers, ping sensors, v4 soundboard, camera and sensors, while the 2nd slave v4 will be used for all of the servos used as well as additional sensors. E4 will be mainly built using MDF with a plastic covering, and movement will be powered by 12v 30 watt gearbox/motors for the drive system. The "burtt acoustic signaller" and system ventilation vents on R2-D2's chest area (the two silver square'ish panels) will be replaced on E4 with a tablet PC, and the Optical Holographic Projector in R2's head will be something similar to what E4 will have, using a portable projector like the Aiptek or the Pico Genie, so no holograms... yet. :P
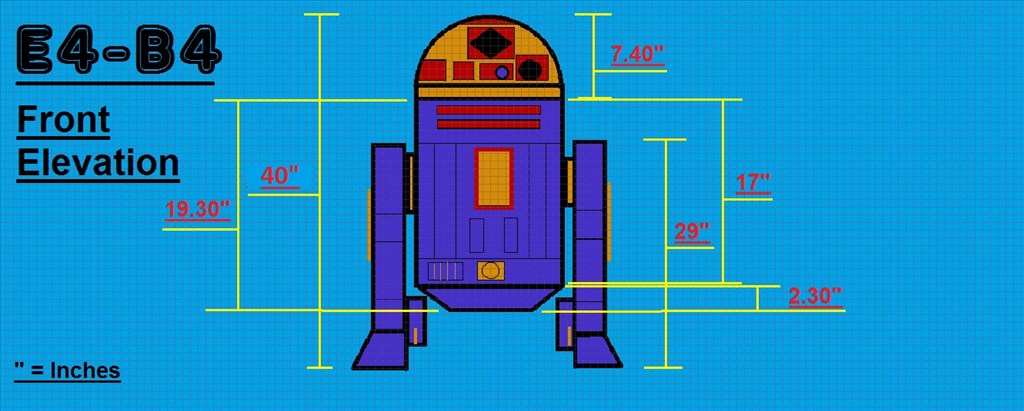
The dimensions will be slightly smaller than the original prob, but not by much so E4 will be plenty big enough. I'm intending to fit a few useful tools that he will be able to deploy, and of course have the fully rotating head which will have all kinds of bells and whistles. I have some of the MDF sheets and 2x4 wood lengths for the frame already, and the motors and head dome (lampshade) should be with me sometime this week, so it will be power tools at the ready. I'm in no rush to finish this project, but I am aiming to have E4-B4 pretty much finished by this December.
I will posting lots of photos and few videos throughout the build process, so I hope anyone reading will find this build dairy interesting and enjoyable. And as always, I'd love to hear your thoughts and suggestions (especially on the colour scheme). Anyway thanks for reading, and let the build begin...
Steve.
Other robots from Synthiam community
Bhouston's A New Hand For Inmoov?
Intellamicrorobotics's Meet @Arti_Robot

that is so cool! you should look at the scale of chopper from star wars rebels.. he's quite a bit smaller than the standard sized astromech.
Also im not sure if you have seen this program but it will let you change the colors on a droid to see what you like :)
R2 Style Builder
@robot56.
Thanks dude. I thought about doing a different type droid, but it's all about R2. He is the best looking one of the lot :). Thanks for the link, that was very useful indeed and a great tool. The link didn't actually work for some reason, but I found it easy enough and had a good play around with different colours. So some of my materials should be arriving in the next day of two, then the fun (and the spilling of blood, swearing sessions and head scratching) really begins :P.
Wont be long before R7 has an overseas cousin.
When I said R2 was the best looking droid, I should have said one of the best, lol. :P
Day 4 (8th August 2015)
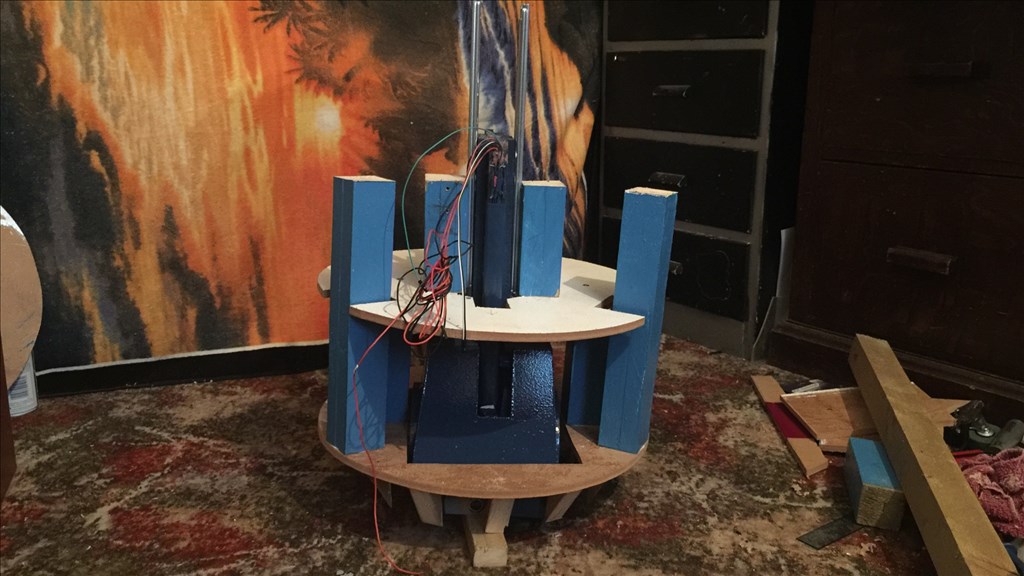
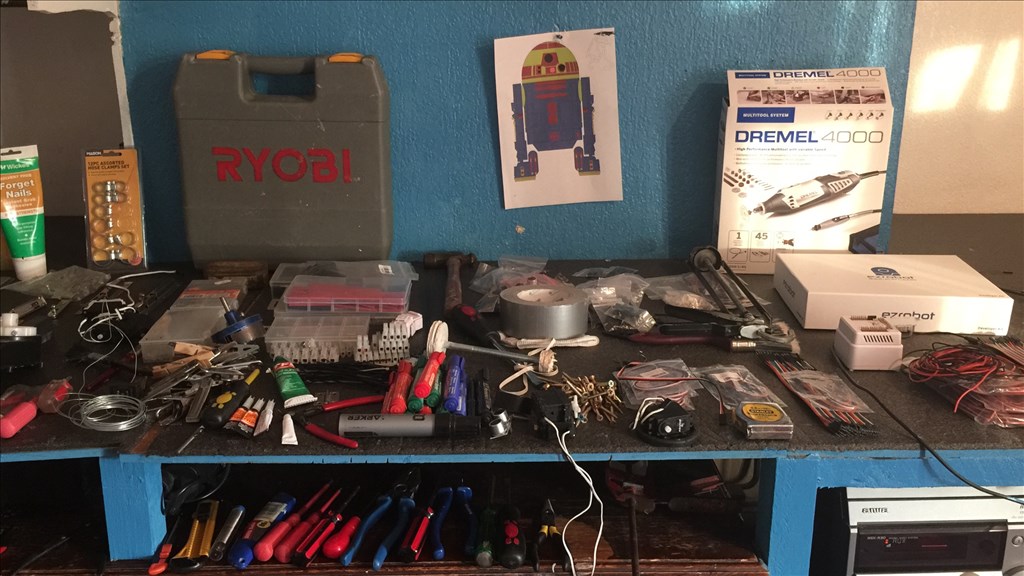
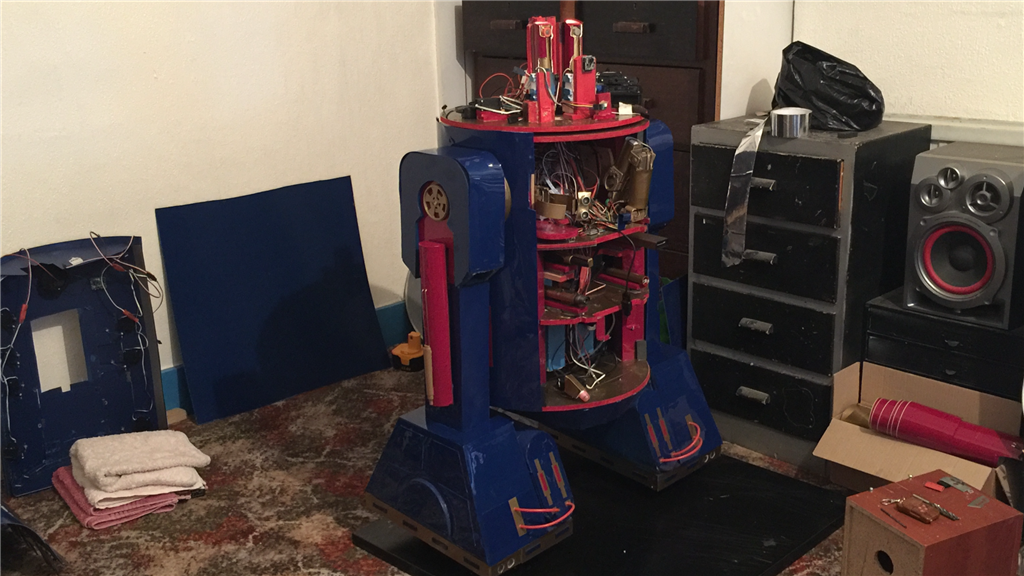
Well here's the first update on E4's build. There's not much to look at right now as I've been waiting on materials that were delayed, but some did arrive on time so I did manage to make some headway. So after I got all of my tools and some of my materials together, it was time to begin the actual build. At this point, I was getting quite excited and looking forward to getting stuck in.
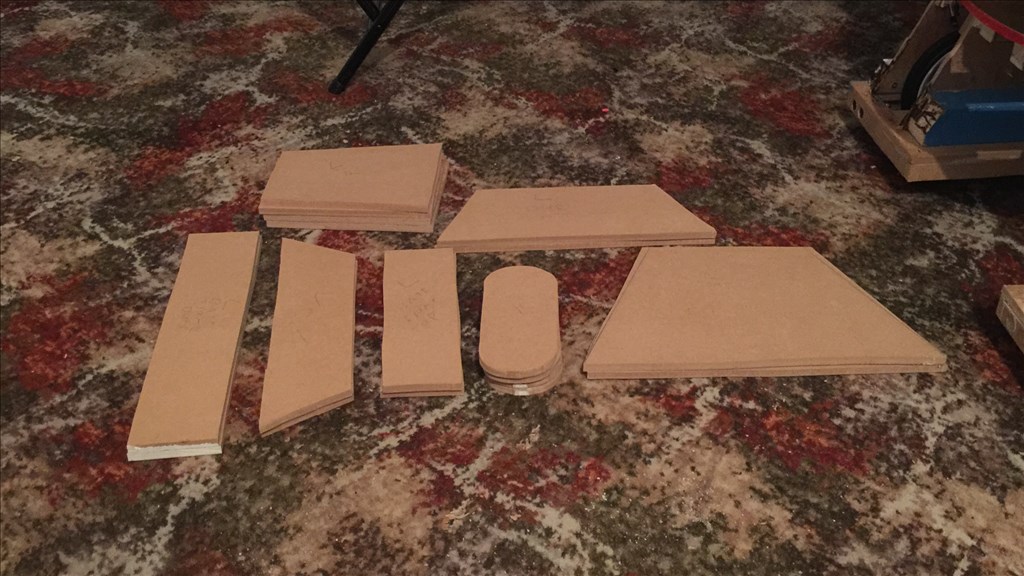
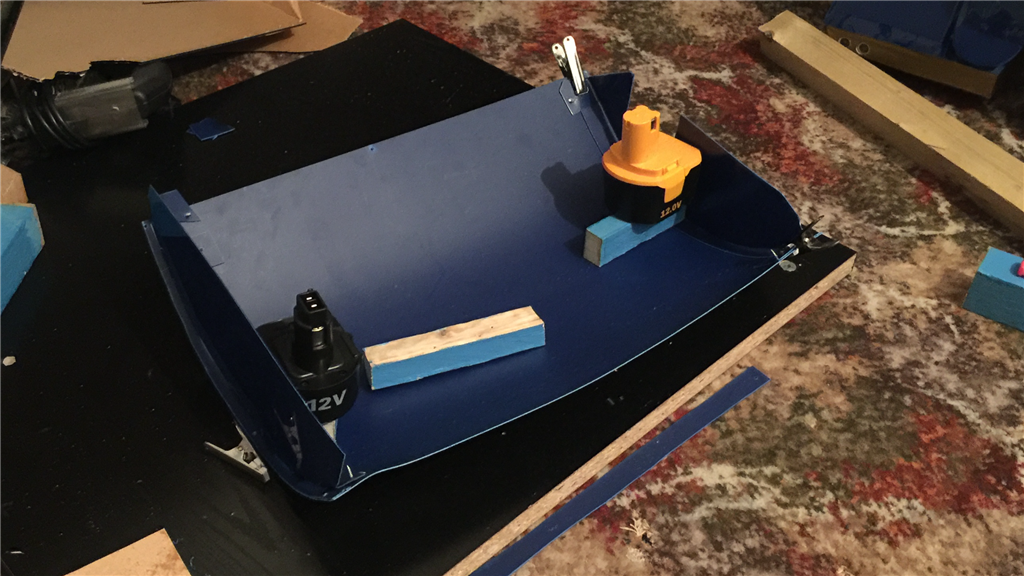
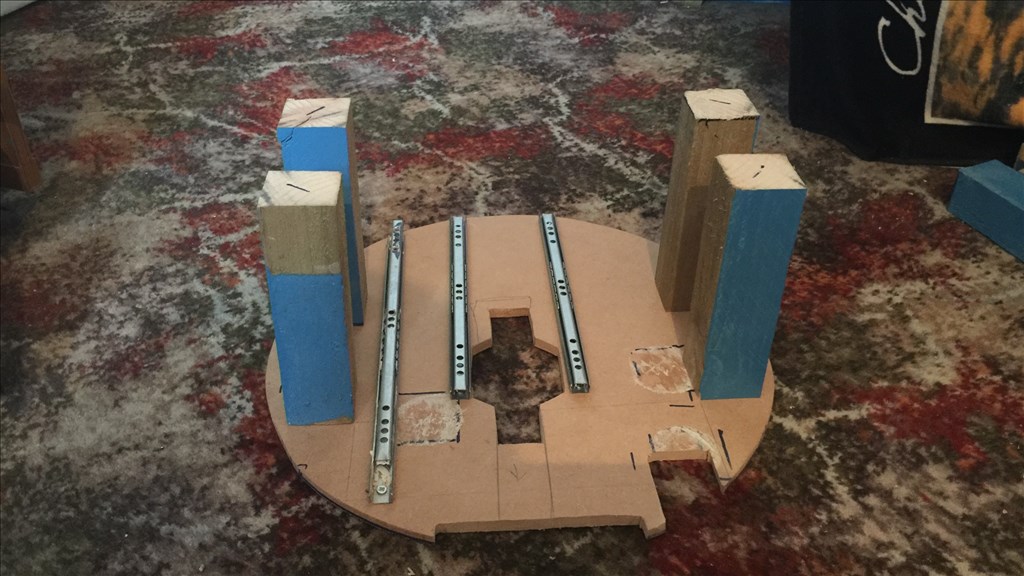
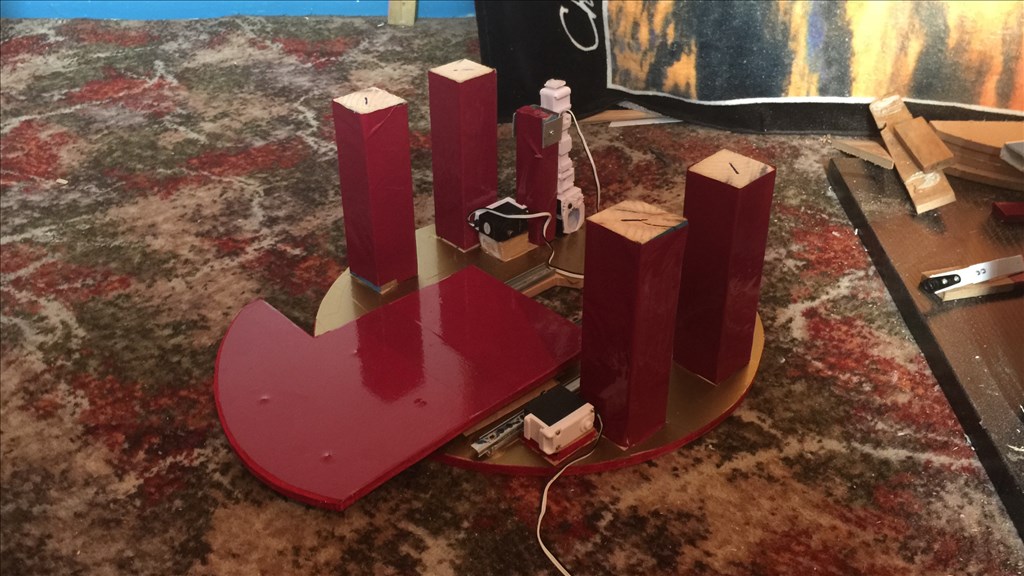
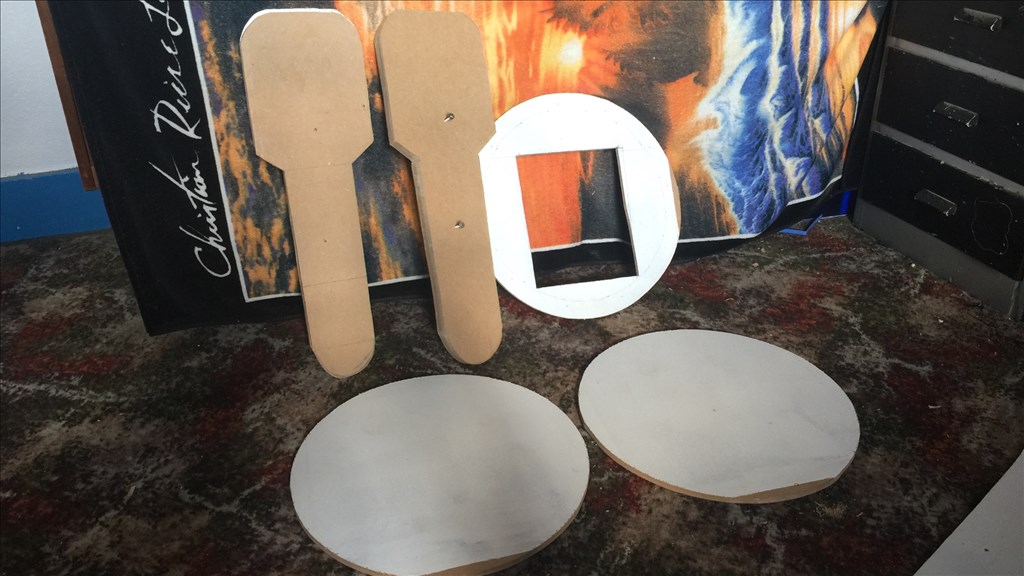
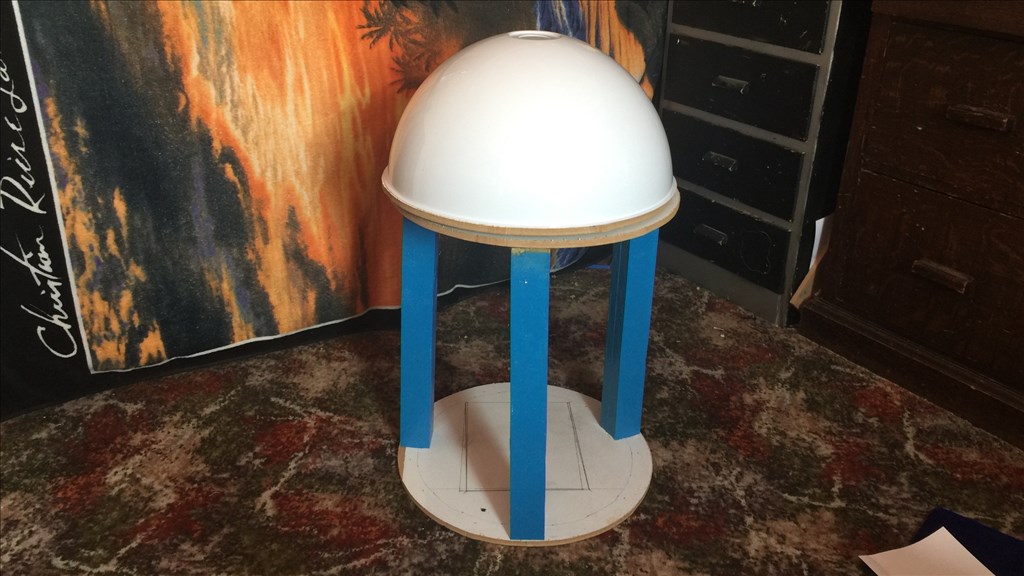
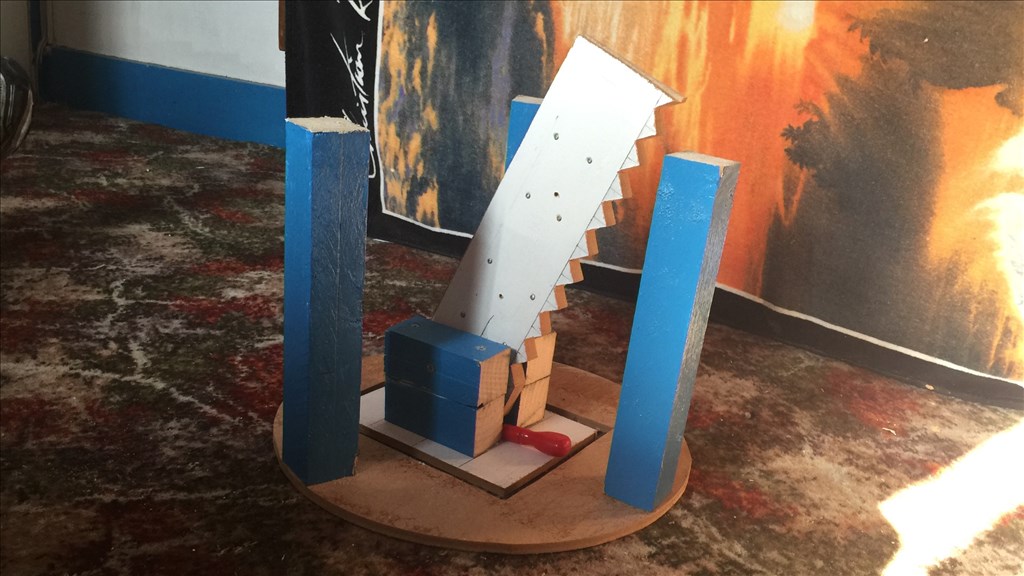
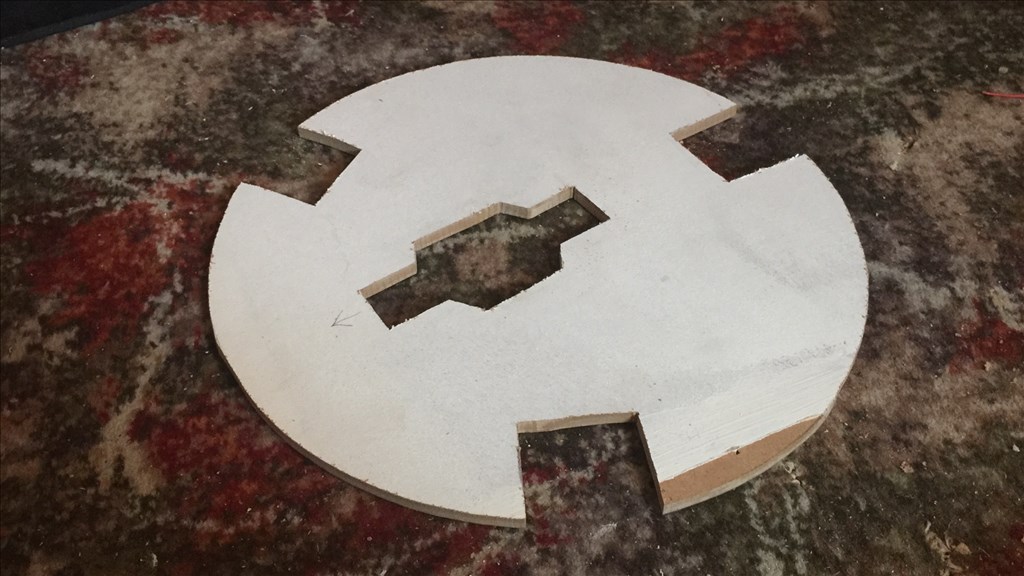
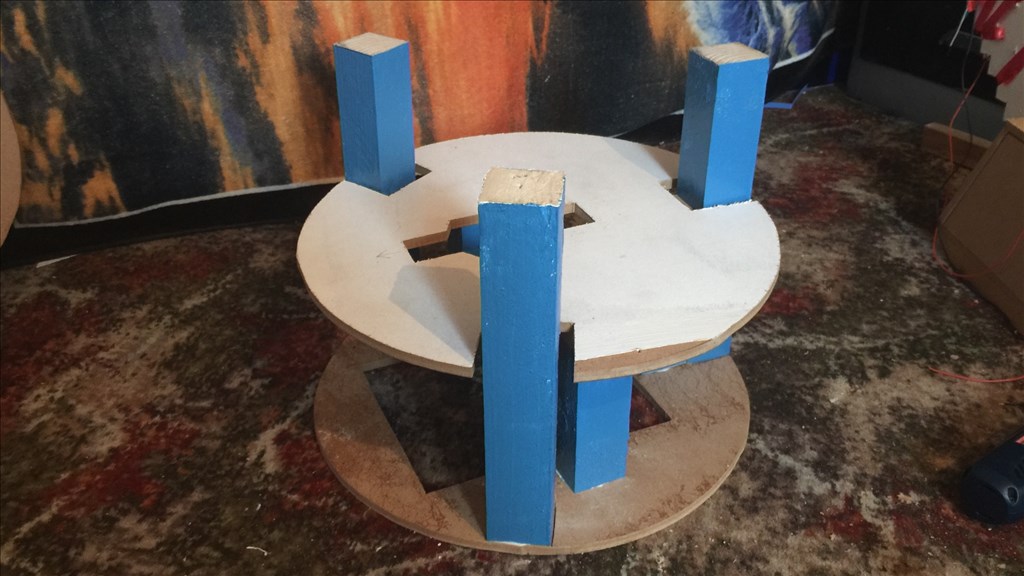
I started off by cutting four 18" discs from MDF for the base plate, electronics platform, top plate, and base plate for the head. Then I cut 6 MDF pieces for the outer legs, top half 7.9" and lower half 4.1" wide and standing 26.0" high. I will work on these more, later on. I cut out a panel in the base plate 9.0" by 7.5" for the centre foot/leg assembly to fit through, then trimmed of the cut out panel by 1cm all around for the base of the centre foot.
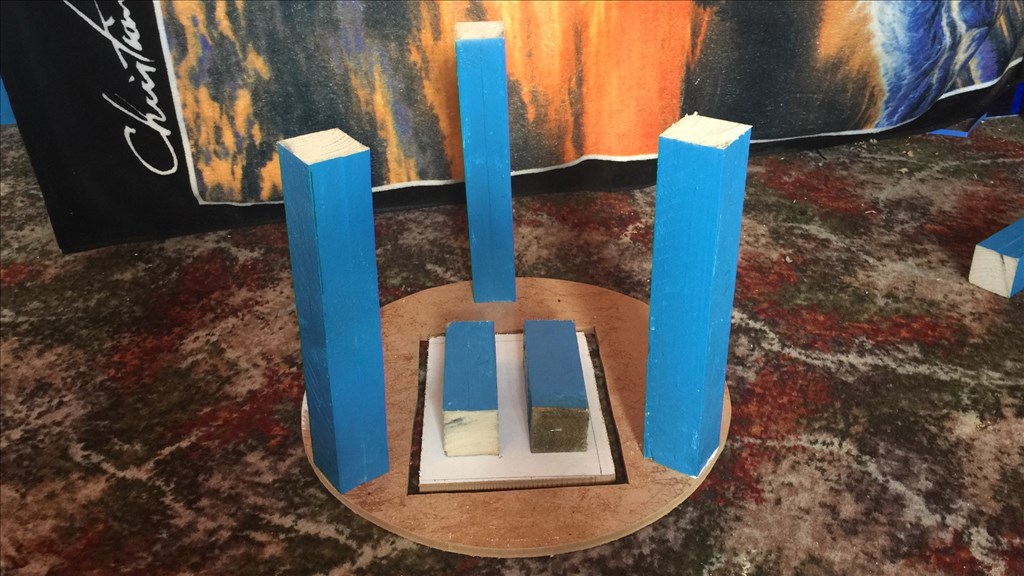
I cut three 2x2 batons 17.0" long for the three body supports. I then stacked the body pieces together along with the head to get an idea of overall size.
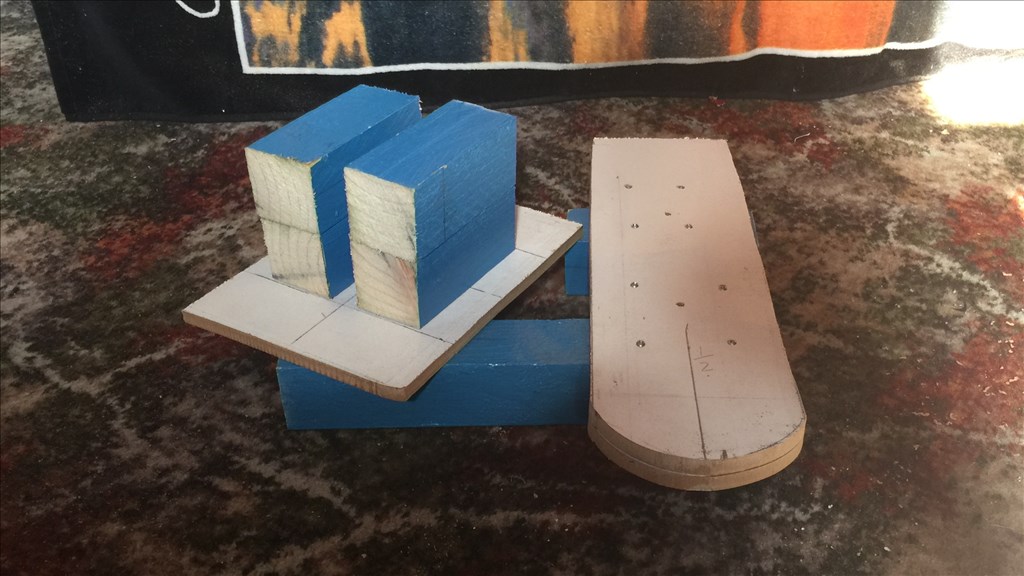
I cut the body supports so they were 11.5" long for the lower body, and 5.5" for the upper body. I then cut two MDF pieces for the centre leg and sandwiched them together and attached to ankle supports to the centre foot.
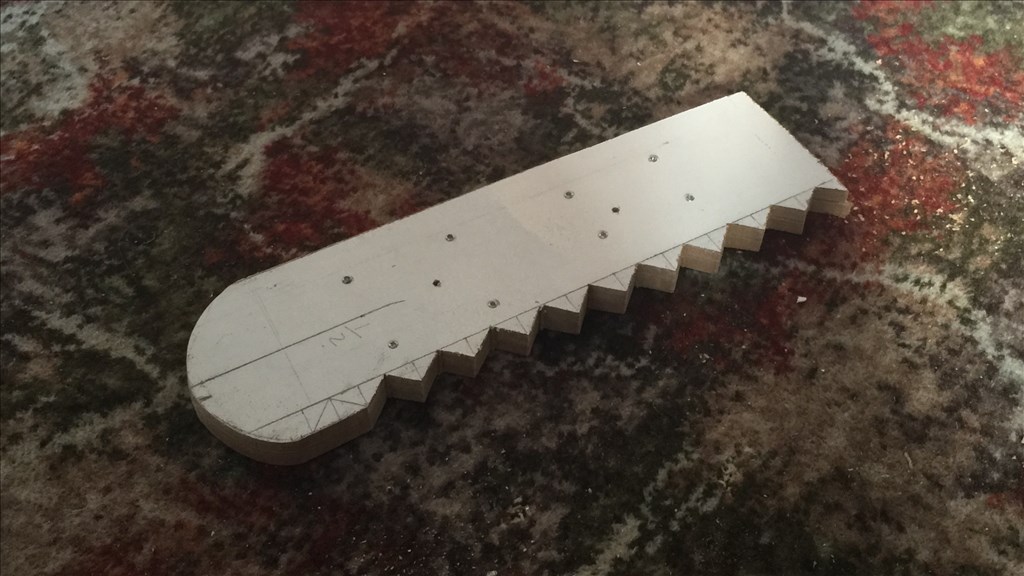
I marked out 1.5cm squares on one side of the leg for the gear mechanism to deploy and retract the foot/leg assembly.
Finally I drilled holes in the ankle supports and lower leg for the ankle pivot and attached them together to check the foot balance.
So that's where I'm at so far. The next steps will be to finish off the centre foot and leg, fit the motor and gear assembly to deploy and retract the foot, then start on the upper body section and outer legs.
So far, so good. :)
nice presentation.
@nomad.
Thanks buddy. I thought I'd try something a little different to what I have done before. Hopefully it will get better the further in to the build I go. Anyway, I hope you are keeping well. :)
i am.
wow youre making quick work of the frame and legs! keep it up looks great :)
@robot56.
Thanks dude. Yeah, I got lucky with our temperamental UK weather yesterday, so I managed to get a lot of cutting done. It should be nice today as well, so I should be able to get a lot more done this afternoon.
Day 7 (11th August 2015)
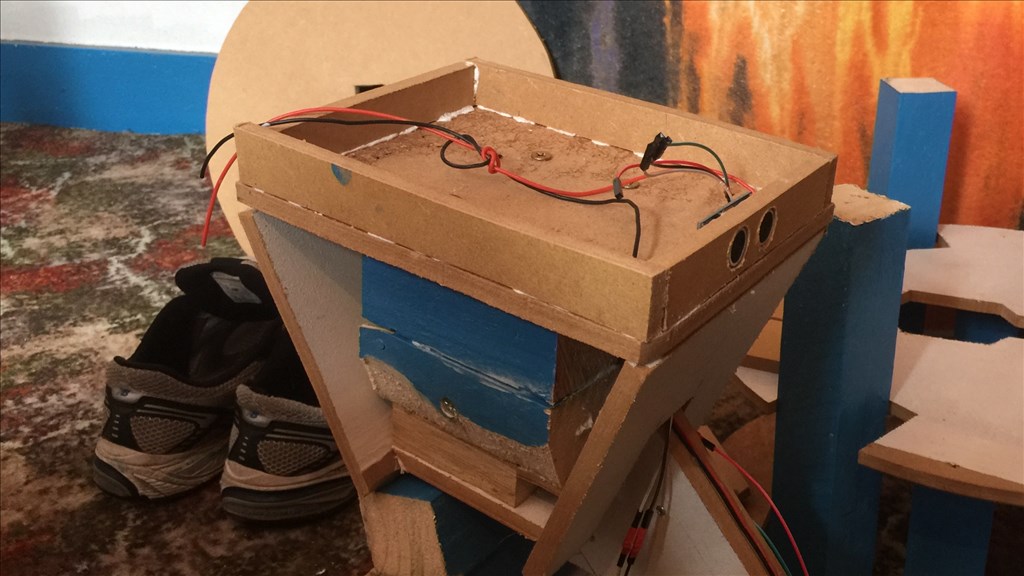
Well, I managed to get a bit further into the build over the past couple of days, and the base is pretty much done. So here is what I've completed so far.
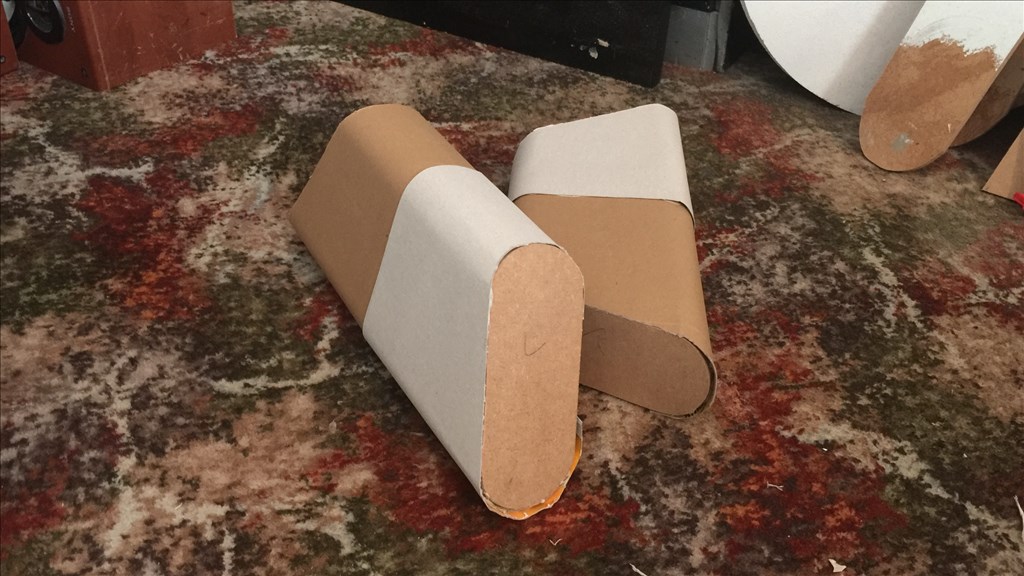
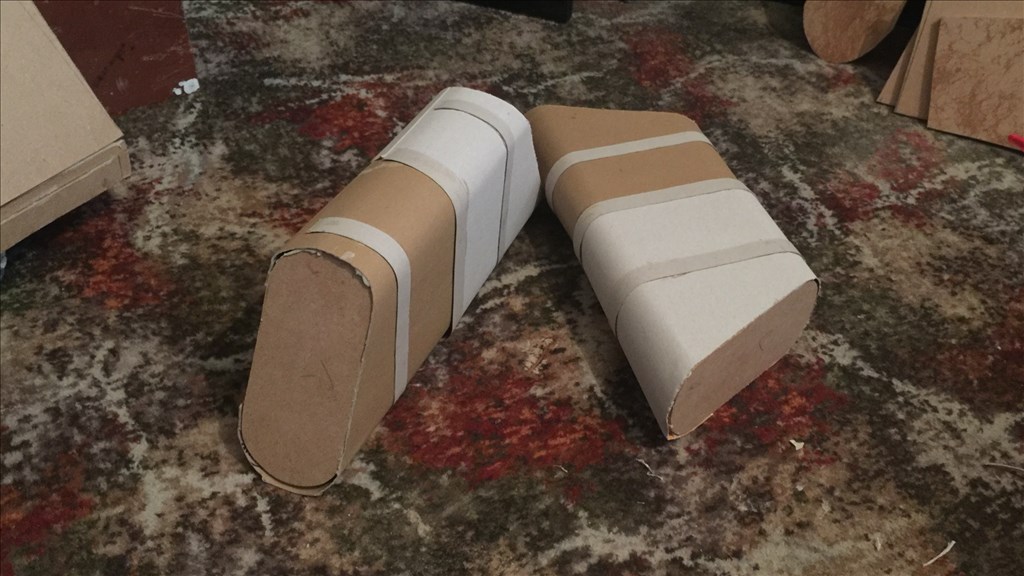
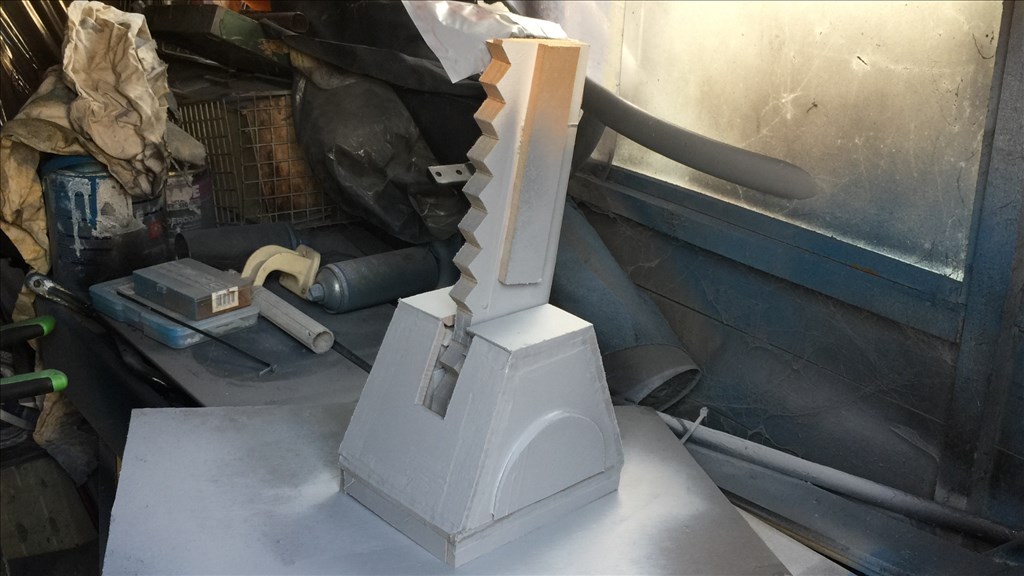
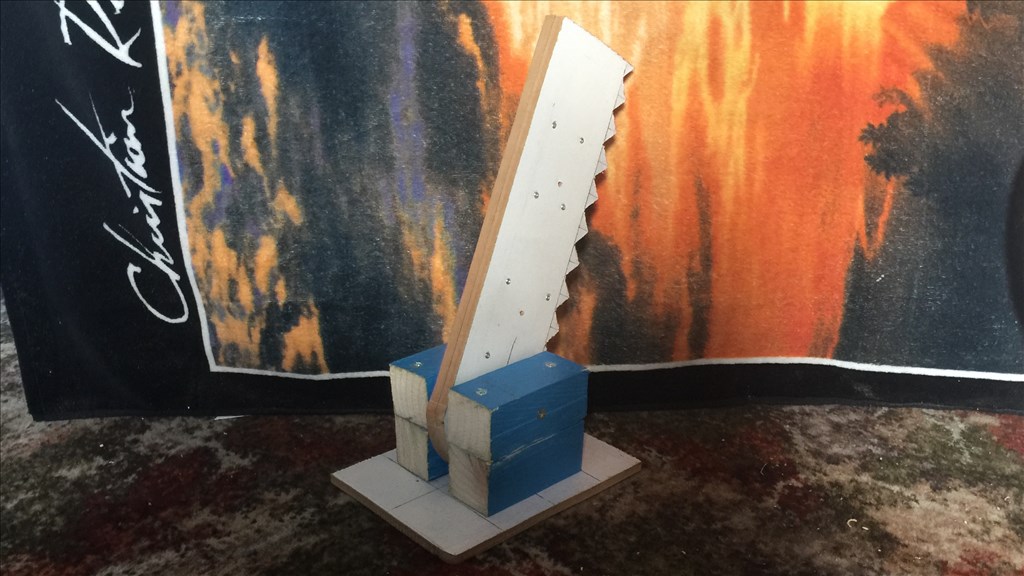
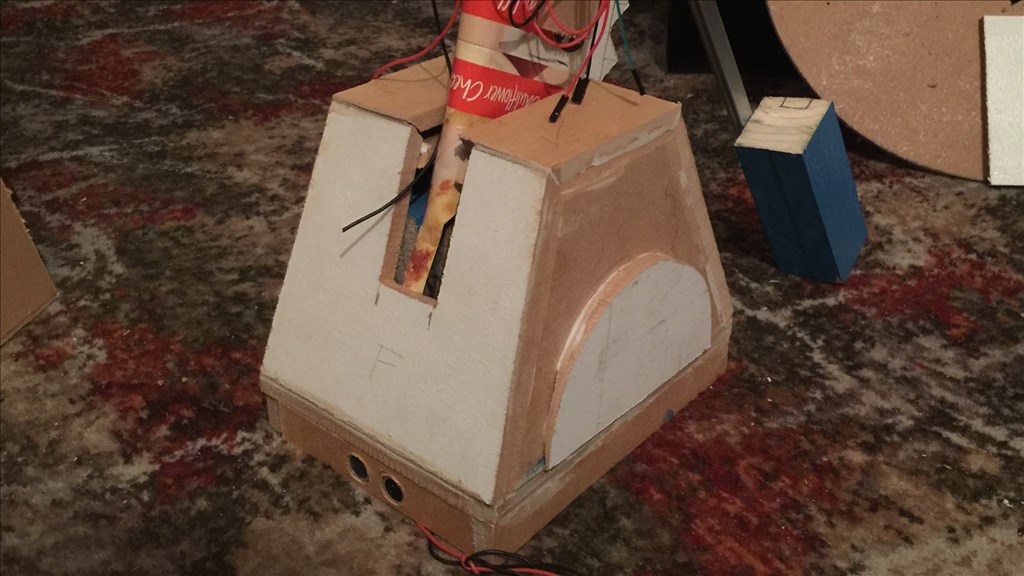
First off, I concentrated on the centre foot. I put the framework in for the foot to add weight and will act as supports for the foot side panels. I then added two stabilisers to the top of the foot to reduce side to side pivot play and keep the leg straight. Then I added the front and rear panels.
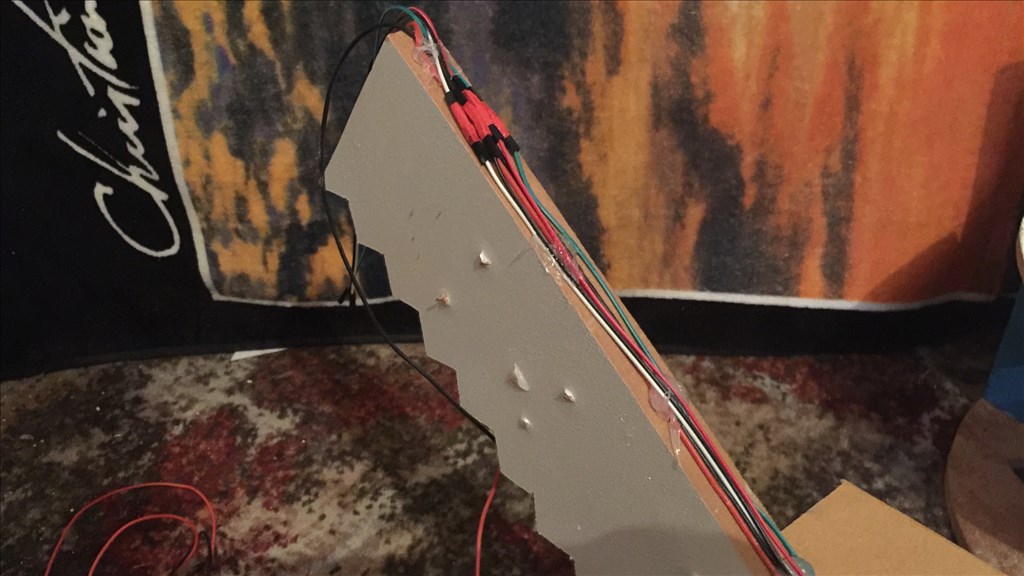
I've also started on the first part of the electronics. Actually, all I've actually done was to trace some wire which I will be using later.
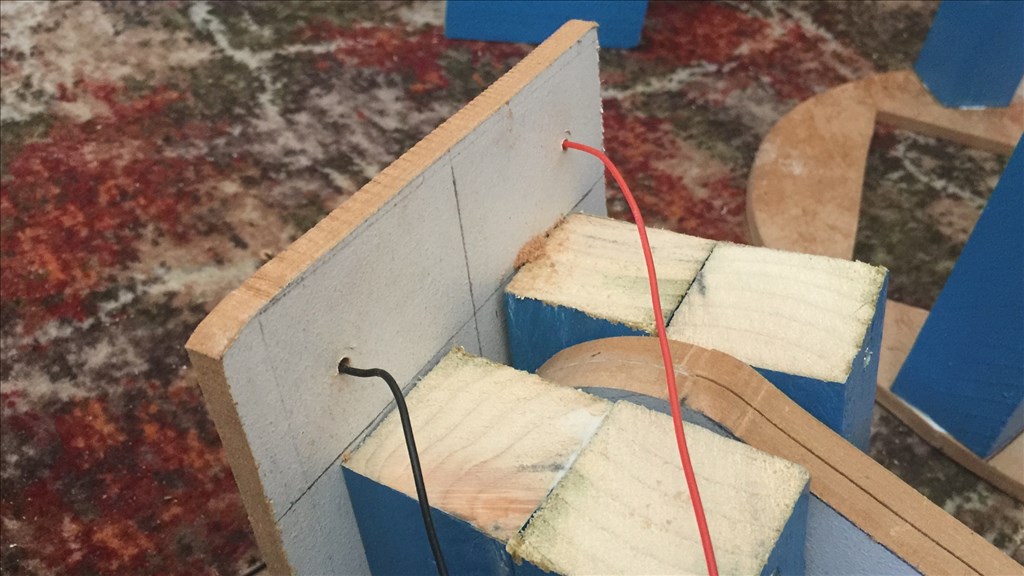
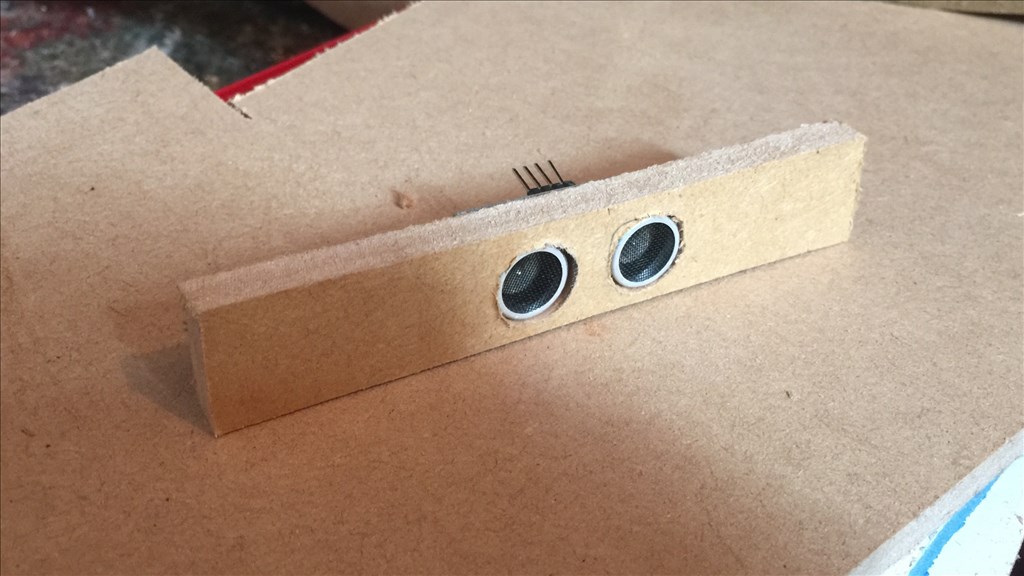
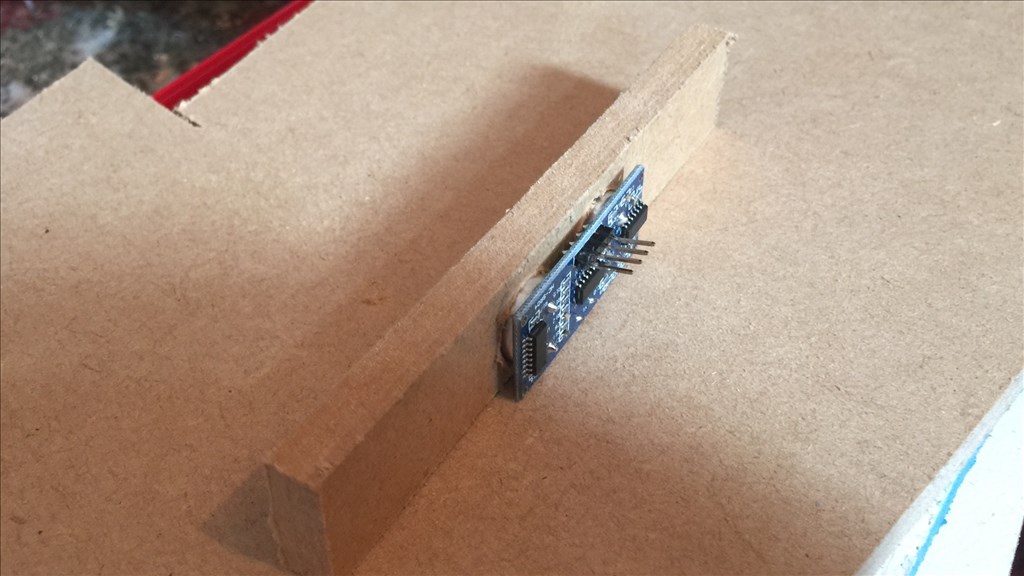
Carrying on with the electrical theme, I have now cut and attached the lower foot skirts, with the front skirt panel housing one of 6 ping sensors that will be installed in E4.
I added a few dabs of silicone and traced the wires to the front of the leg.
To finish off the main build of the front foot, I added the two top and side panels along with some detailing. The foot is now pretty much ready for paint and a few final details.
The next job was to cut an upper base panel and attach it to the body frame. This will support the foot mechanism.
For the start of the body skirt, I cut out twelve 2" triangles to support the skirt skin which I will attach later.
So that brings this update to a close. I've changed the idea of the "gear" system to raise and lower the centre foot, and instead decided to go for a pulley system with a servo interlock. This should be less strain on the motor, and I'm not 100% convinced that the gear assembly idea will work very well. Once the foot is painted, I will fix it to the body and look at fitting the motor when it arrives.
That's all for now. :)
loving your build and am following it avidly. I just have a thought on the ping in the foot, read somewhere that ping sensors don't like being too close to the floor because they can sometimes read the floor as an object. so give it a test to see if it's ok.
@bborastero.
Thanks for your comment. So far things seem to be going well and I'm enjoying this build so far and I'm glad you are enjoying the diary.
Also, thanks for the tip on the ping sensor. Bearing in mind that I'm sill yet to fit the caster wheel which will raise the ping up a bit from what's currently shown in the pictures, I will take your advise and test it to see if there are adverse effects. I can always relocate it higher up on the foot which will be an easy fix and will blend in with the final detailing. :)
What "scale" is this build, approximately?
@Zap.
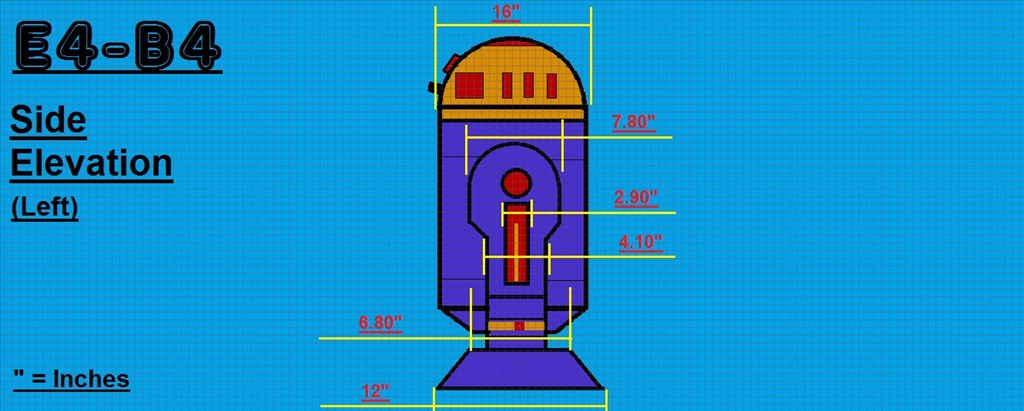
I'm going by some full size 1/1 prop build plans I found online a while ago, minus 2 inches here and there. The reason for the slight size change is the dome is normally referenced at about 18" diameter, and I have one at 16", so he won't be much smaller than a full size prob build.
Ok, that's cool. I was going to point you at some half scale 3D printed astromech detail parts but I think your build is too big for that.
@Zap.
Ahh, that would have been cool, but like you say, they would be a bit small. No worries though as its a custom build and not a replica to give him some individuality. Thanks anyway though. I appreciate the thought. :)
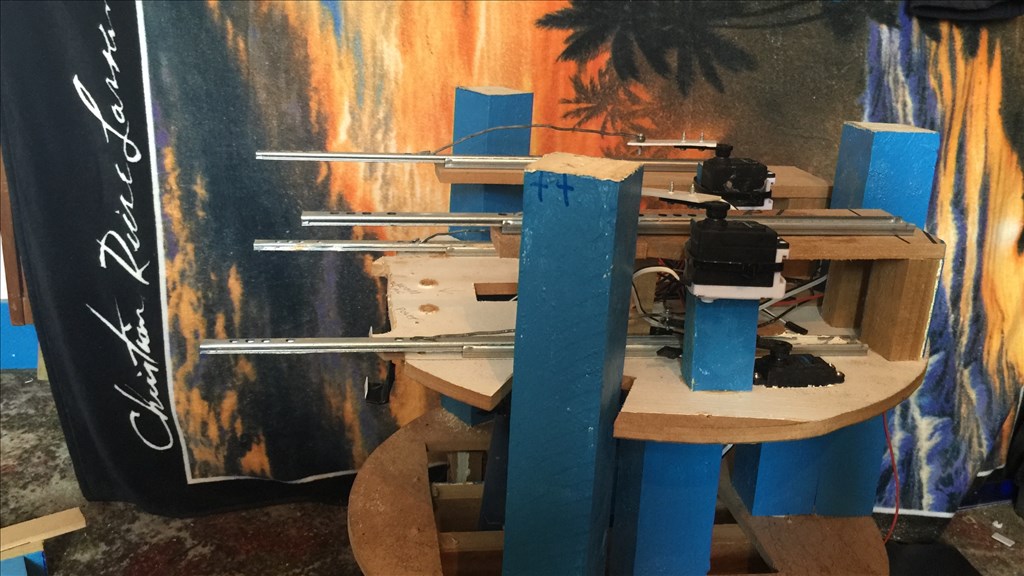
Day 9 (13th August 2015)
So it's time to get this centre foot fitted and move on to the next stage of the build. I've been delayed a bit waiting for the motors to turn up which seems to be taking an age to get here, but I'm a little step further along (no pun intended). :P
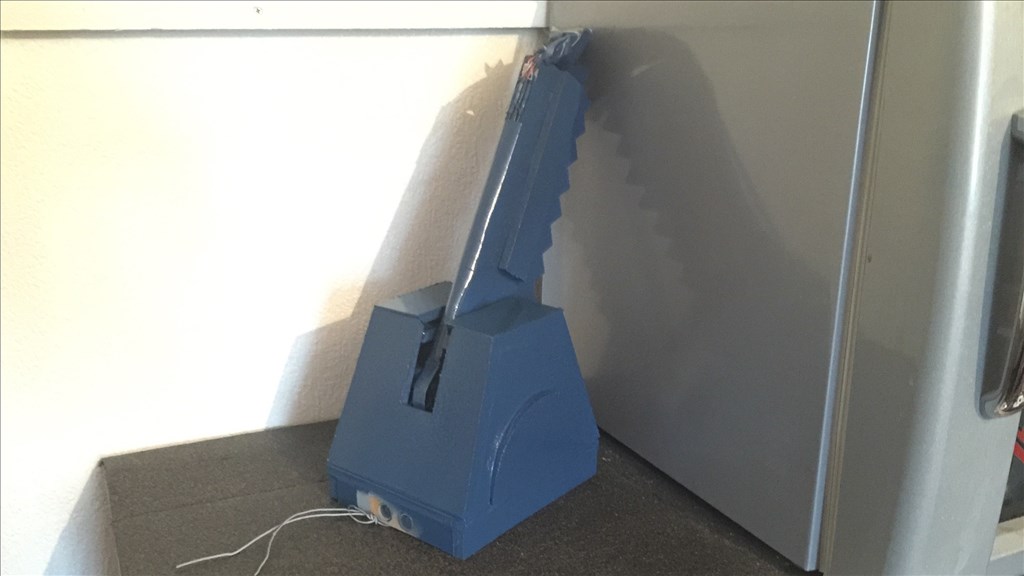
So with the centre foot pretty much finished, it was time to get some primer and some paint on to it.
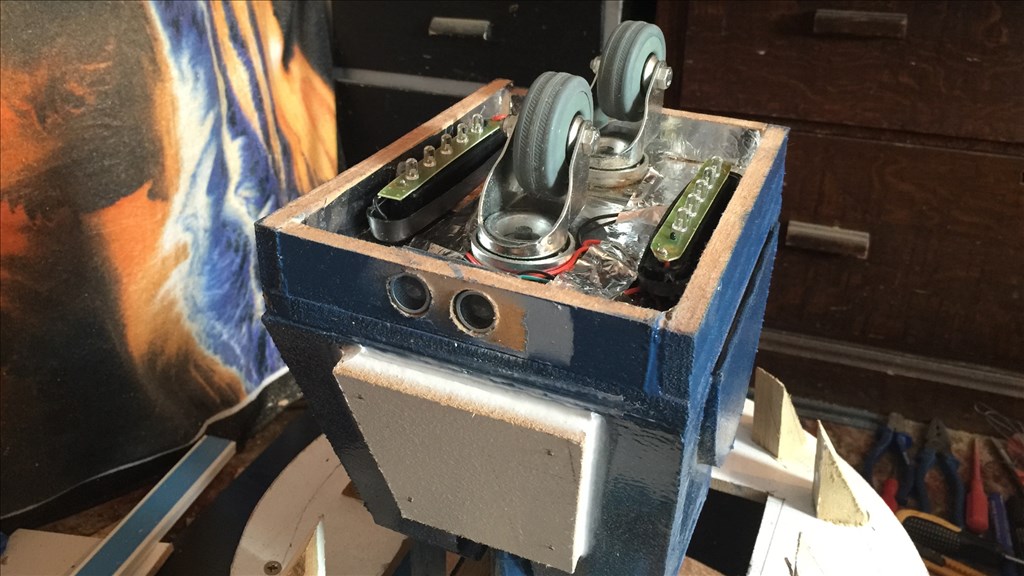
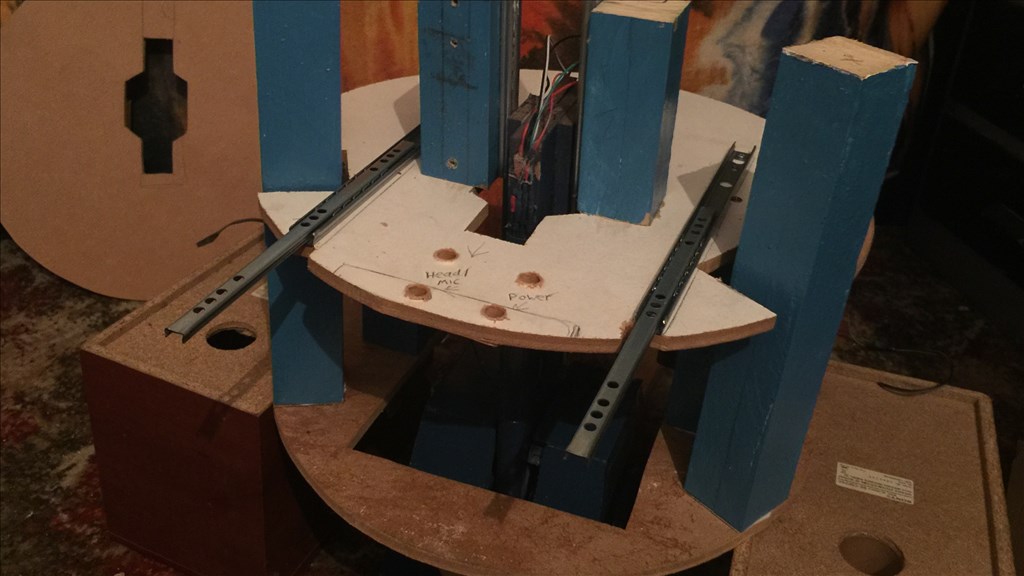
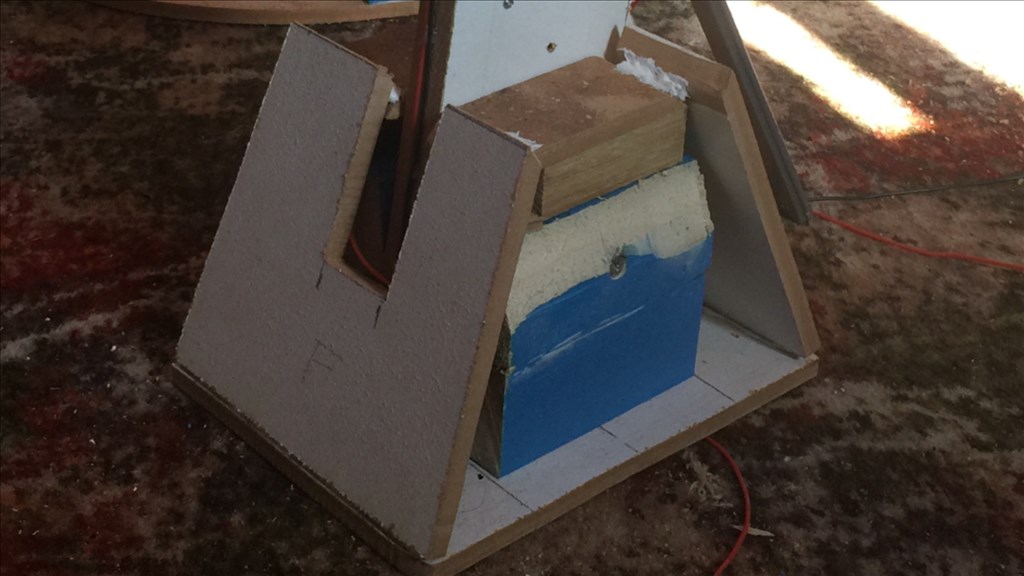
While the paint was drying, I fitted the runners, which are cupboard draw runners, which will guide the foot when it lowers and raises.
I attached the runners to the leg and gave it a "drop and raise" test, and all was well, with plenty of space all around the recess when retracted, and all that needs doing now is to fit the motor.
Last job I did was to fit 2 further draw runners that will deploy and retract some utilities to be fitted later. I've also drilled some holes to feed some head/microphone and charging cables through for the Acer tablet.
All that is left to do on the centre foot is to add some final detailing and caster wheel which will be done towards the end of the build. When the motors and 15 amp motor controllers turn up, I will make a start on the outer legs and feet. Well, it's starting to take shape (sort of), and I'm looking forward to getting them outer legs fitted.
Until next time. ;)
Day 19 (23rd August 2015)
An update with a bit of a difference where a design decision had to be made. More on that in a bit. First off, a BIG thanks to @Zap Brannigan and to @Robot56 for their advice and answers given in Robot56's thread, which were a great help.
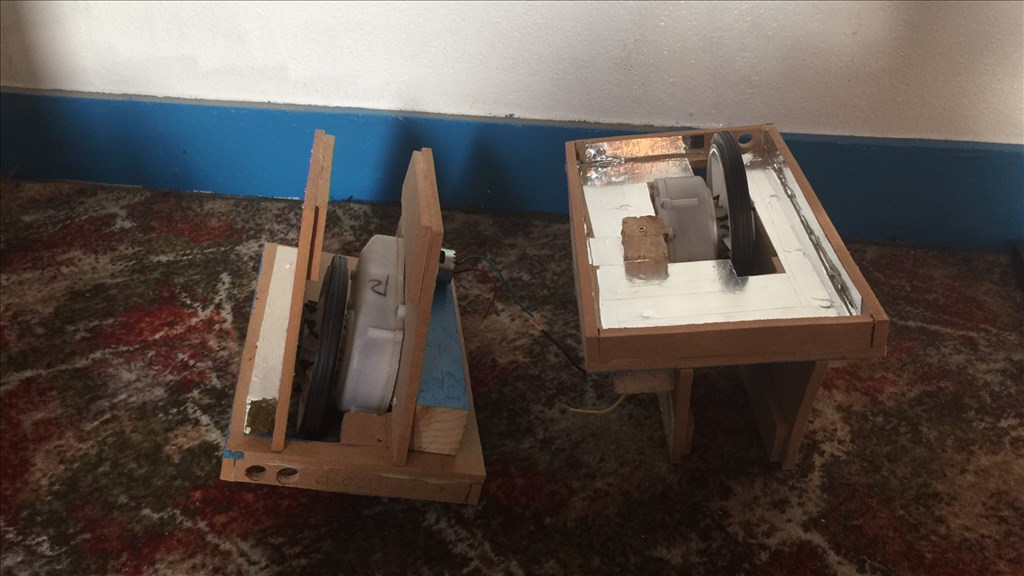
So, I had a couple of extra jobs to do on the centre foot which was to fit two free steering casters, and two LED strips for some under foot lighting. I added some aluminium tape to the underside of the foot to reflect and disperse the light.
So, the big decision I mentioned was in regards to the build design of E4 while I was finishing off the centre leg/foot assembly. I temporarily fitted a motor to the leg to try the mechanism out, and it did work but I just didn't fully trust the set up to work flawlessly every time. So I sat back, had a beer or five, and went through the pros and cons of having a retractable centre foot, or having it fixed.
The pros for having it retractable were...
1.) Not many Astromech droid builds have a retractable third leg, so having one would be something different.
2.) It would quite simply be a cool thing to have.
The pros for having it fixed down were...
1.) The mechanism was taking up a lot of room (almost half the build), so without it gives me more room for other things I wanted to add.
2.) Loosing the assembly would make the whole thing a lot lighter.
3.) It would give greater stability when driving around in upright mode (two leg mode although this would technically be three legs).
4.) It will still have the ability to lean back in to tripod mode.
5.) No chance of retractable leg interlock failure, which could potentially end up having E4 fall flat on his face... Ouch.
6.) One less motor and motor controller to use which is better for power management (better run times).
7.) Less structural strain on the outer legs and body frame when in two leg mode, again due to excess weight.
And 8.) I just was not confident enough about the interlock and the amount of weight the motor had to lift. Too much could go wrong which could have led to bad things happening.
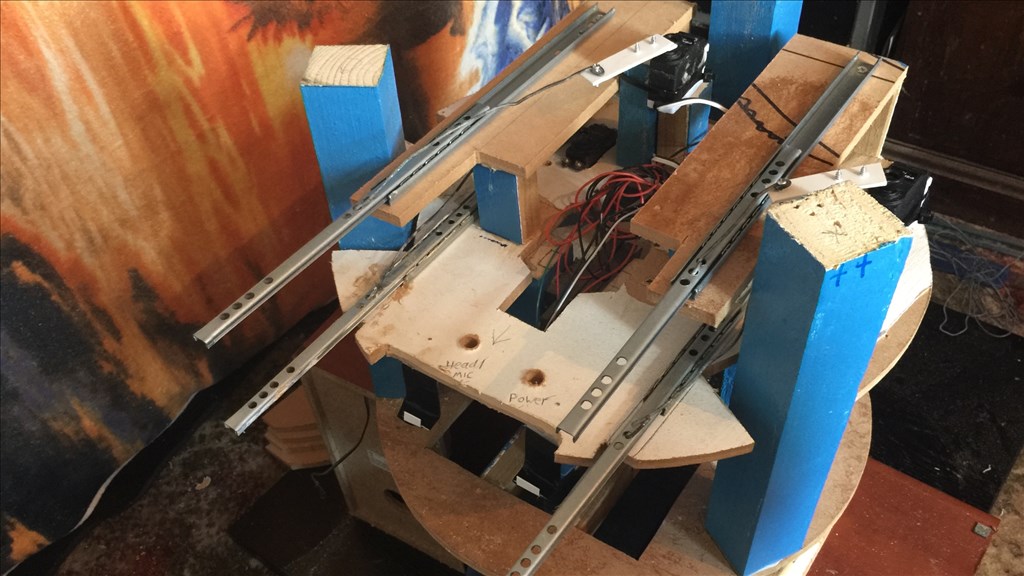
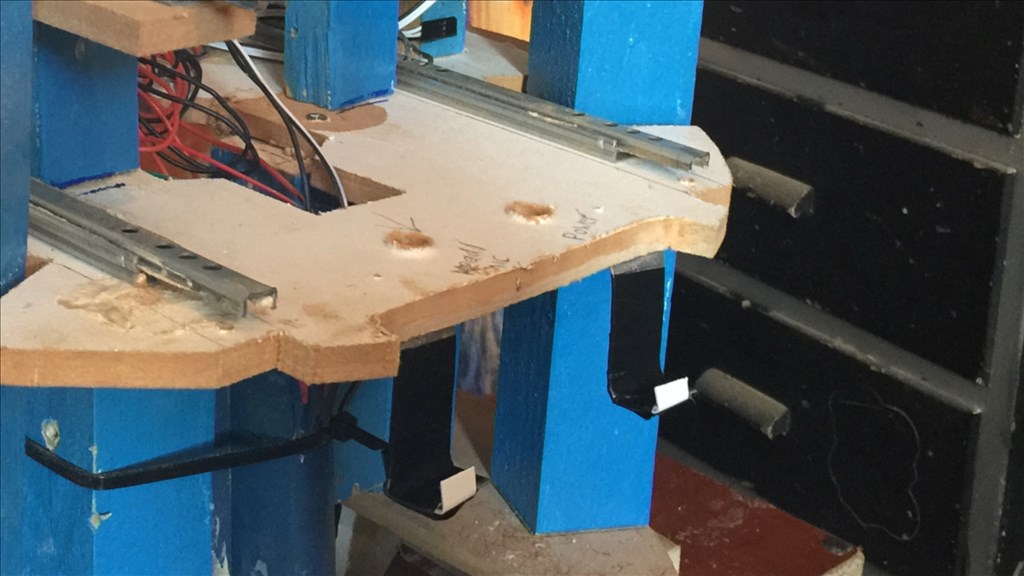
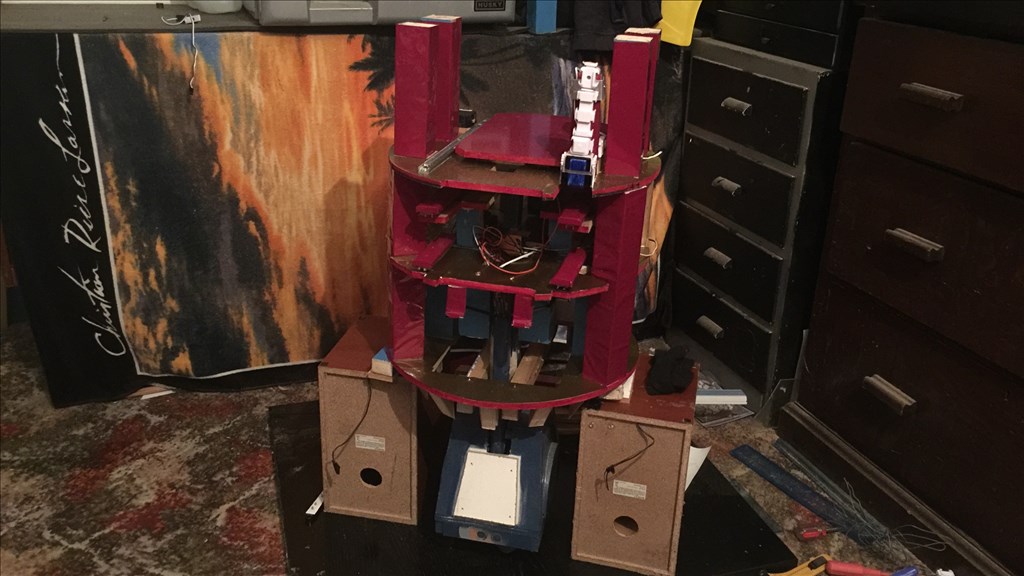
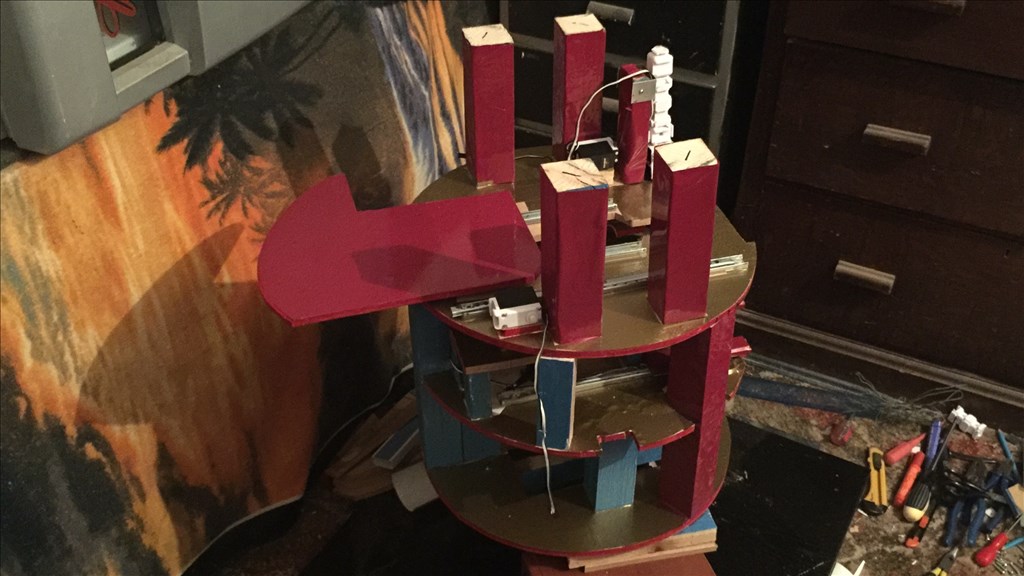
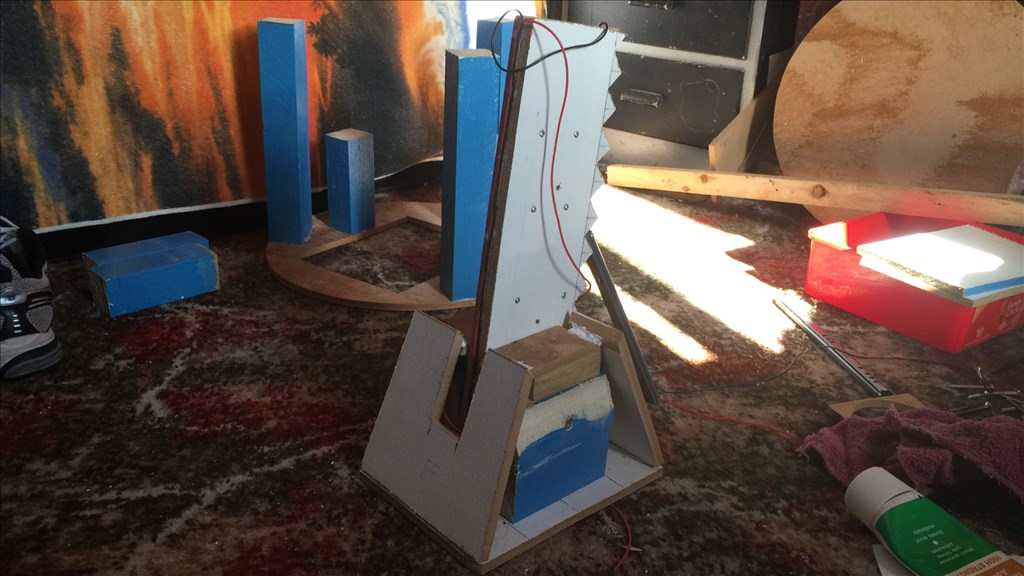
So the decision has been made, and E4-B4 now has his centre leg permanently fixed in the down position. I may revisit this one day, but for now I have fitted two cross sections to the underneath of the body, and two supports on the lower tier section where the leg is now permanent fixed.
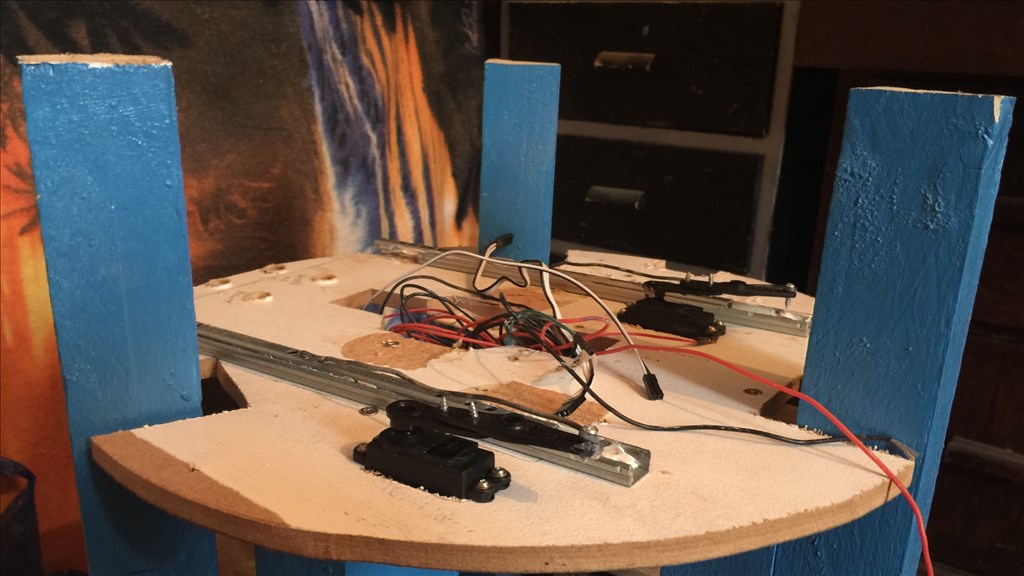
As mentioned in point 1 for having the leg fixed, this has now given me more room to work with, so I have slightly relocated the existing utility runners that I fitted on the lower tier, and added two further runners above them. The servos are securely fitted, and linkages I made are connected to all four runners.
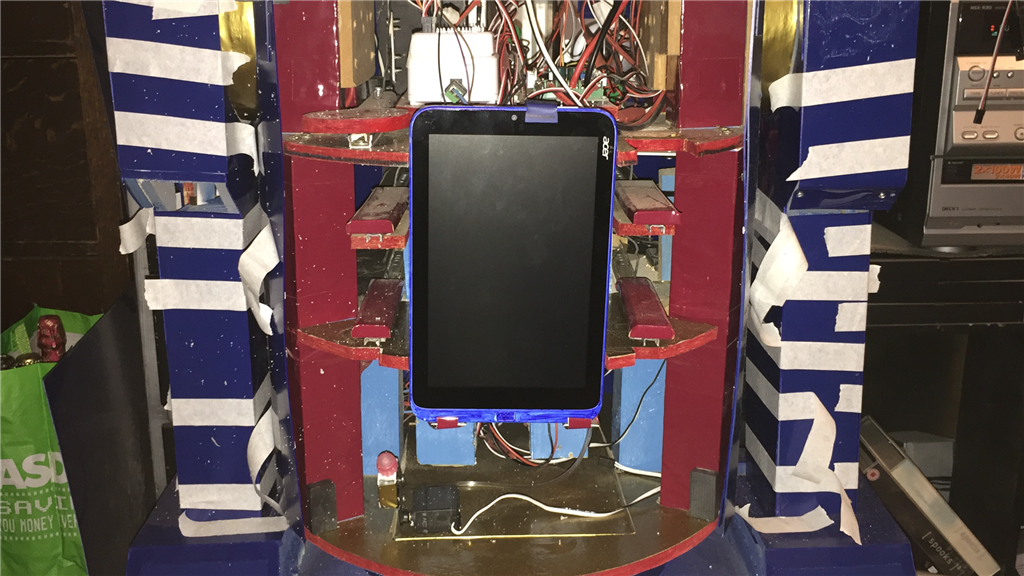
I have also cut out some recesses on the lower and upper tiers where the tablet will be housed, with some brackets to hold it in place.
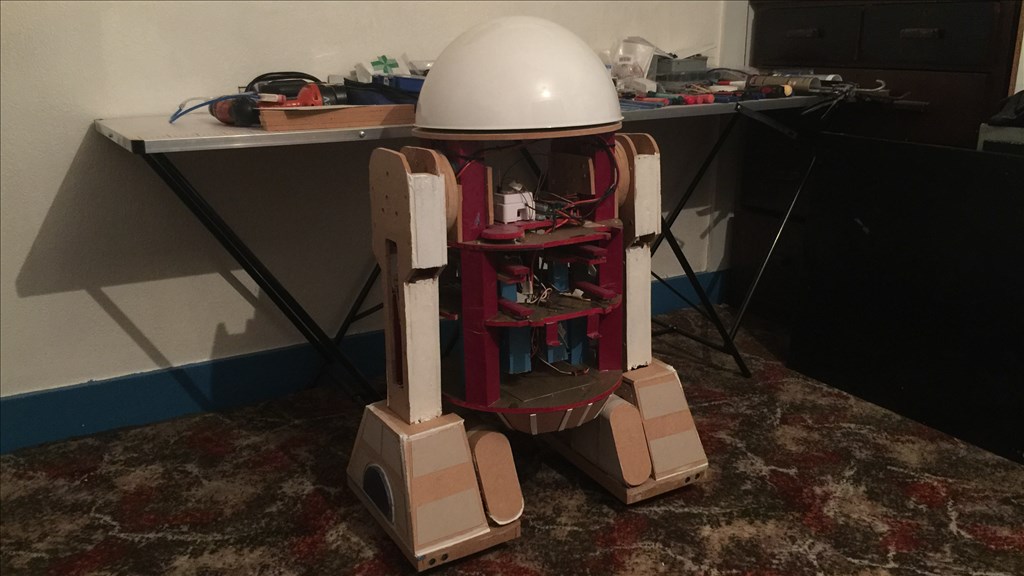
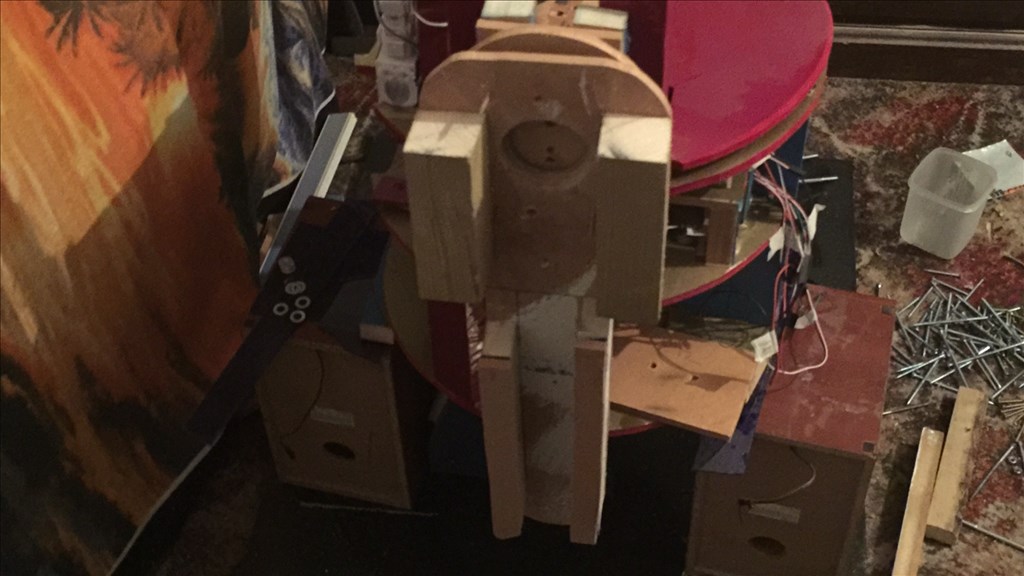
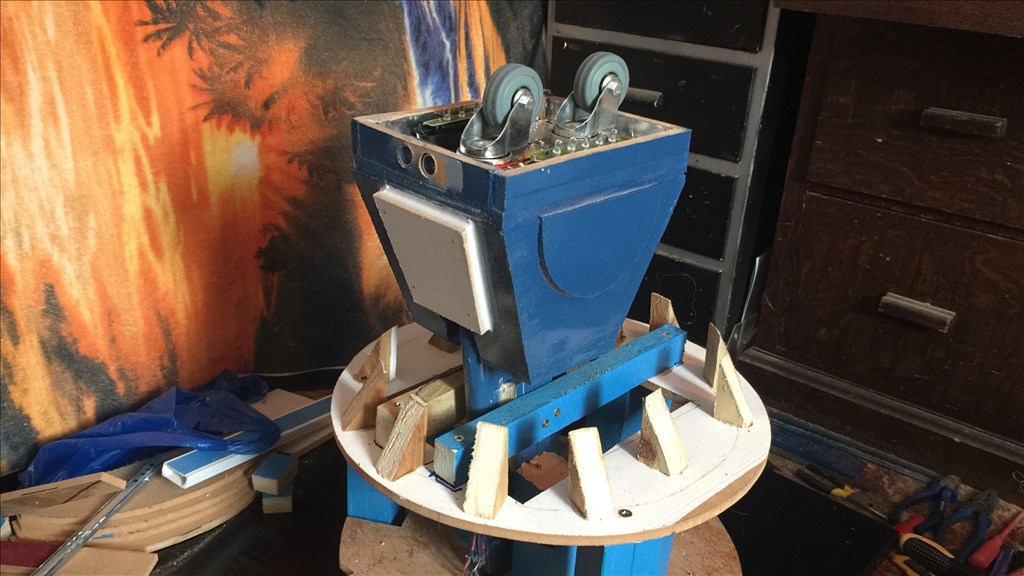
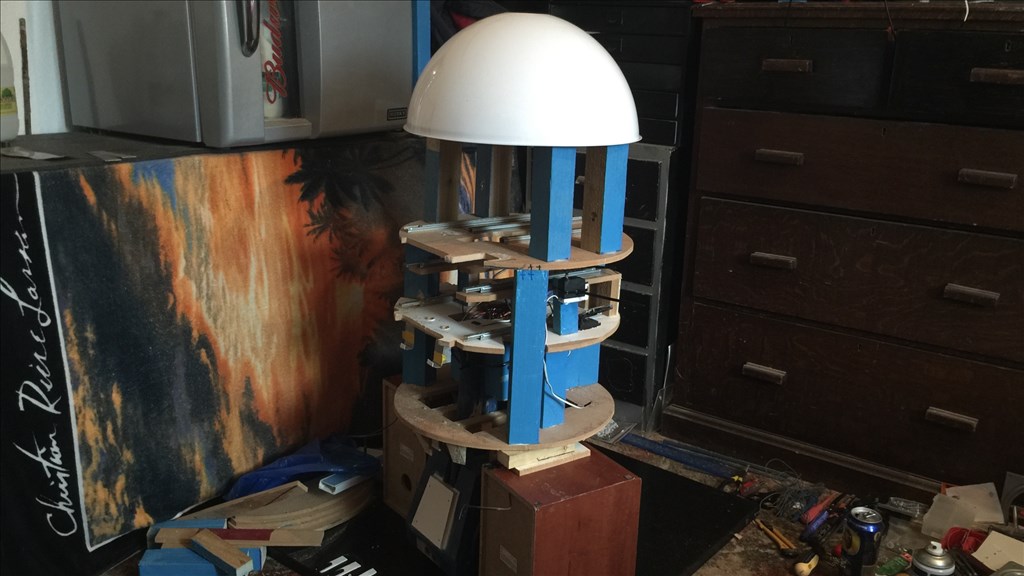
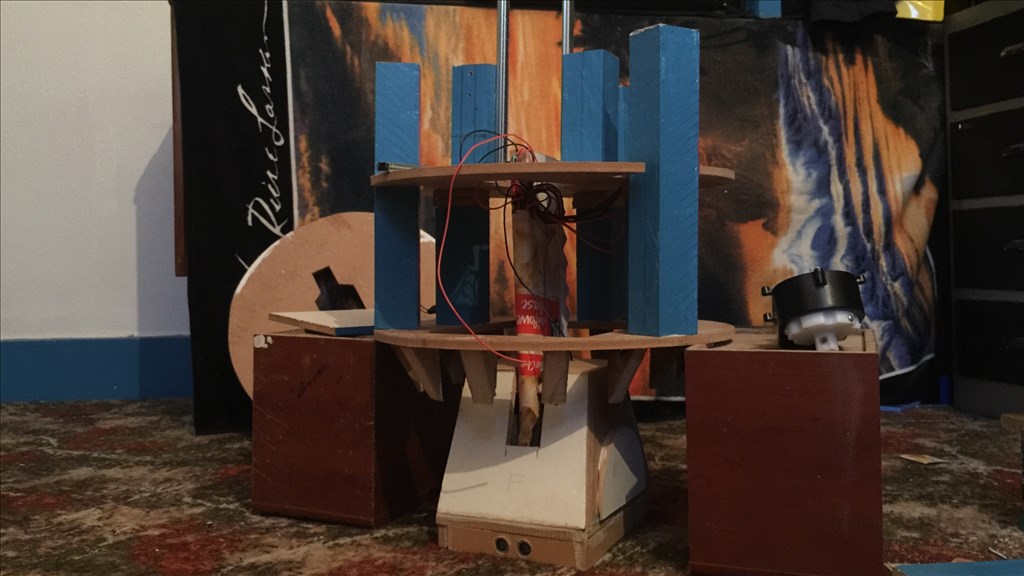
I though I'd have a laugh at this point, and placed the dome on to the body frame.
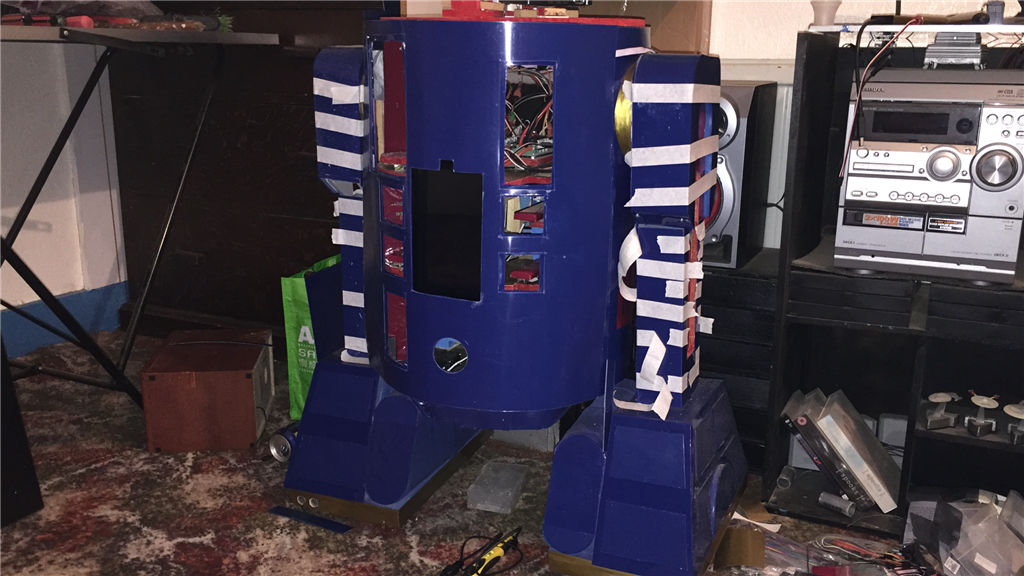
Looks nothing like an Astromech droid, lol, and looks a long way off from doing so. But at least it has a bit more of a structure now, and at this point, I'm probably about half way through the build (excluding electronics). He also looks a bit taller than I thought he would be, but the measurements are correct, so it's all good.
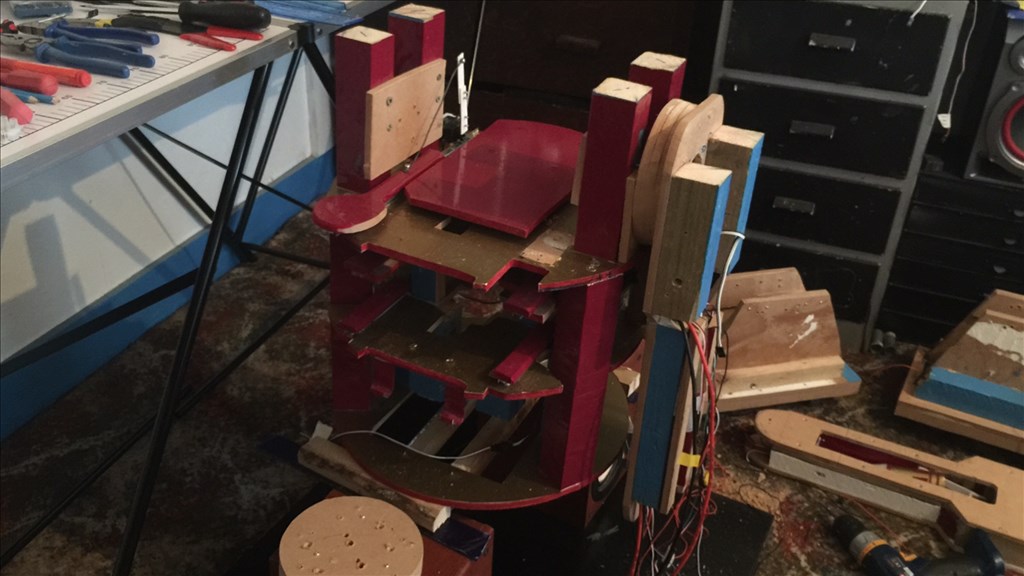
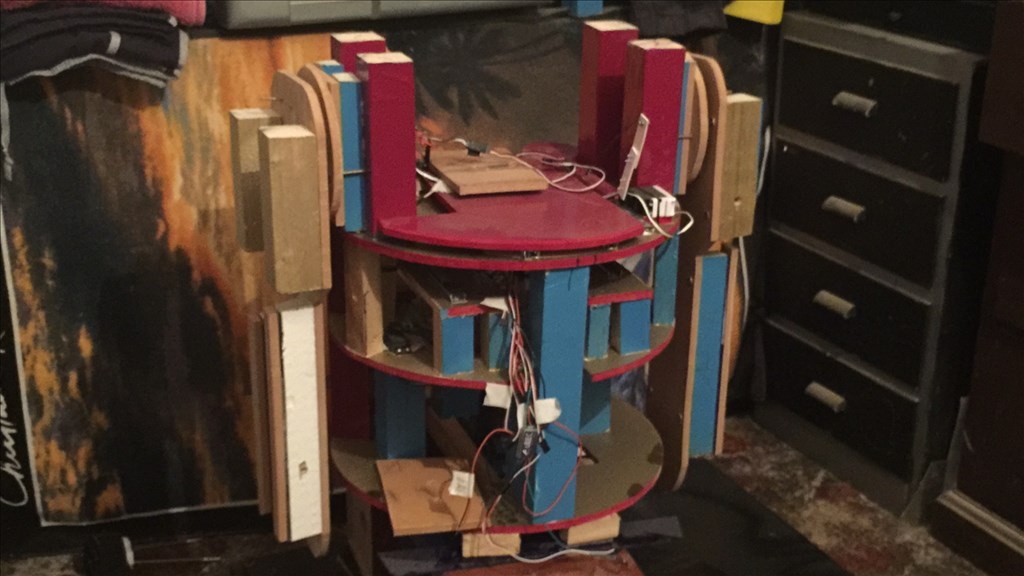
I then started Work on the upper tier where I cut and fitted four 2x2 supports for the outer leg brackets, which I will be working on next. I also added a long utility runner with a servo, two further non servo powered runners towards the centre of the platform, and a lever mechanism for a manipulator arm. The two non servo powered runners now supports a retractable electronics platform, which I will be able to manually slide in and out for easy maintenance. I added a little bit of colour to upper tier which is now fixed to the frame and waiting for the outer legs to be made and fitted.
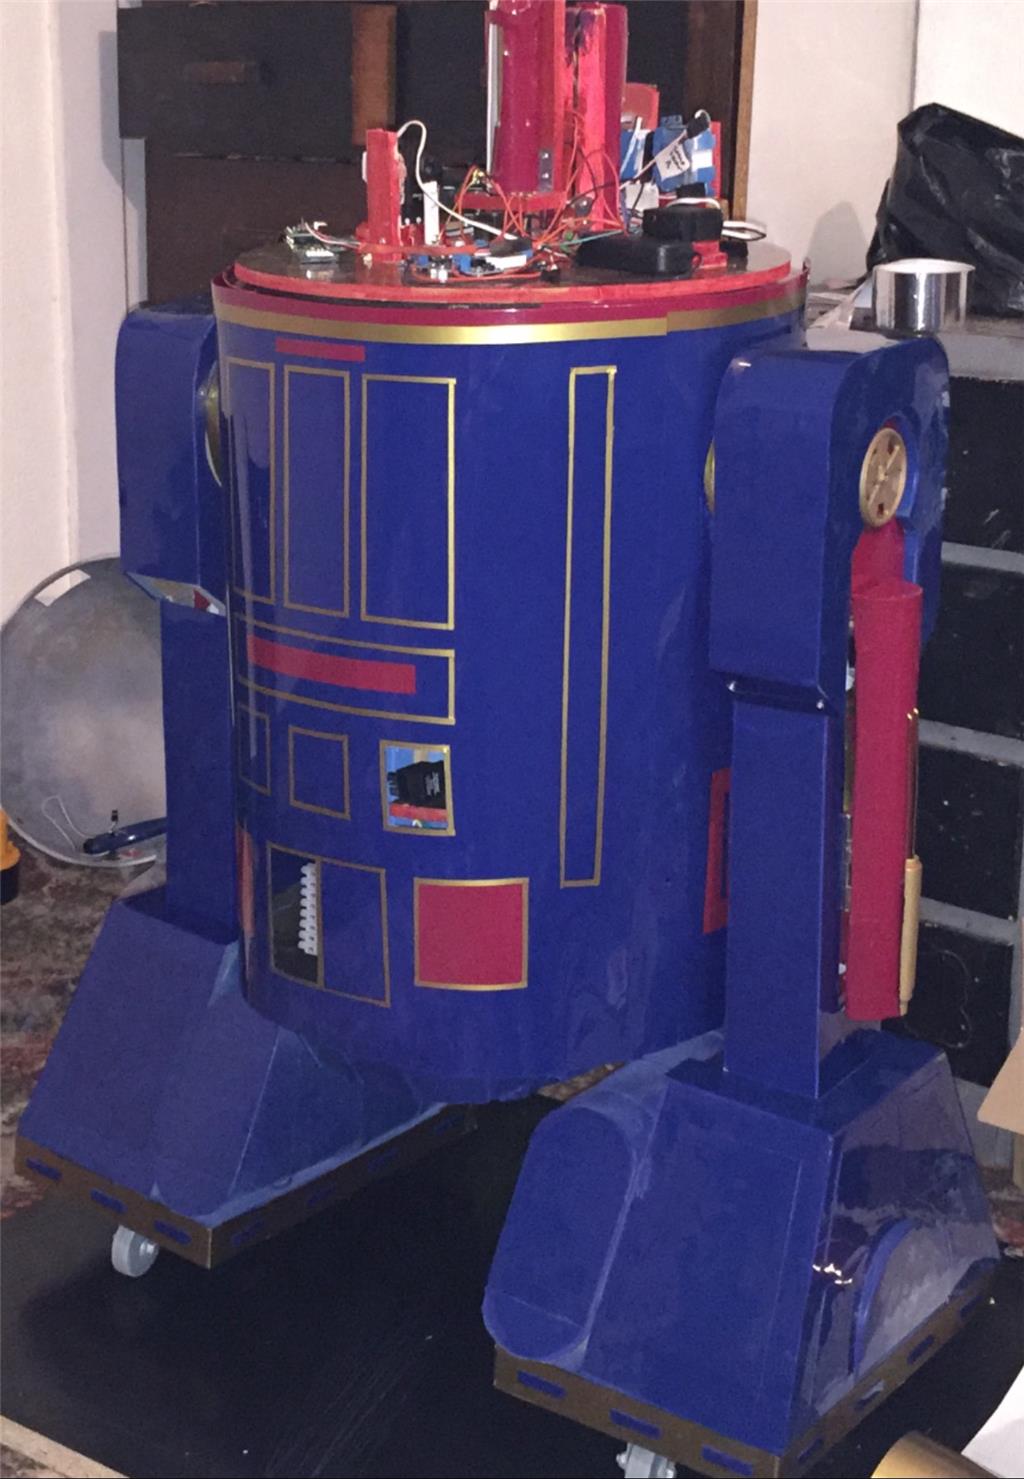
Finally, I added some more gold and burgundy colouring to the rest of the body which makes the whole thing look a bit tidier (kind of has an IronMan look about it, which was unintentional, but kinda cool). Now it's starting to look like something other than a load of pieces wood fitted together. I still have a few more supports to cover and I'm going to respray the foot and leg with a darker, glossier blue which will better match the HIPS sheet skins.
In the next update, the outer legs should be done, and that's a point I'm excited about because that will take me over half way through the building phase, and should start to look more like a droid, hopefully.
(I think I will have to find some smaller speakers for him though eyeroll)
More soon. ;)
@SteveG Thanks big time for sharing the build with us. It is fun to sit back and have a Beer or 6 and watch someone else's project come together. I really looks great. I have to laugh, you use the EZ Bits to get things done easily, like I do.. (Gripper etc.)
I look forward to seeing your future posts.
Ron R
@Ron.
Your more than welcome with me sharing this build, and I'm pleased you're enjoying the build diary. Yes, beer and building robots don't mix, but it sure does help... sometimes, lol. Thanks for the kind words. I'm pleased how it's coming along, but a little disappointed I had to leave the retractable leg out this time.
Oh and BTW, you gotta love them EZ-bits, don't you? I had these grippers knocking around for a while so I thought I'd put them to good use. :)
Are you using plans from the astromech builders club? I got all the plans and half scaled them for a mini build I was going to do. I believe I started a project showcase on it, but I can't be sure.
@Technopro.
I'm not really using plans as such, as I figured I'd challenge myself and do the build with little reference. I do check some photos from time to time, and the measurements I found online, although I'm not sure what the source was.
By the way, it's good to see you on the forum again. I haven't seen you around much. I hope you're keeping well. :)
Nice progress Steve. It's coming together nicely. It's amazing what a little paint and some hardware will do to help being the build forward.
I was sad when you decided to ditch the retractable leg. It would have been so cool but I understand why it had to go. Somethings just don't fit and work the way the brain invasions it. The way my mind works is after I had made up that list you came up with and saw all the negatives and only two positives I would have spent a year working to overcome the downfalls. Then after all that I'd end up scrapping it anyway because I found a better mousetrap. tired I'm actually at that point with my B9 build. I'm considering scrapping a big part of my sound system to make room for a better power plant. So my hat's off to you my friend for being able to make the hard decision when it needed to be made. ;)
Ya, I agree. You'll need smaller speakers. :P
@Dave.
Yeah I don't need to make legs. Just throw some motors in the speaker boxes, lol. :P
Seriously though, I say I had a few beers and had a good think about the retractable leg, but the truth of the matter was I put the build on hold for nearly three days to decide which way I should go. Better materials, better planning, and a much better bank ballance, and I would have persevered with it as I really would like to have done it. stress stress
Wow, that's a big change fo B9. That's quite a sound system you have there, but again, the pros and cons for a better power system... I would probably do the same if it's any consolation.
Anyway thanks for everything you said. It was very nice to read. ;)
wow your build is looking incredible! Im sorry about the third leg but the astromech will still turn out great. I often find myself rethinking and having to change the design on the go... Its a hard thing to do but I think in the long run you will be happy knowing you did what you wanted :)
@Robot56.
Thanks buddy. Yeah I think you're right about the decision. I'd rather be happy and have something reliable than have to keep adjusting and worrying about if things are going to work correctly. Anyway, the extra space will give me room to add a few goddies, so it'll be worth it.
Starting on the outer legs tomorrow, so that'll keep me busy for a while.
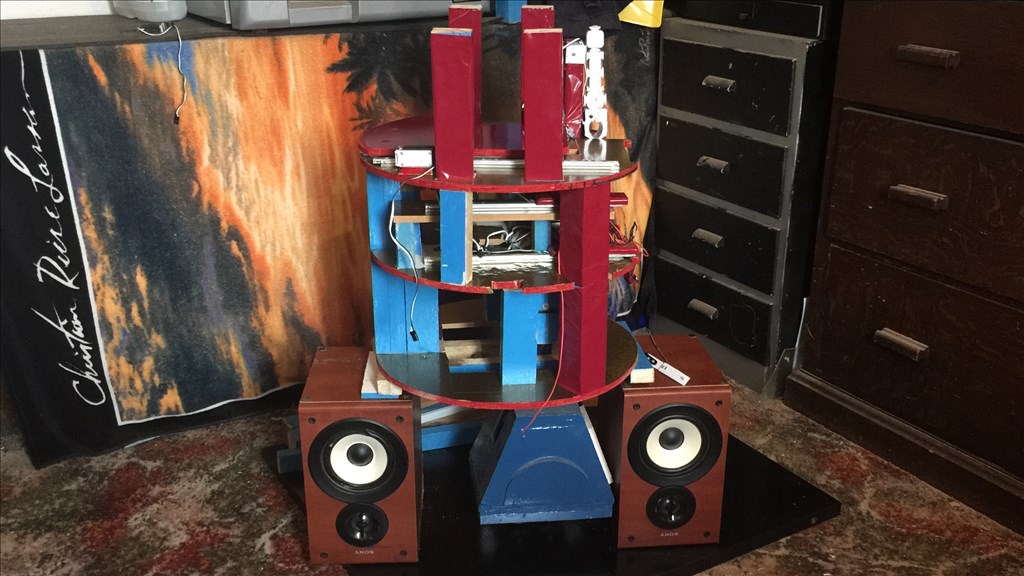
Day 42 (14th September 2015)
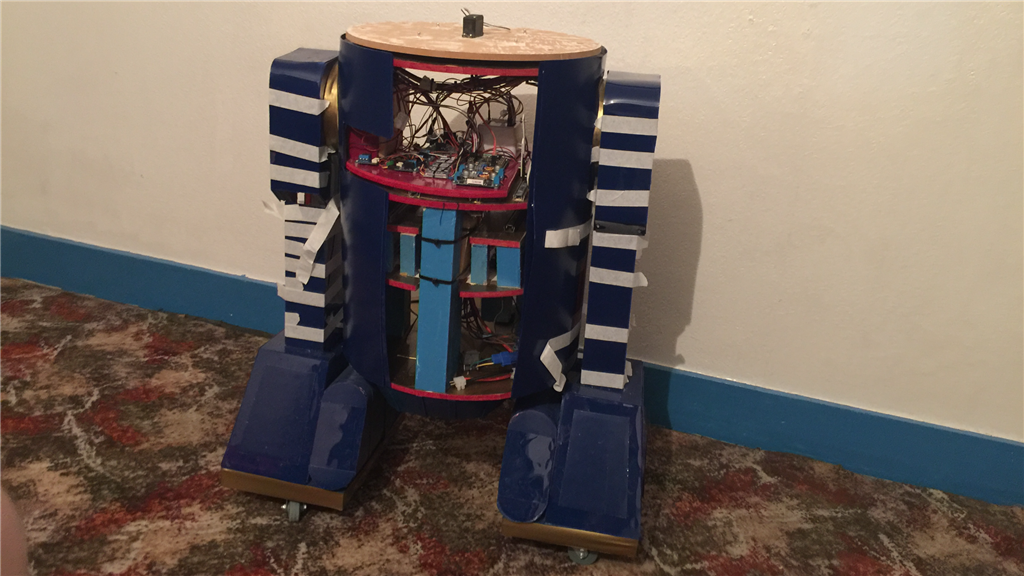
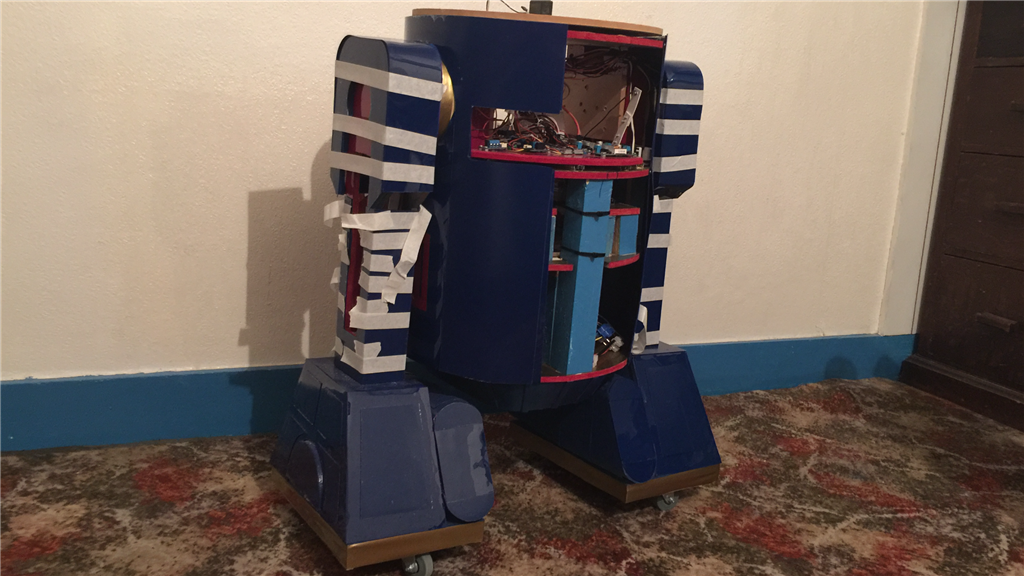
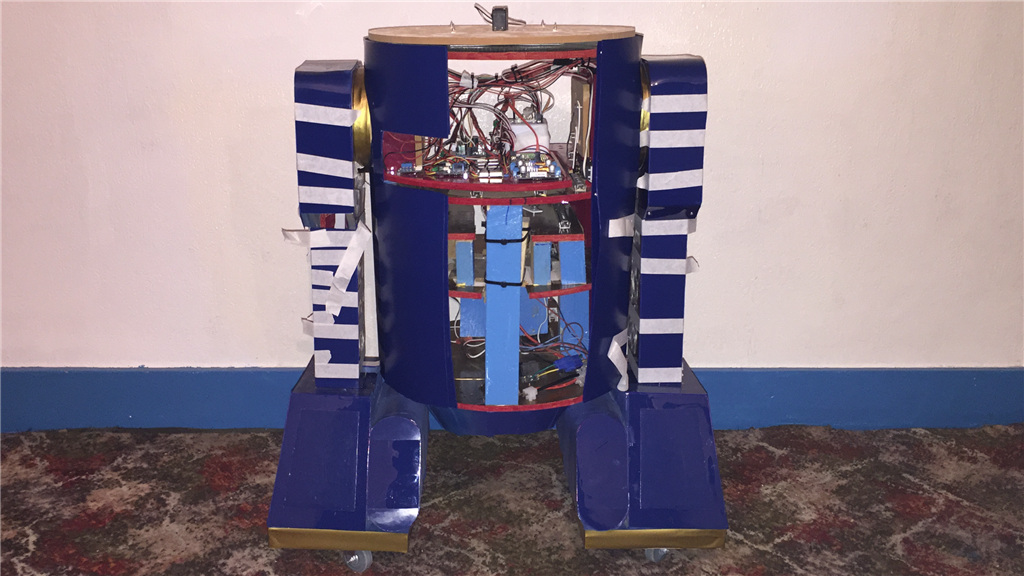
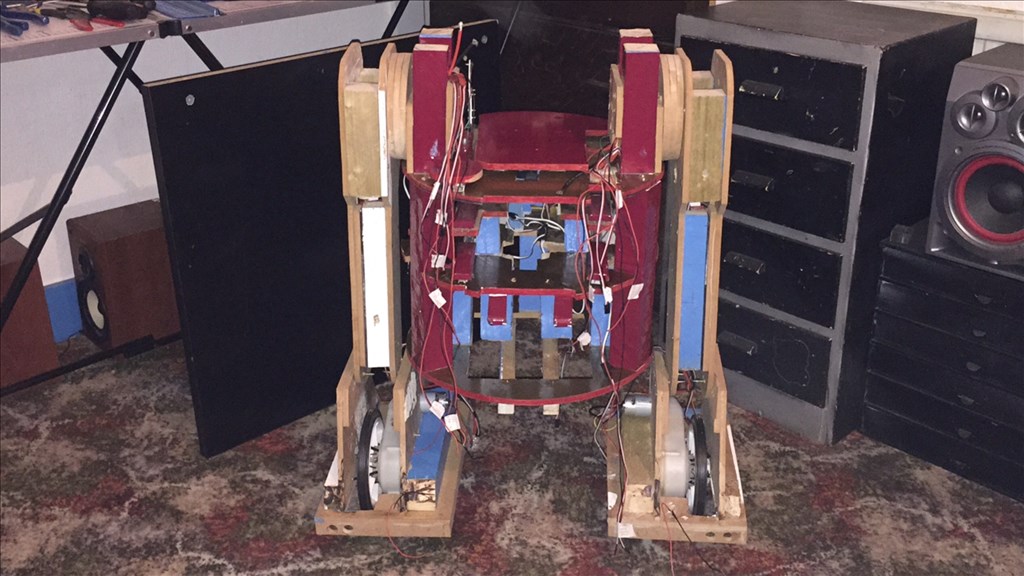
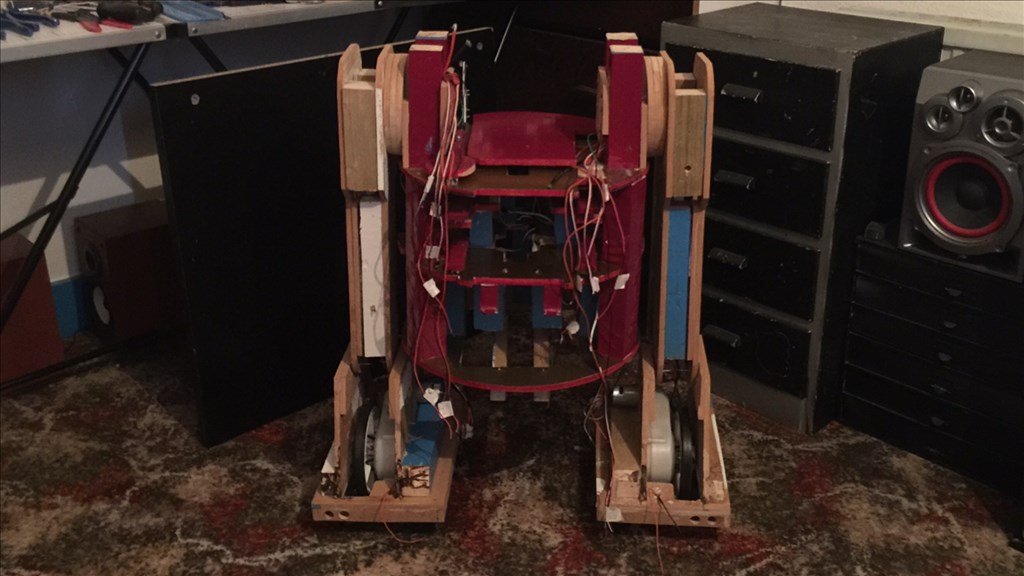
E4-B4 is now standing in his own two feet...
E4-B4's status has been changed (or rather, been demoted) from Project to [i]Prototype[/]. Someone said to me "it will be a rewarding but challenging build", and boy they weren't kidding when they said challenging, lol.
As I mentioned previously, I had to leave out the retractable centre leg for a couple of reasons, and after a lot of trial and error, I'm now leaving out the motorised shoulders for when he lays back in three leg mode. This was because the overall weight of the wooden body was just to heavy for the (quite powerful) motors/gearbox to reliably work. So I have now removed the centre leg completely, and removed the shoulder motors and fixed the outer legs in place. This I was not happy about as I have now lost two main features, so I will continue the build as a prototype as he is already partially built and use him for script testing and experimenting, then sometime next year I will use strong but much lighter materials to do the build I originally wanted to with all of the movements I wanted him to have.
So, on with the update.
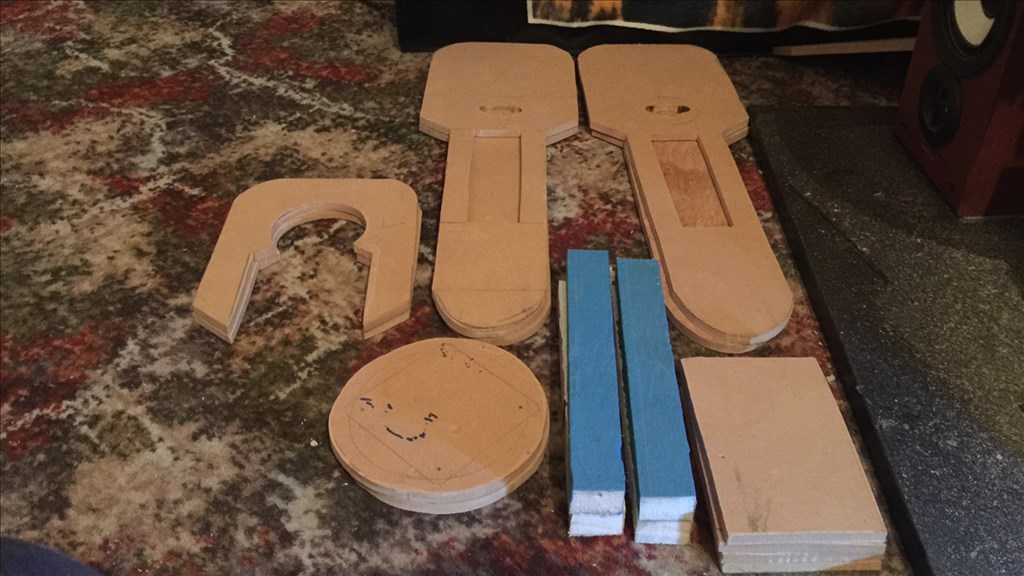
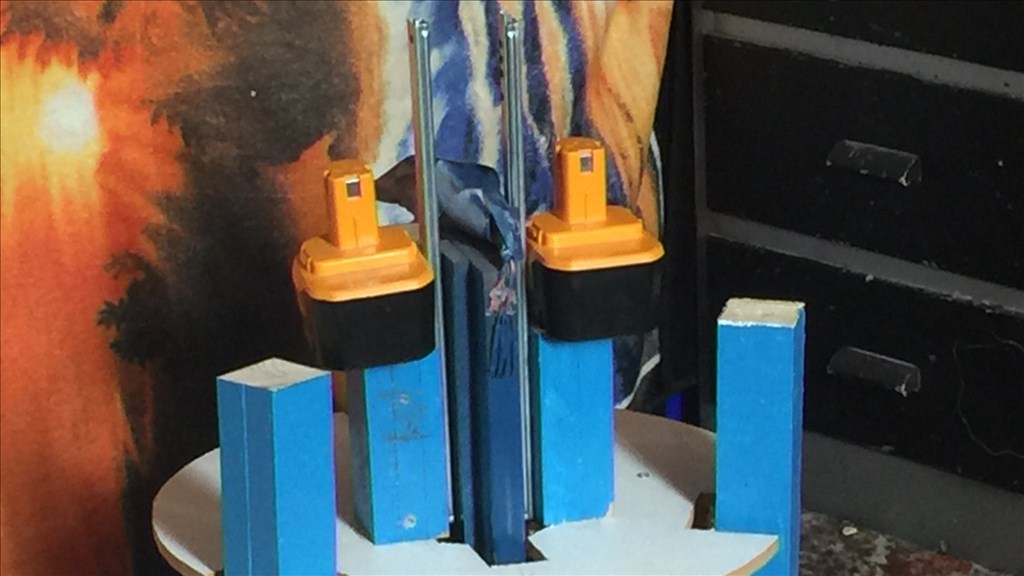
Using some MDF sheet and a mix of 2x2 and 2x1 batons, I measured and cut the necessary lengths and shapes for the outer legs.
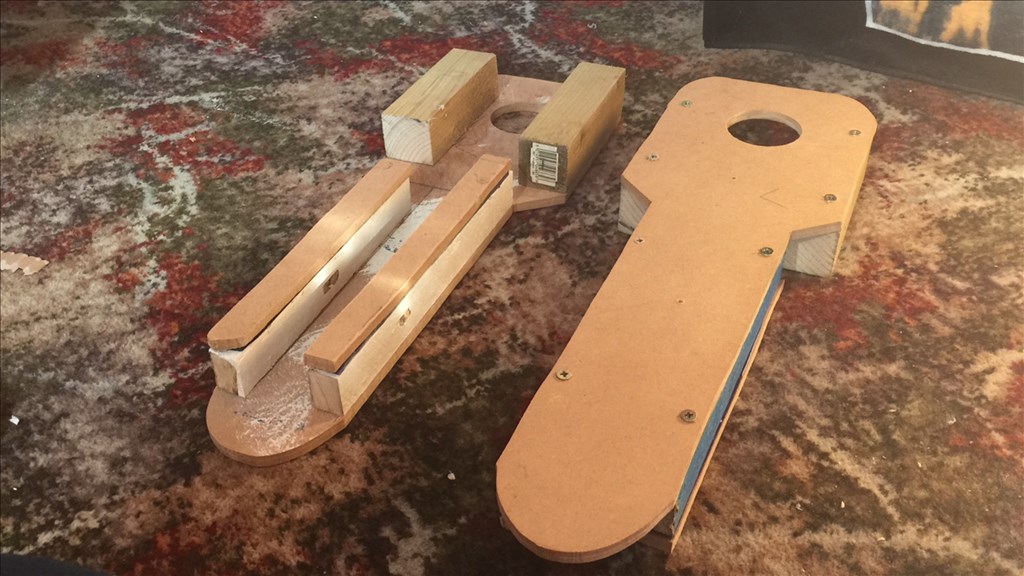
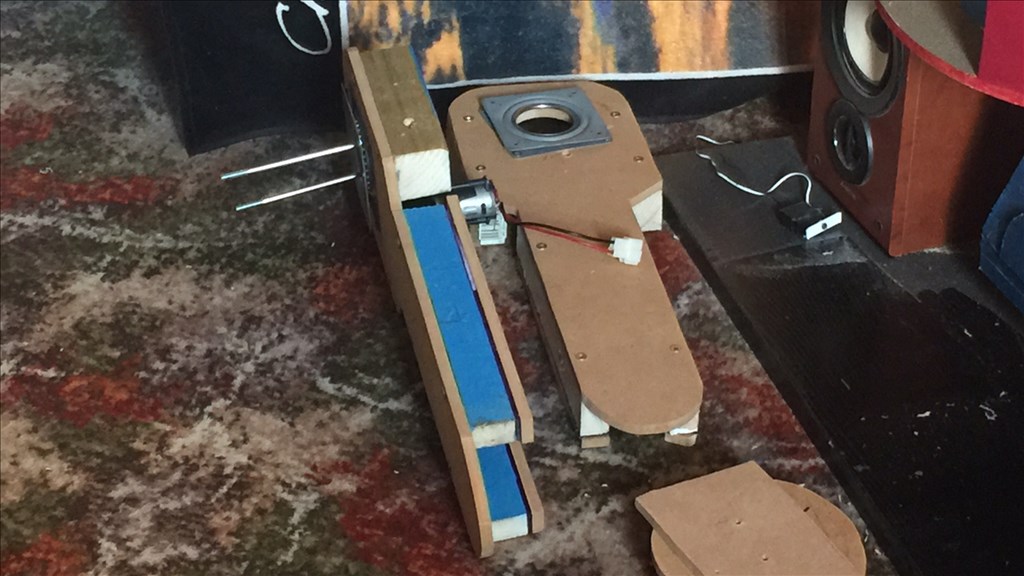
Originally, I had fitted two motors and bearings which I attached to the body.
But with the decision made to have the legs static, I removed the bearings and motors, cut some new round spacers and attached the legs to the body. I then traced all of the necessary wiring for servos, drive motors, lighting, and ping sensors.
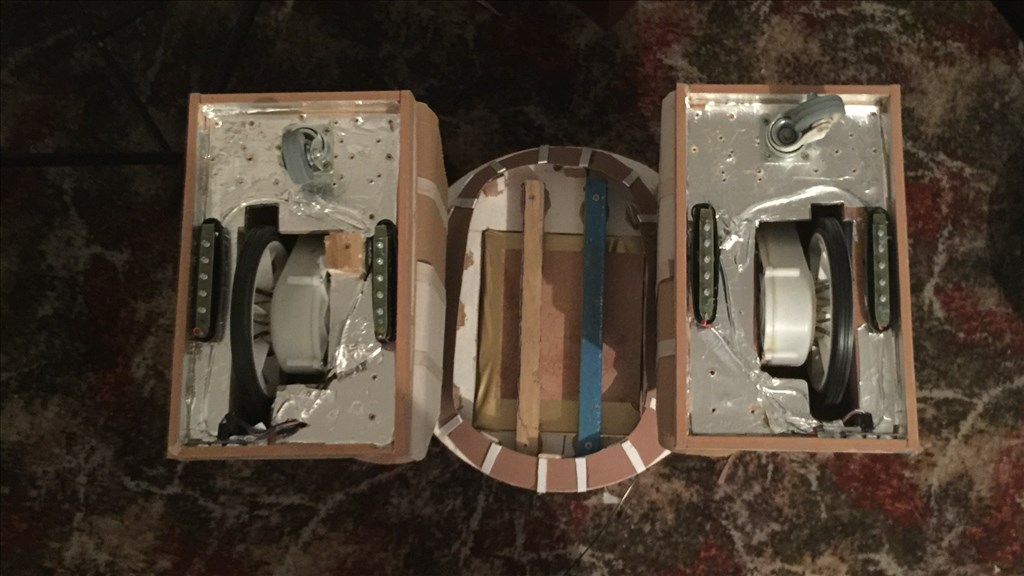
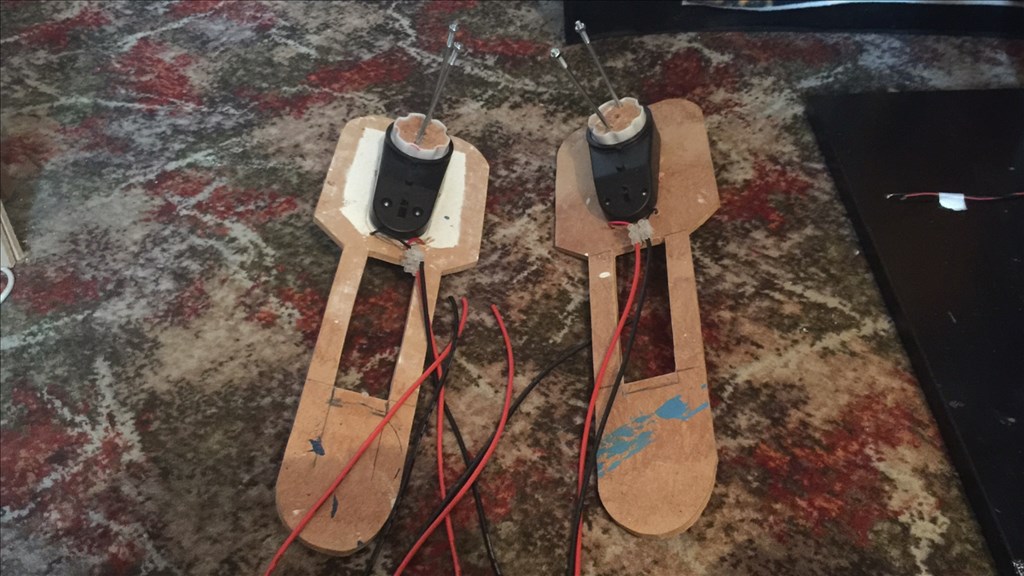
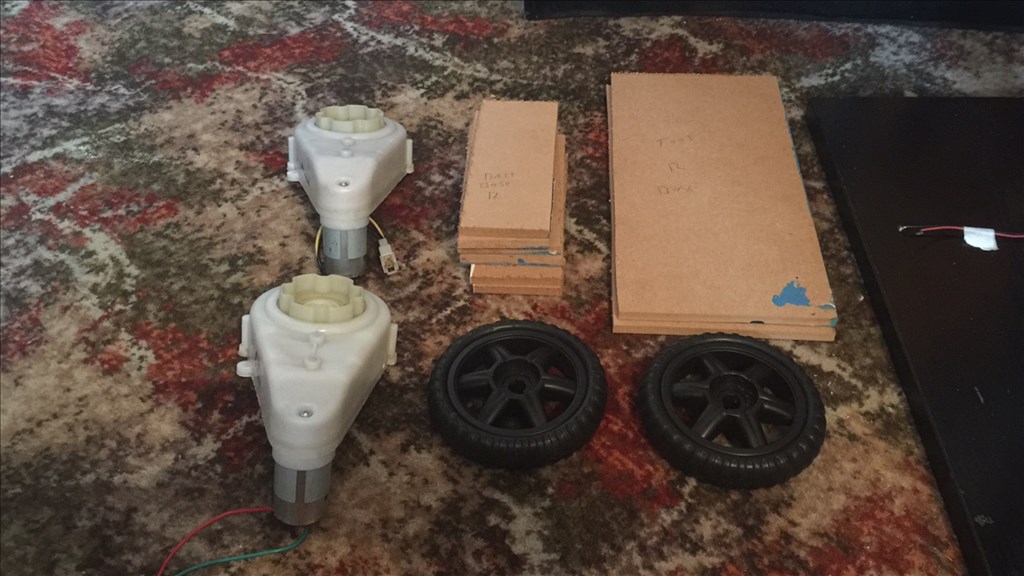
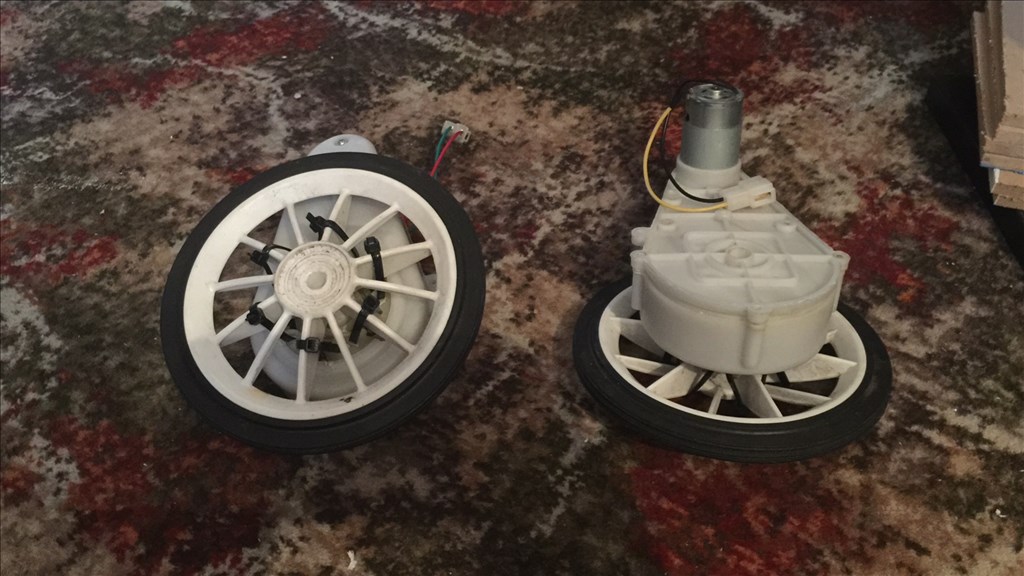
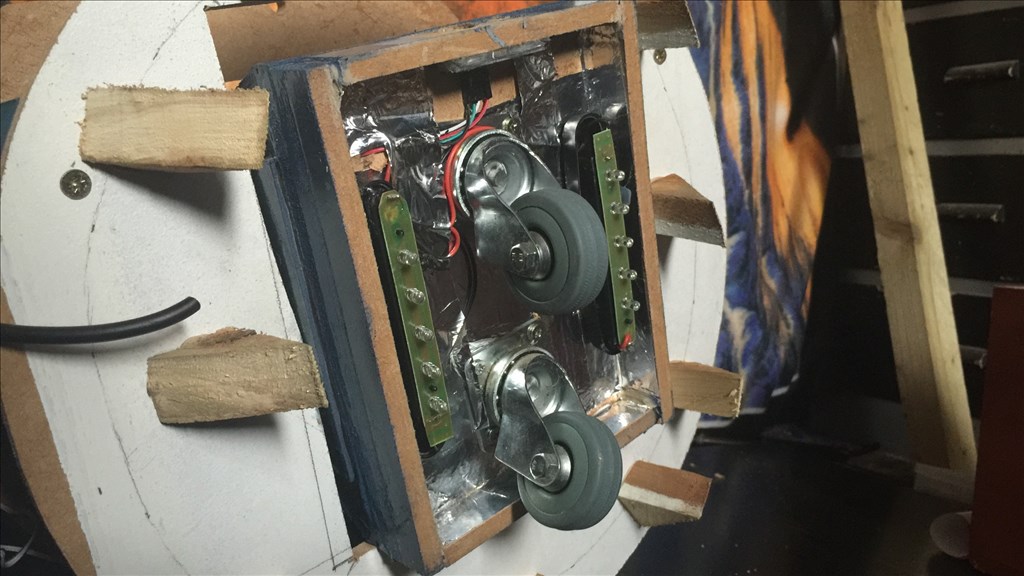
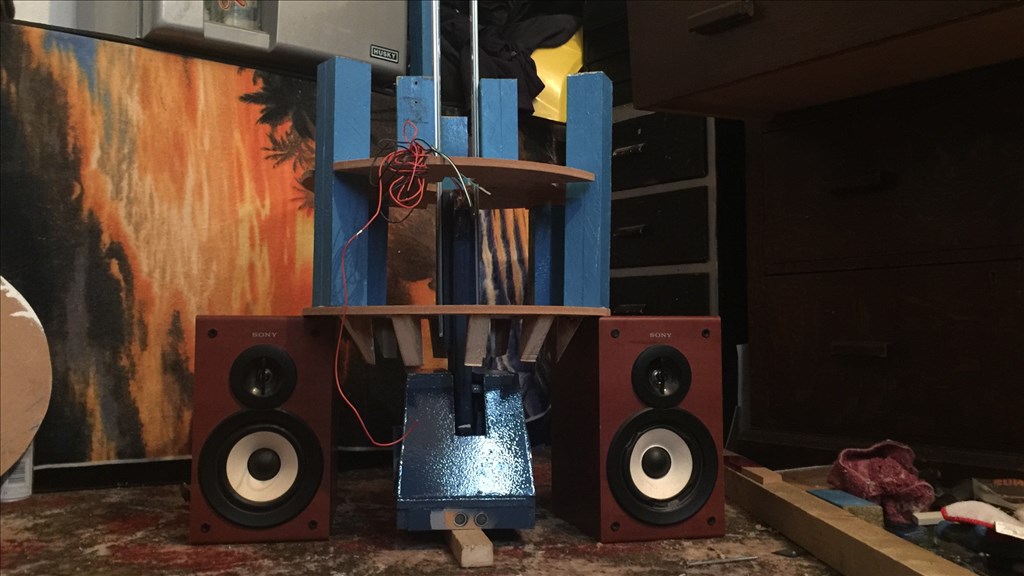
The next step was the two feet. Again , the frame work for the feet were cut from MDF and 2x2 batons. The motor/gearbox assembly were fitted along with rotating caster wheels. Some holes were drilled in the foot skirts to house ping sensors, and under foot lighting was added.
I had an absolute nightmare getting this guy to drive in a straight line. Measurements on a robot build, any robot build, is important as many of you will attest to, but on a build like this, they really do have to be spot on. But even with pretty much spot on measurements, with the main drive wheels in his feet, I tried adding and removing caster wheels, adjusting the caster heights, raising and lowering the overall height of the legs, and tried in different floor surfaces, and he either pulled to the right or to the left (mostly to the left)
But after two full days of adjusting, trial and error, and dialling in, I'm pleased to say that I've got E4 pretty much tracking straight and true. Nothing special, but here's a short video demo of his first successful drive test...
Each foot now has the drive wheel and one rotating caster fitted to the back of the foot. What I will do for his movement will be to add ramping scripts the forward, reverse, and turning for more elegant movements and to reduce the risk of tipping over, and add turning scripts for the U turn style movement that R2-D2 does in the movies.
But in regards to the build, the next thing I will do will be to give him some new shoes (basically covering them up) and add the battery boxes. Then it's on to... the head, and that takes me over half way of the build process.
Fun Query:
After now losing the two main features I wanted, I watched Star Wars ep4 to give me some motivation to carry on. So, with all of the military hardware the Empire has, a humongous heavily armoured battle station, massive star destroyers, artificiality intelligent robots, powerful weapons, the power of the dark side of the force, and rely heavily on troops, you would think that the empire would splash out a little bit more on better armoured suits for the storm troopers. I mean, one shot from a laser blaster... and they're toast, lol!
You may have given up some options that you liked but what you presently have is REALLY GREAT !
Thanks Doc. That's very nice of you to say. It's words like that which will push me through my disappointment of leaving options out for now, and carry on making him the best I can. :)
Great work! You must be thrilled to see it moving around.
Thanks Dave. My friend, you have no idea how pleased I was to see it move, and in a straight line :D. Looking forward to getting on with the rest of the build now.
Steve, Great job. I really like what you have done so far. I also loved that it moved in a straight line. That is more difficult than most people know. I assume you are using encoders in the motors.
Hey Dave.
Thank you for your comments. I'm really pleased to hear that you like what I've done so far.
In regards to the motors, no, I'm not using encoders. Just the two 12v DC motors/gearbox going through a 15 amp motor controller/H-Bridge. I have slightly offset one of the motors PWM by two points to help it track straight, which I think was causing some of the issues I had. Like it has been said in the past... not all motors are created equal.
Day 49 (21st September 2015)
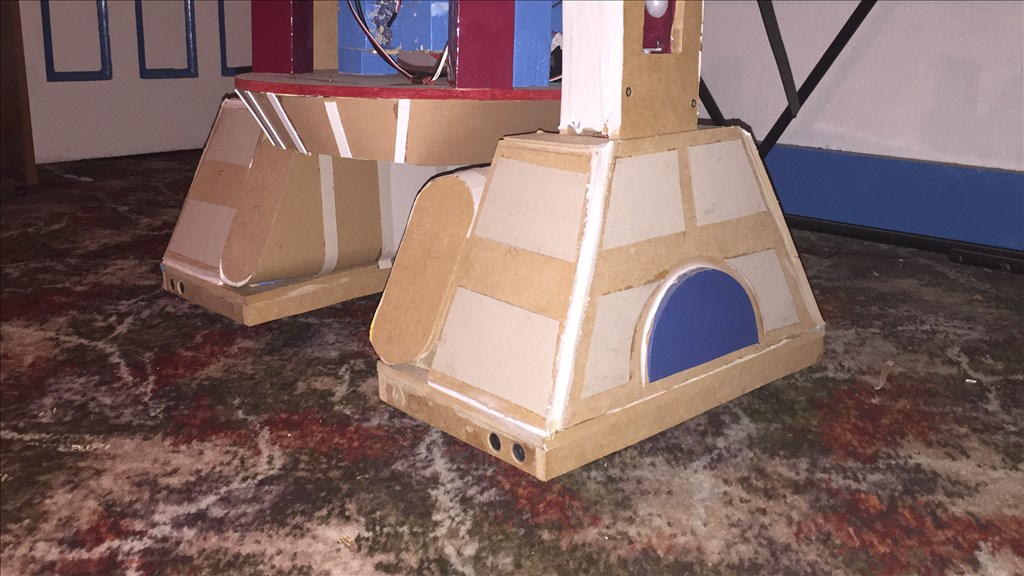
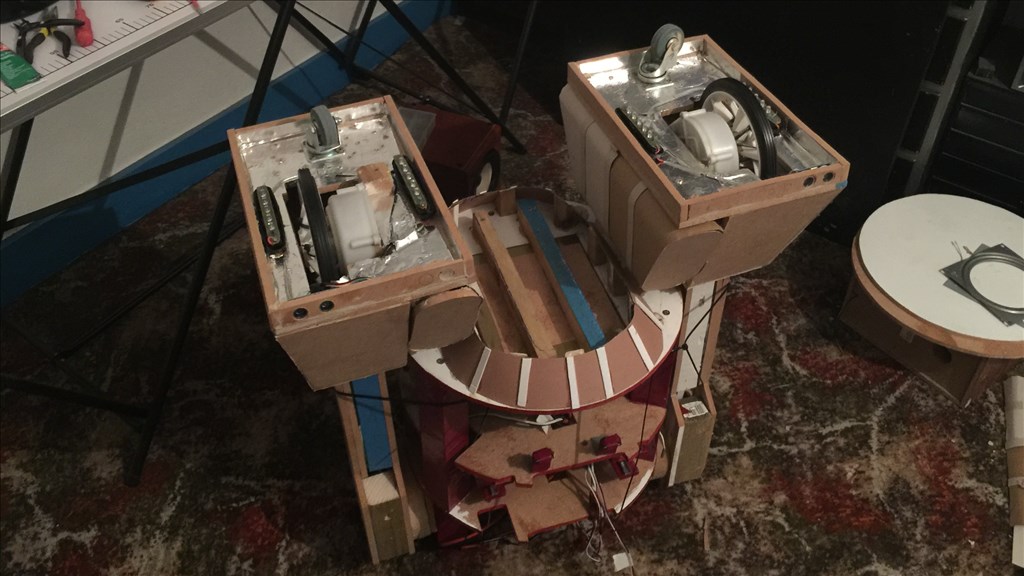
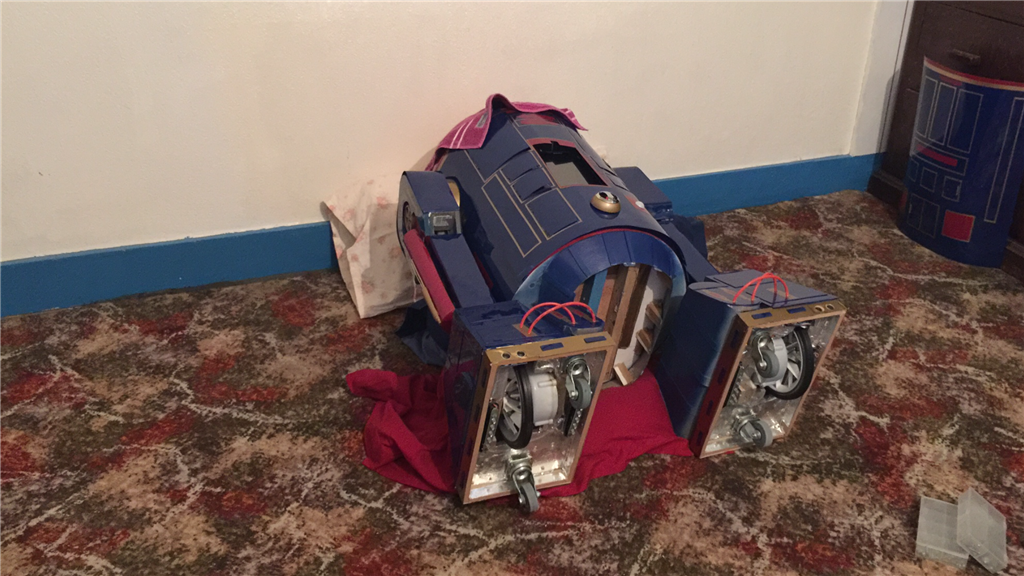
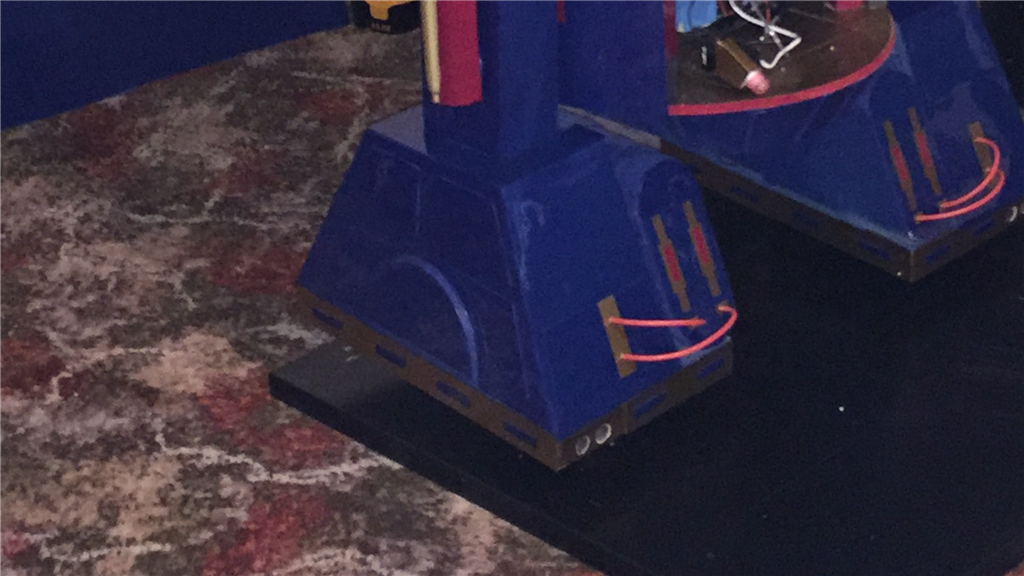
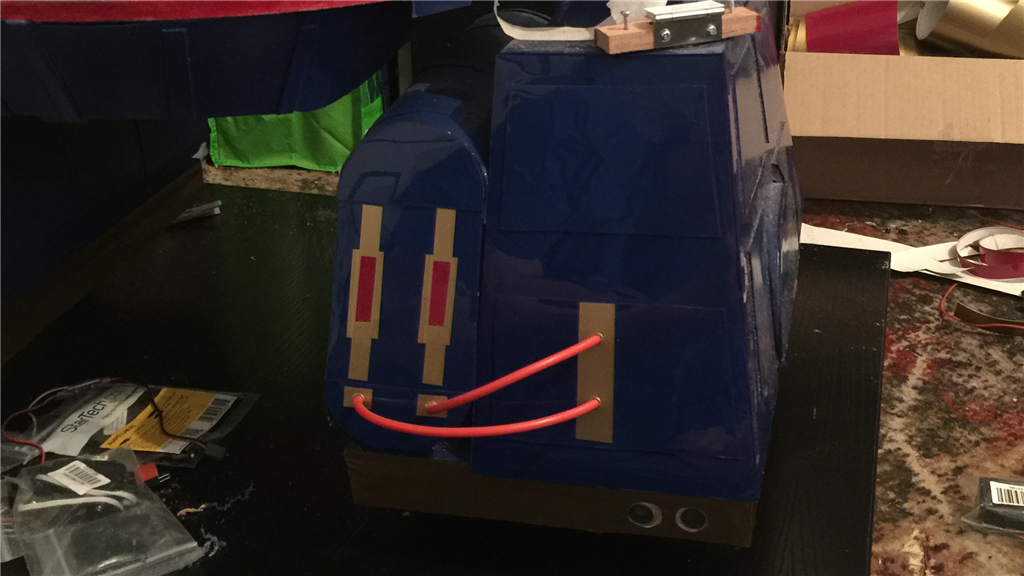
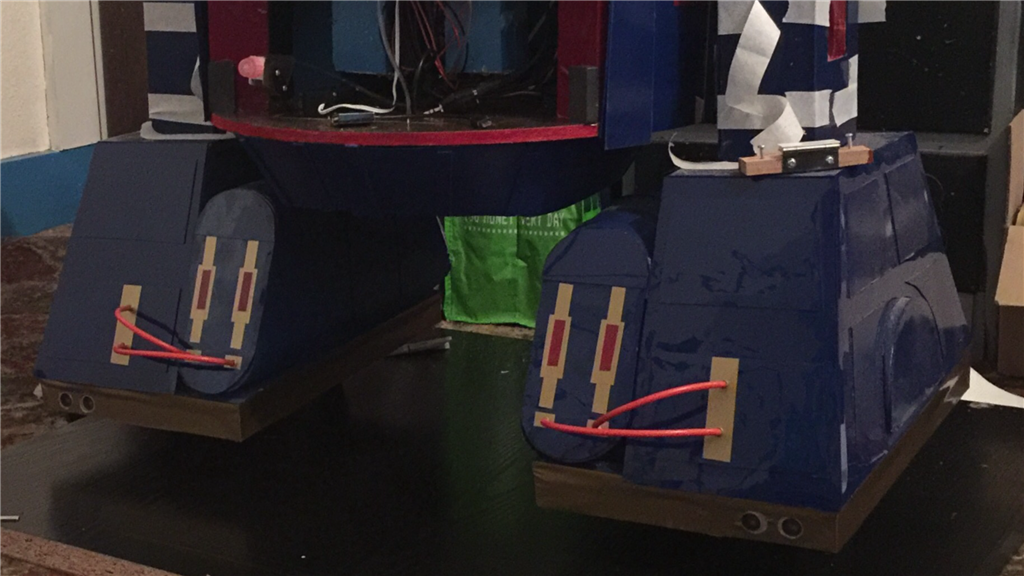
A short update to show what I've been doing over the past few evenings. E4 has some new shoes...
Ive made some more progress over the last few days, and the end of the actual build is getting ever closer now. Here is where I am at...
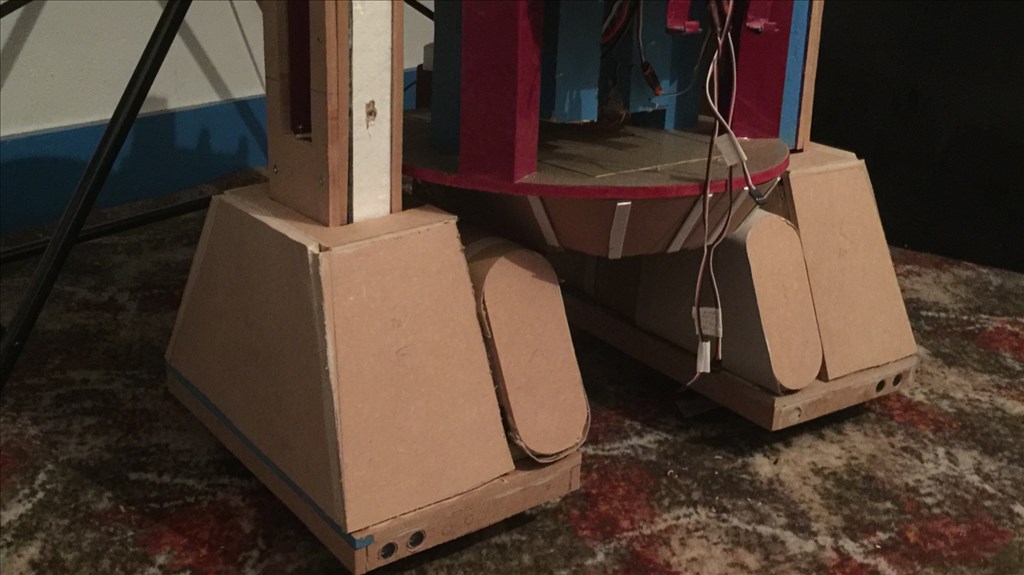
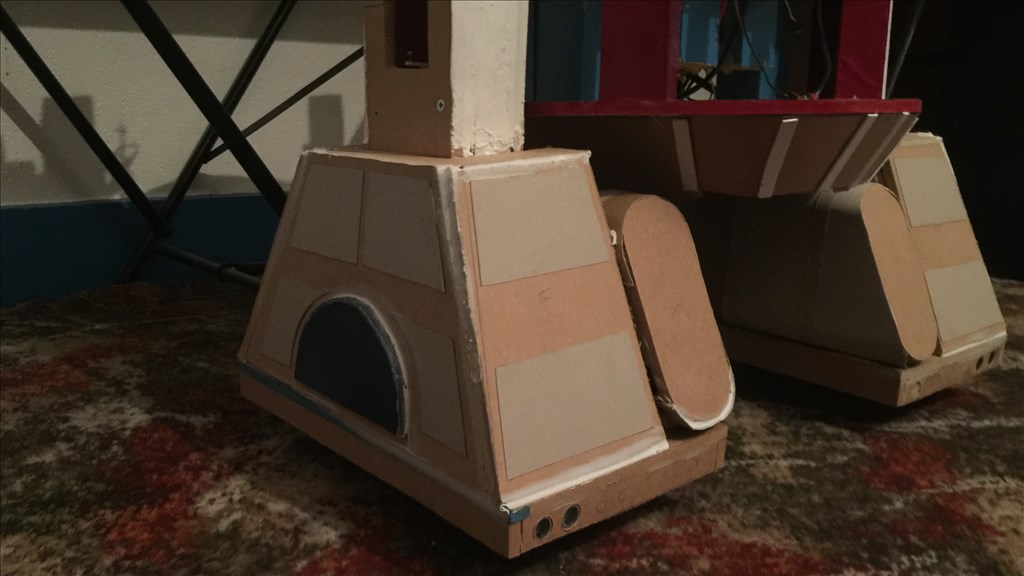
To get the feet finished, I cut out some MDF panels for the battery boxes and feet panels. I decided to make the battery boxes a little different to what R2-D2 has, which are slightly longer and the front and back panels slanted.
While E4 was doing a hand stand, I have refitted the body skirt supports and cut out the skirt panelling which is now fitted to the body. I added some detailing and it is now ready for paint.
Finally, I cut, filled and fitted the foot panels and added some detailing that will all be painted the same colour. I was going to give him a Nike swoosh or some Adidas stripes for his new shoes, but quickly decided against it :P. The final detailing will be added after the filler is rubbed down, and they are primed and painted.
I've filled over the side leg panels and are waiting to be rubbed down, primed and painted, so it's a trip down to my local auto accessories shop to get the paint mixed.
And I couldn't resist putting the dome on to see what I'm working towards...
Over the next few days, I will be getting some of the electronics fitted, such as the SSC-32 servo controller, relays, and regulators, then get some of wiring traced and connected to the EZ-B. I will also make a start on the head and start to get the inner body skin fitted.
Until then. :)
Steve G, That robot is looking awesome! Great build and I love your approach. Can't wait to see more. Steve S ;)
Thanks Steve. Very nice of you to say.
Yes the materials I'm using are mostly reclaimed stuff I had laying around with all of the electronics being new. The really fun part is not to far away now... that being the electronics. I've already got some of the servos fitted, but still got another 20 or so to install as well as a few other bits and pieces to squeeze in to the body.
Doing the head shouldn't be so bad, but I think adding his skin will be challenging though. Still, it's all part of the fun. Once I get some more of the electrics sorted I'll post another test video.
Thanks again. :D
Day 89 (31st October 2015)
eek eek HAPPY HALLOWEEN EVERYBODY. eek eek
It's been a while since the last update as not much progress has been made. I must admit that I lost a little bit of motivation, so decided to take a couple of weeks out to recharge my own batteries. I took the time to write some tutorials for the community as some of you know, which gave me something new to focus on that helped a great deal, but I'm back on to the build now, and hoping to get E4 finished by Xmas (this year :P).
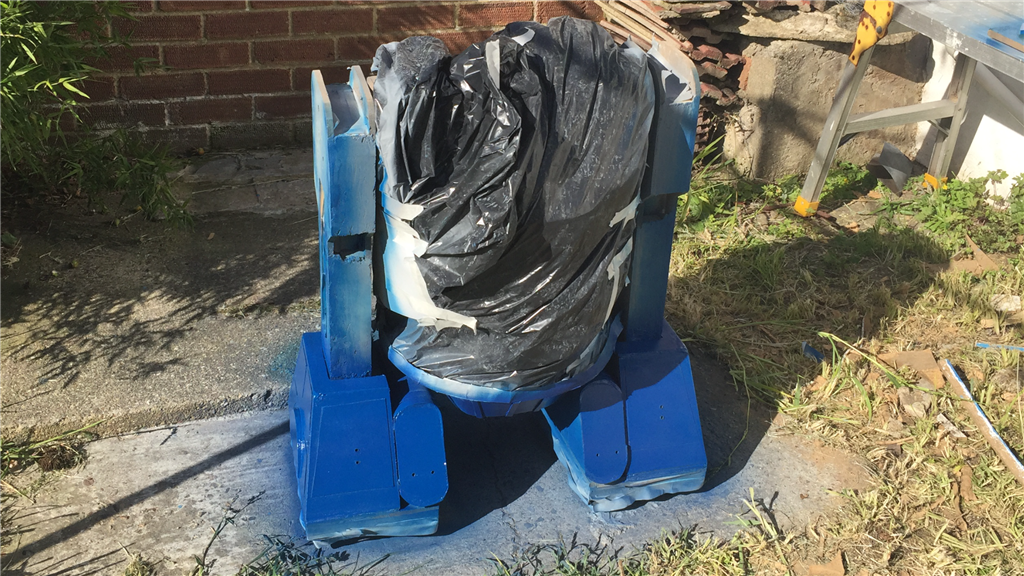
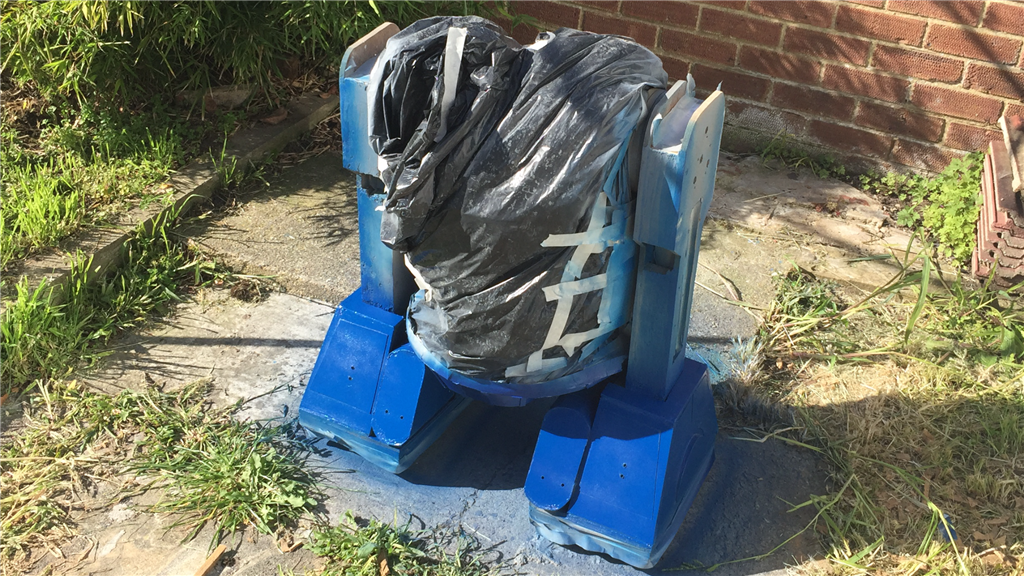
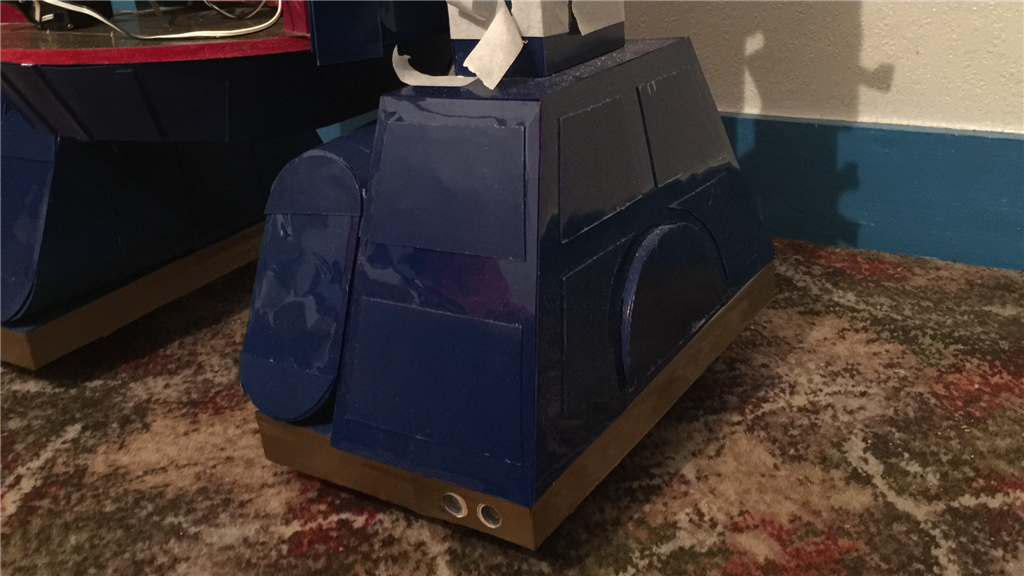
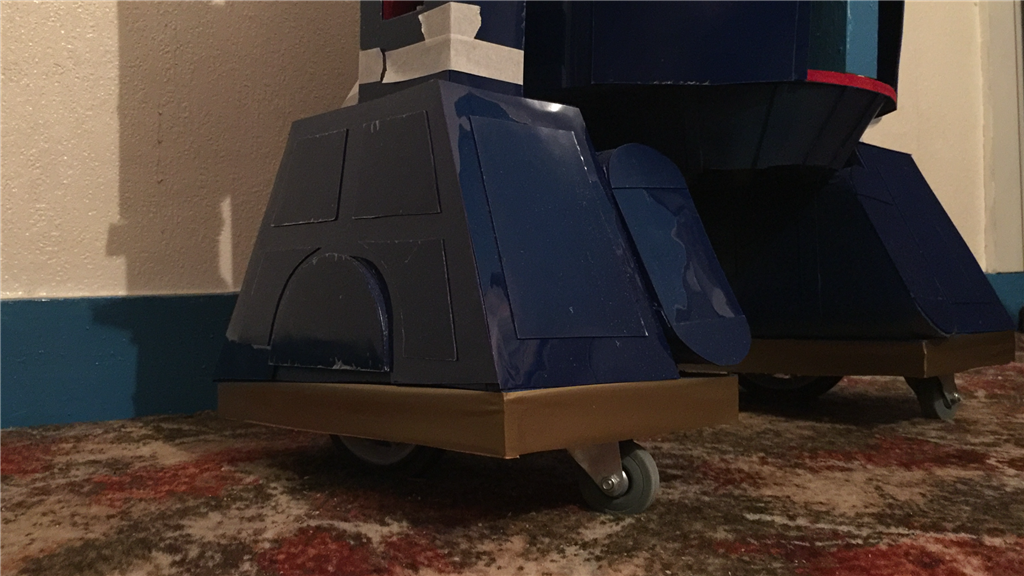
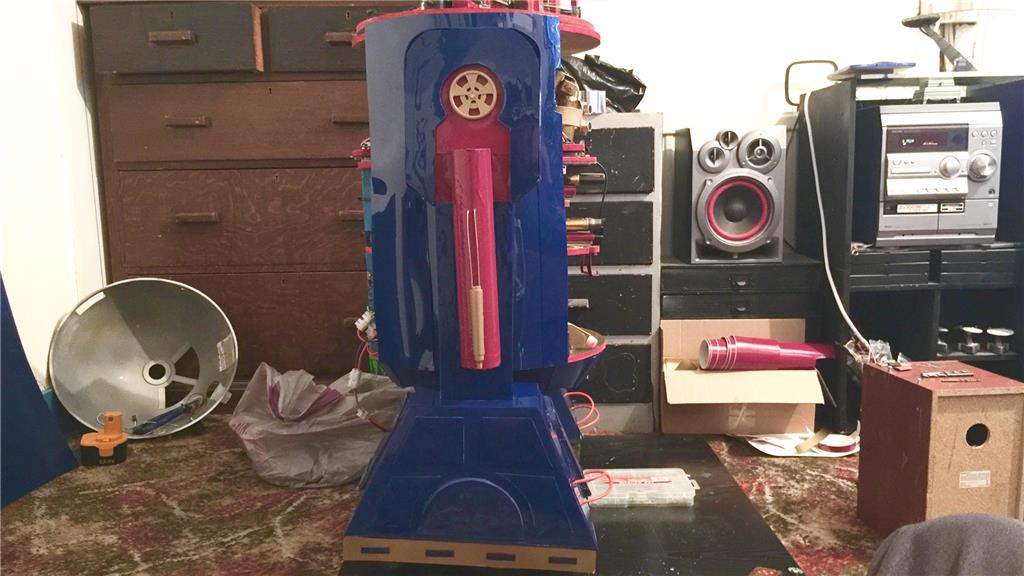
So, where's the build at now? Well, all of the unremovable feet and leg panels have now filled and sanded smooth. Heading in to October, I got lucky with the weather, so this gave me the opportunity to get a lot of the painting done. Below are a couple of snaps with the priming done and E4's first couple of gloss blue coats...
With the feet, legs and skirt now painted and lacquered (clear coated), I set him aside for a couple of weeks to let everything properly cure. I have to say that I am very pleased with the end result. The panels have now been covered with cling film to protect the paintwork while I continue with the build. Last little job for the feet was to paint the lower panels of each foot, gold.
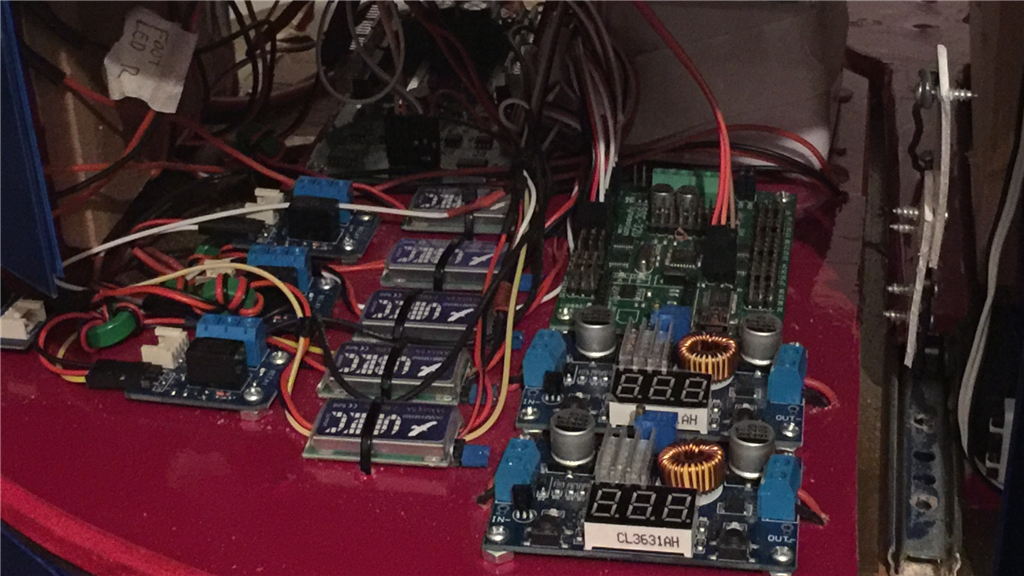
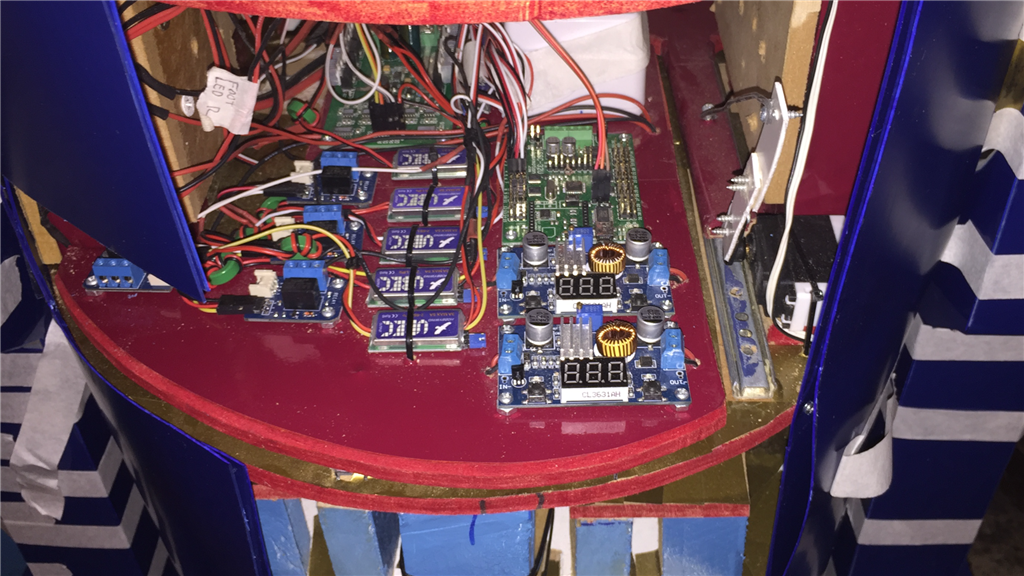
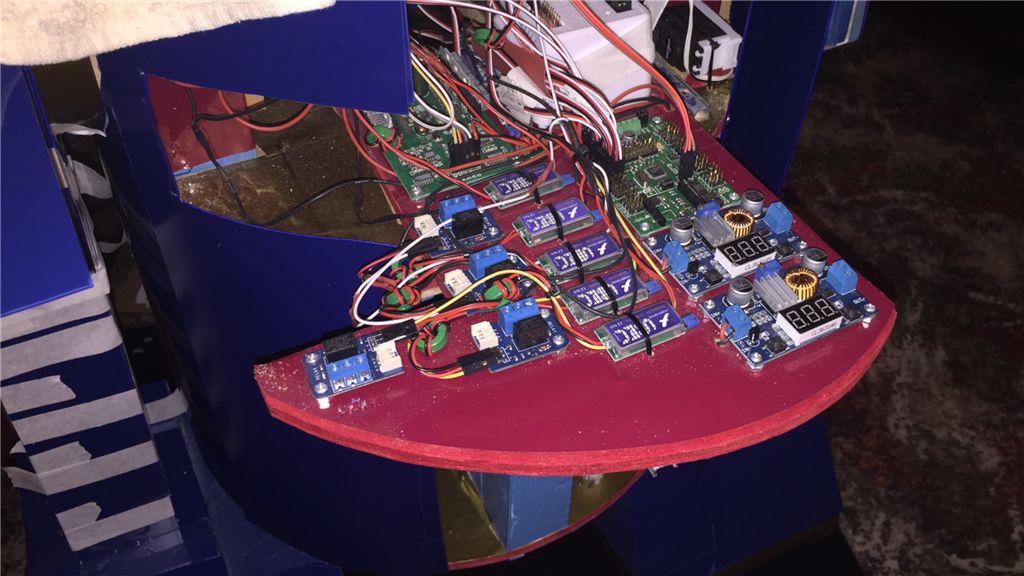
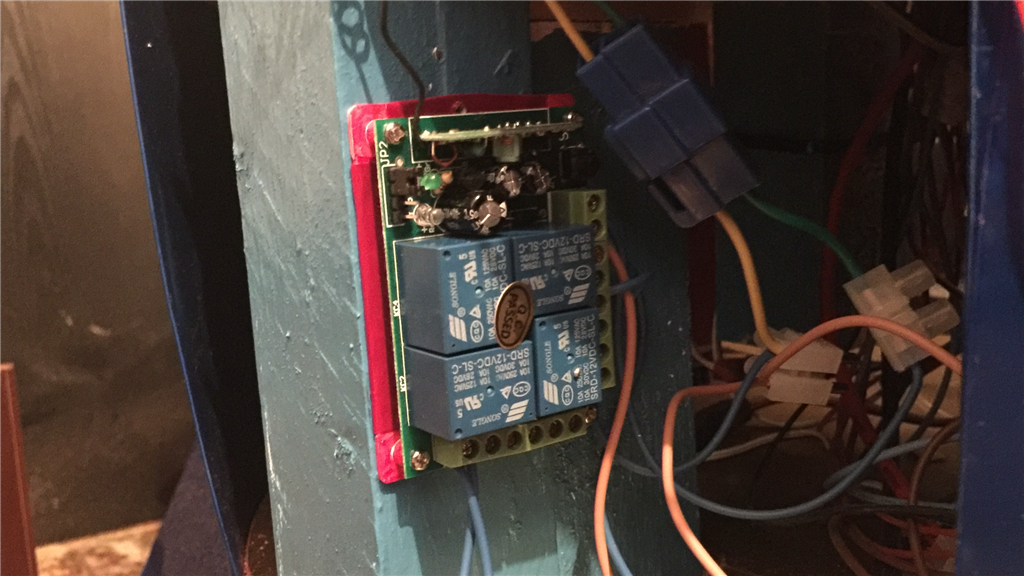
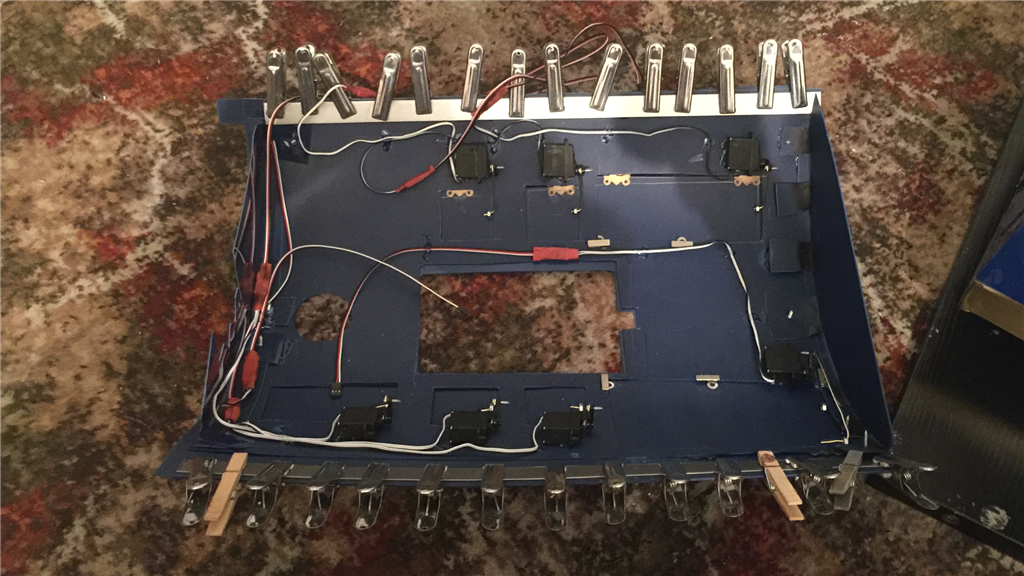
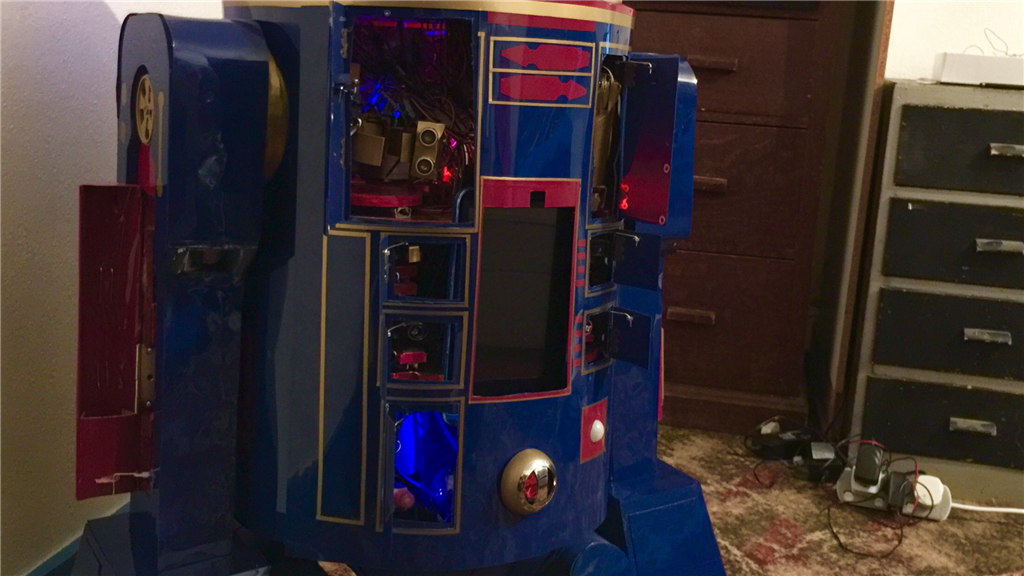
The next job was to get some more of the electronics done. The retractable platform now has...
the v4, SSC-32, 15a motor controller, relay switches, dropdown Buck converters, and some 5v regulators.
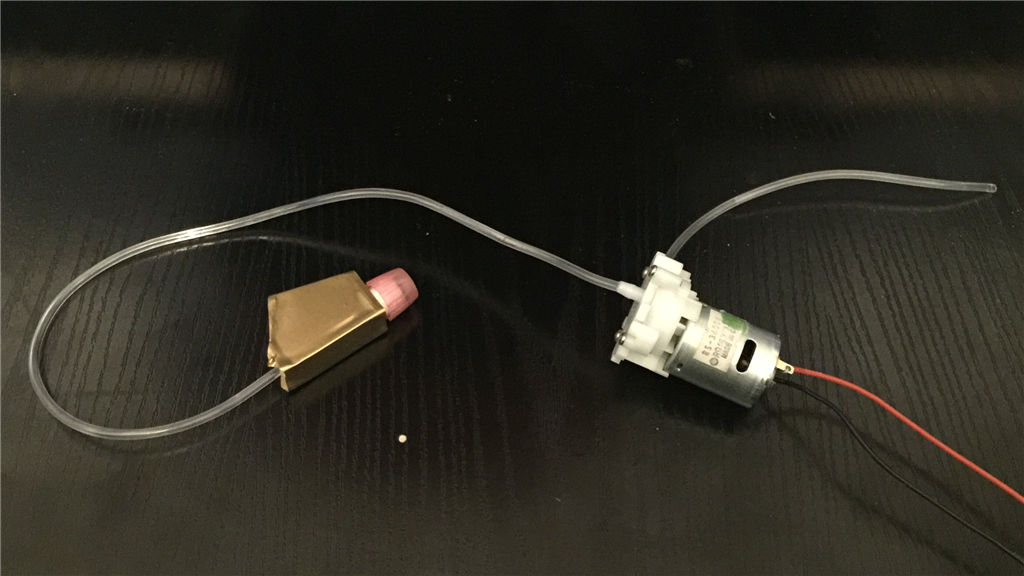
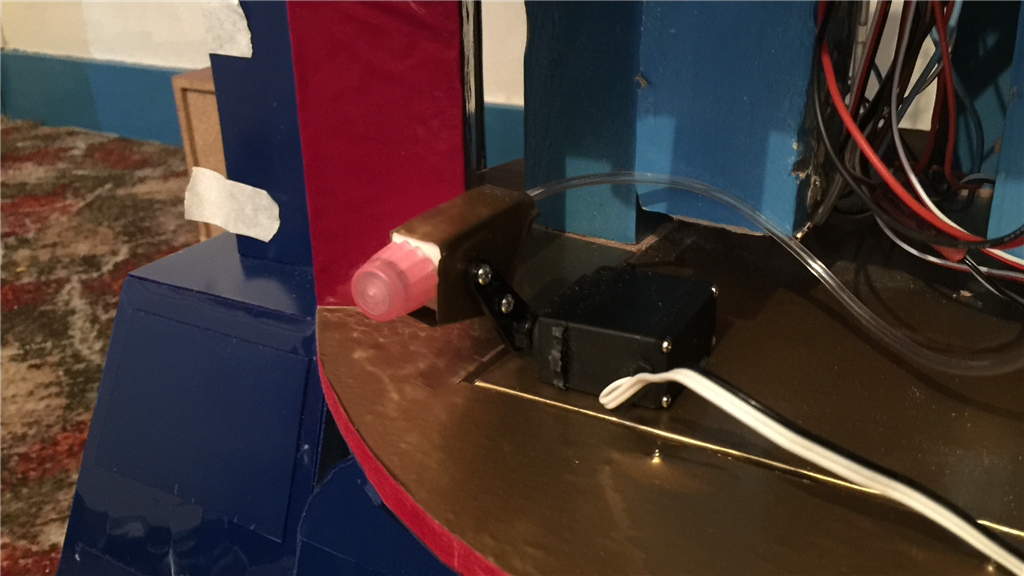
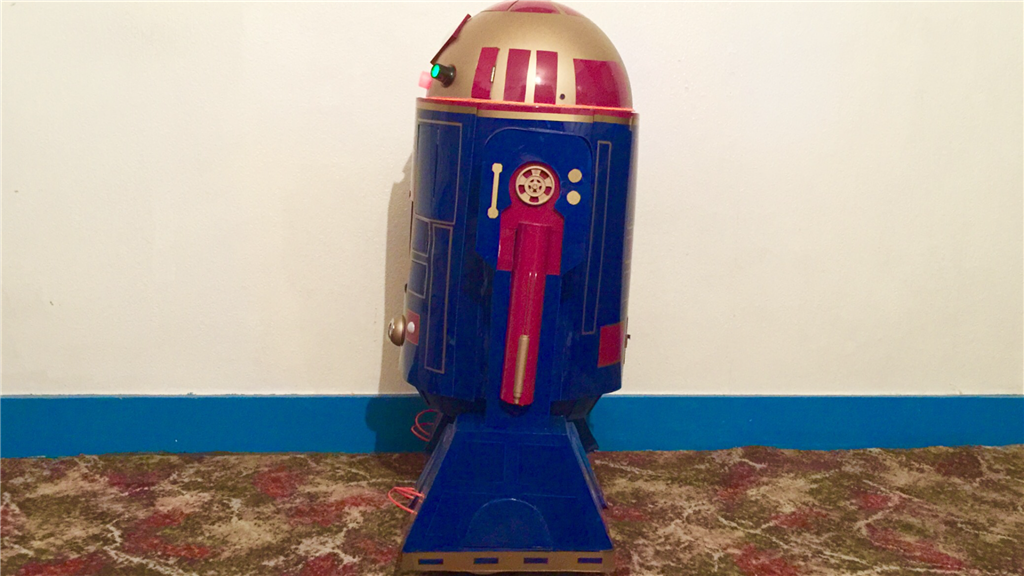
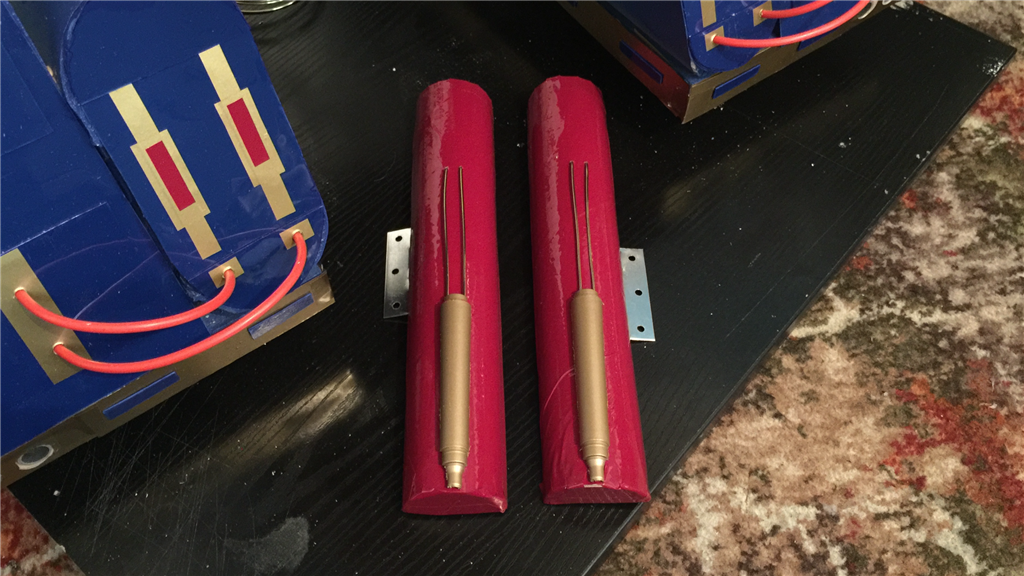
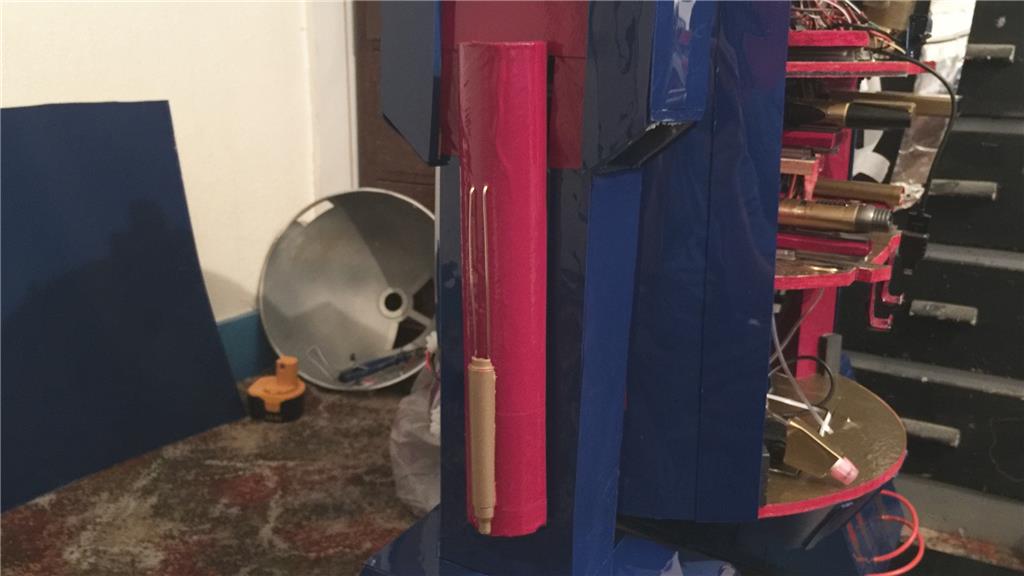
Keeping on with the electronics theme, I have fitted E4-B4's first utility tool. In Star Wars, you may know that R2 has a fire extinguisher. This gave me an idea to have some fun with people, so I rigged up a water squirter. This was made from a trigger section of a water squirter bottle, a small water pump, some tubing and a 180 servo.
After cutting, painting, glueing the trigger to the tubing, a servo was fitted and attached to E4's body. The servo moves the trigger up and down, and the pump is activated with a relay.
I'm just waiting on the right size water bottle to turn up now, then it will be fitted to a bracket so it can be easily remove to fill it up.
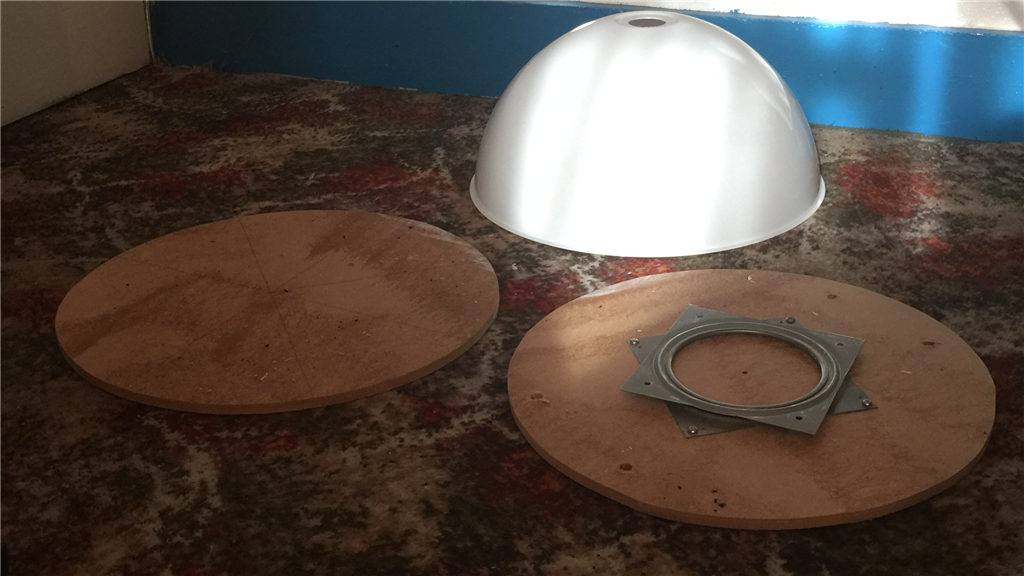
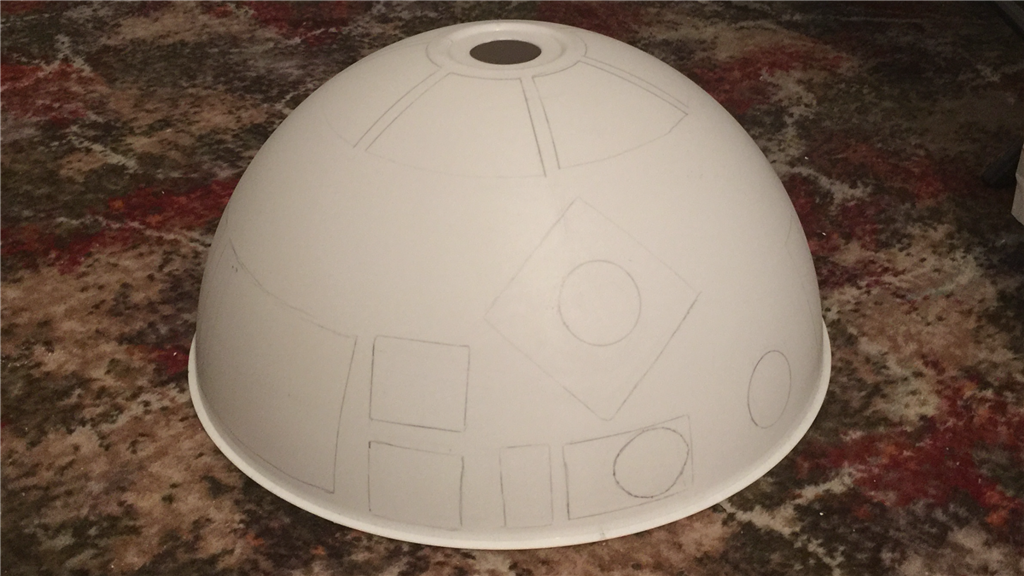
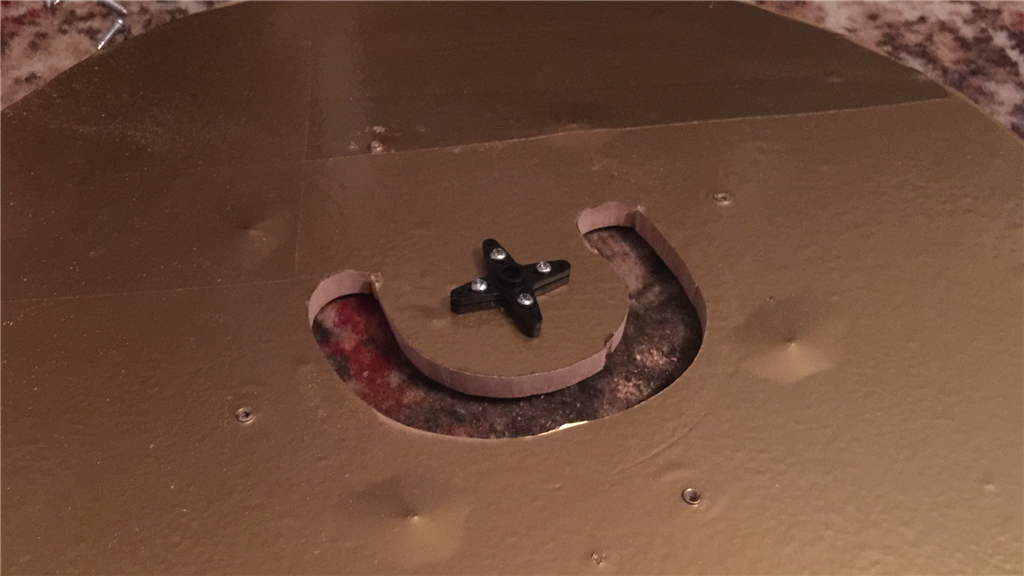
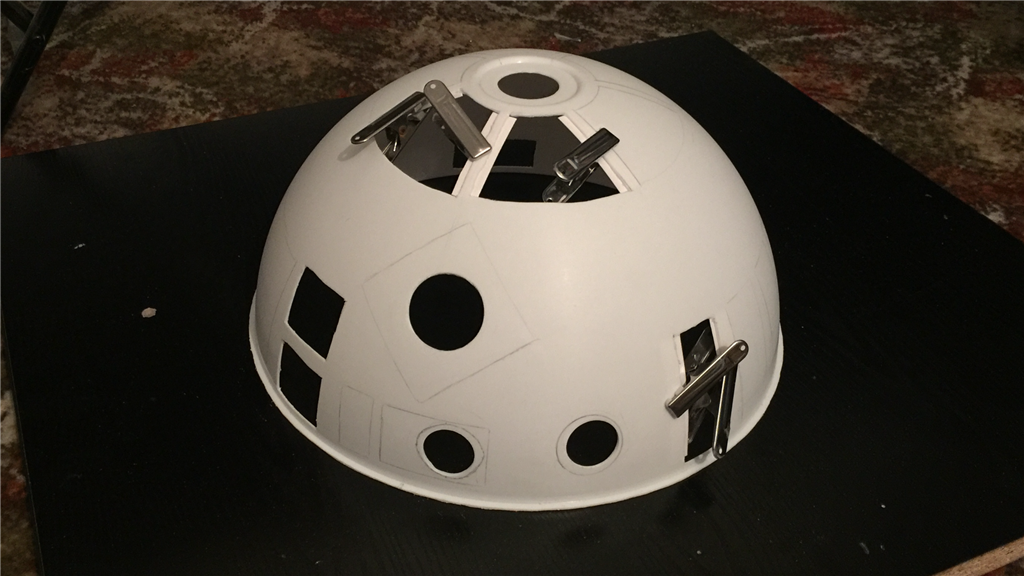
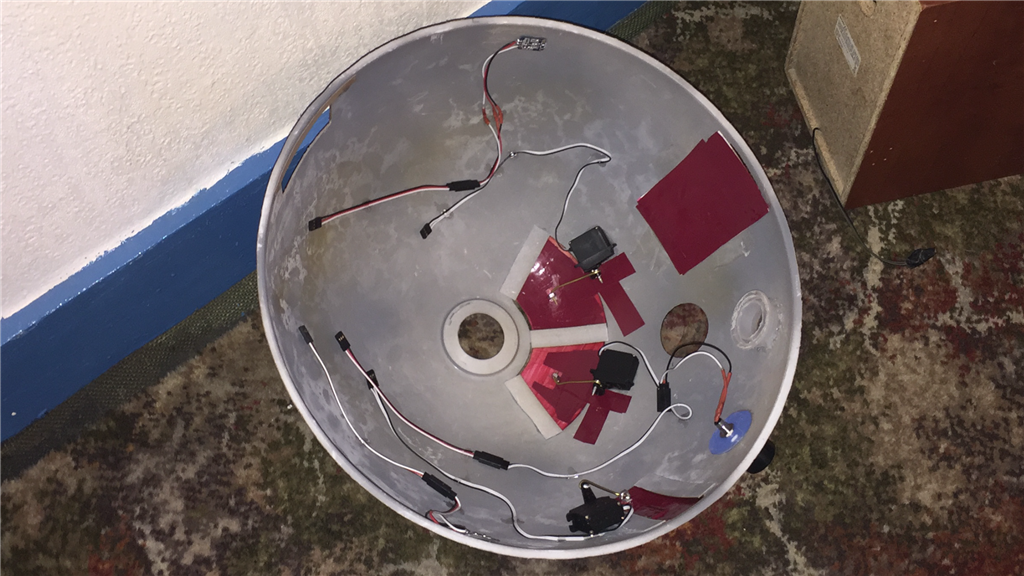
The next job I wanted to do was to get the side body skins fitted, but before I could, I had to make and fit the head platforms. Two MDF disks were cut, one slightly smaller than the other so the dome could fit flush over it. Measurements were made to find the exact centre of both disks, then fitted a 6" lazy Susan bearing to the larger disk. I also took the opportunity to mark out the sections of the dome which are to be painted and cut out.
A servo horn was fitted to the centre of the large disk, cut a section out to mount the servo in the smaller disk, joined the two sections together and cut a channel out to feed the wires through.
With this part done I carefully measured and attached the head section to the body, calibrating the servo to 90 degrees to make sure the section was centred properly. The final step was to cut, paint and attach the side skin panels. For this, I used 3mm HIPS (high impact polystyrene sheet) which was an off blue matt finish. When cut to shape and size, these were painted and lacquered with the same deep gloss blue to match the feet and legs.
I added a little bit of detailing using some burgundy red vinyl adhesive sheet, and made a cutout for the electronics platform to slide in and out through. These were also temporarily covered with cling film to protect the finish. The electronics platform was tested to make sure nothing would catch, and it had plenty of room to slide in and out.
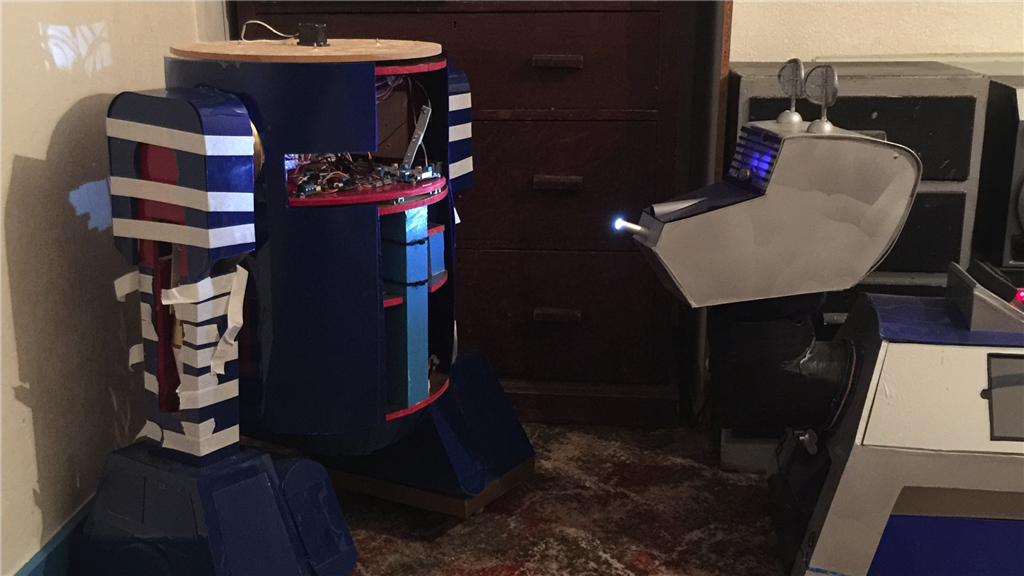
Robots helping to build robots. K-9 lends a helping hand (or rather, nose) and shines some light on the subject...
And that's where the build stands at the moment. Next jobs will be to sort out the front and rear body skins, then work on the head section and dome. There is still a fair bit to do, but it's starting to come together more now.
No robot building to day or tomorrow however, as well as it being Halloween, I also hit 42 years old today, so lots of food and even more drink with some friends today, and sleeping it off tomorrow, lol. sleep
Next update to follow soon. :)
HAPPY-B DAY steve
nice pis
Thank you Patrick. :D
Holy cow Steve. What do you mean by not making much progress? That's a huge amount of work! Very nice work. This build is turning out better than K9 (and that was one good looking dog).
Lol, thanks Dave. I guess what I meant was that I didn't make much progress before my 2 week time out. Since then I had a better idea of what I wanted to do, how I wanted to do it, and had more motivation to cack on. Anyway thanks for the kind words. I'll try and get a video demo up for the next update showing certian bits and pieces working. :)
Day 100 11th November 2015.
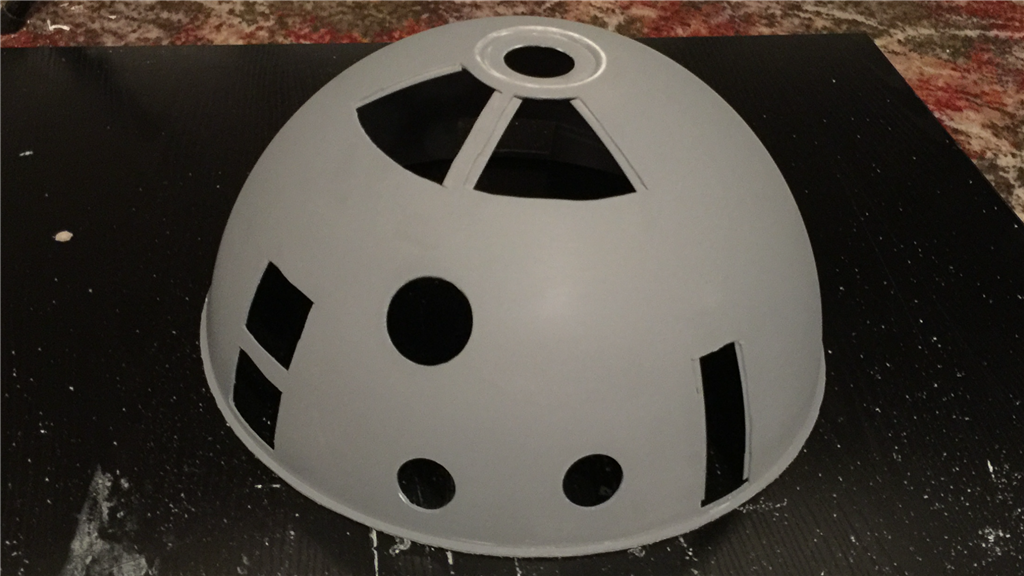
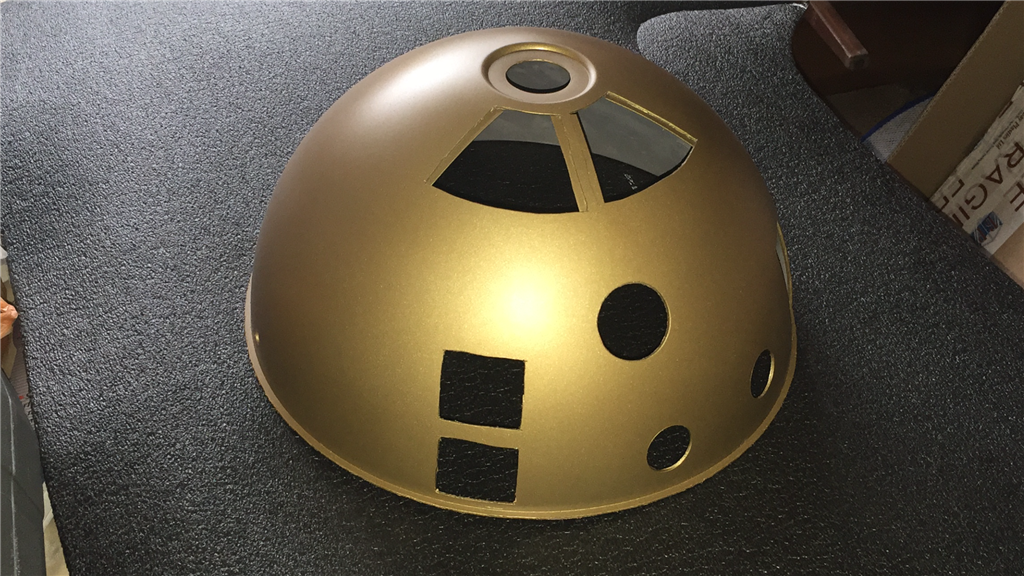
100 days to the day in to the build, so thought I'd post another update. Things are moving along quite nicely again now, and I managed to get a few more bits done. I got the old Dremel out and cut the sections out of the head that will have opening flaps and lights/camera ect. I managed to get the primer undercoat on and rubbed down, but have been hit with some crappy weather so the painting is on hold for now.
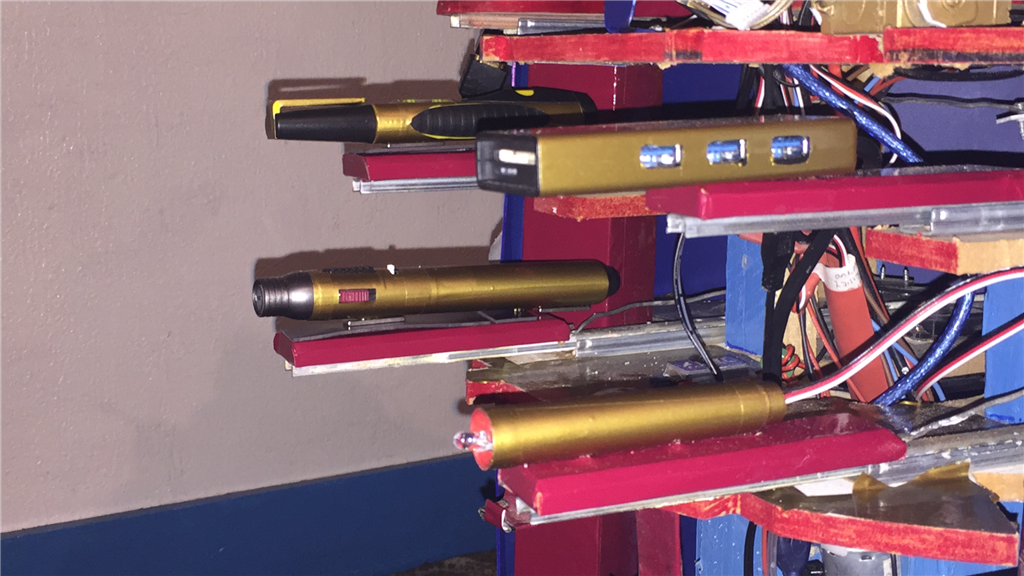
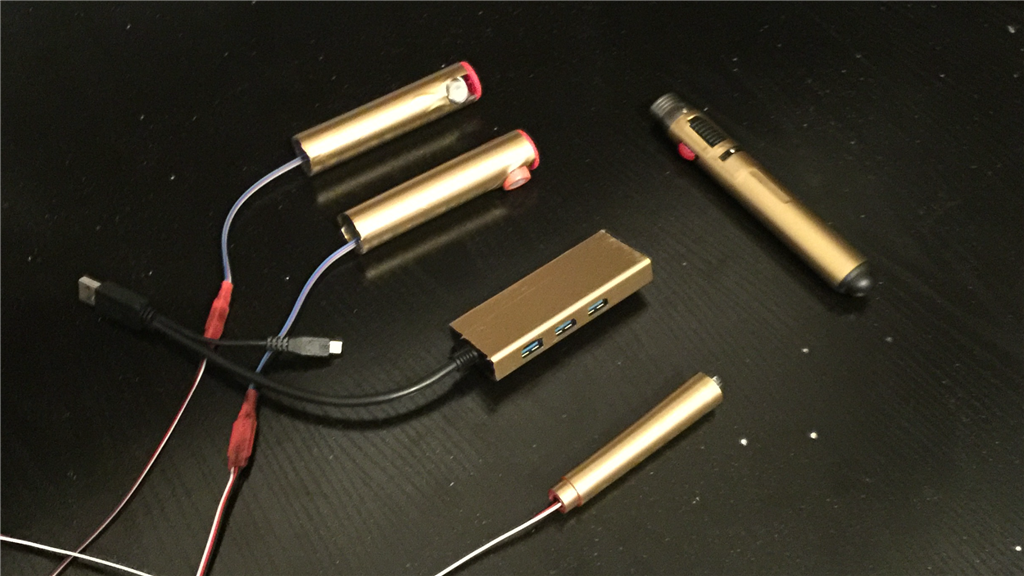
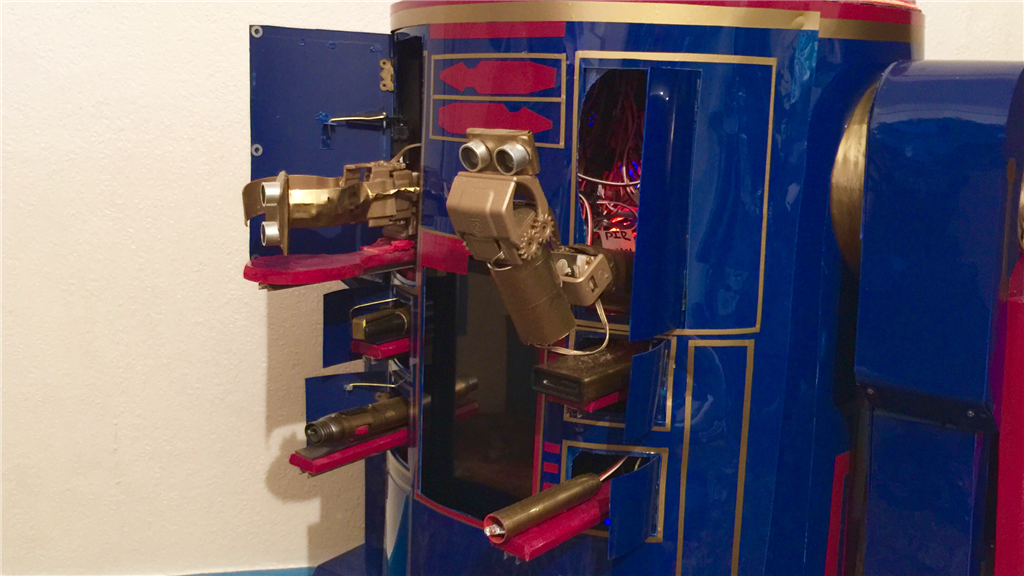
I have also made a start on some of the utility tools which have been made and painted. I still have a couple more tools to finish off.
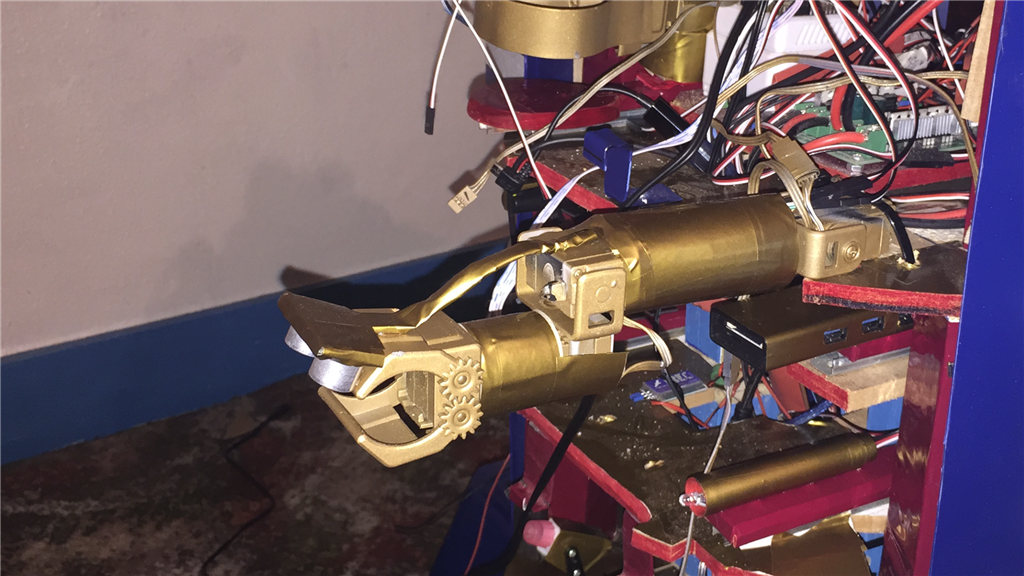
I did a bit of customising on one of the JD grippers. This won't hold anything, but will act as a support and secure items that will be held on a small retractable platform. It just needs painting now.
Using a bit of scrap HIPS, I cut out and moulded a securing clip to hold the tablet in place which can be bent back slightly so the tablet can be easily removed if needed.
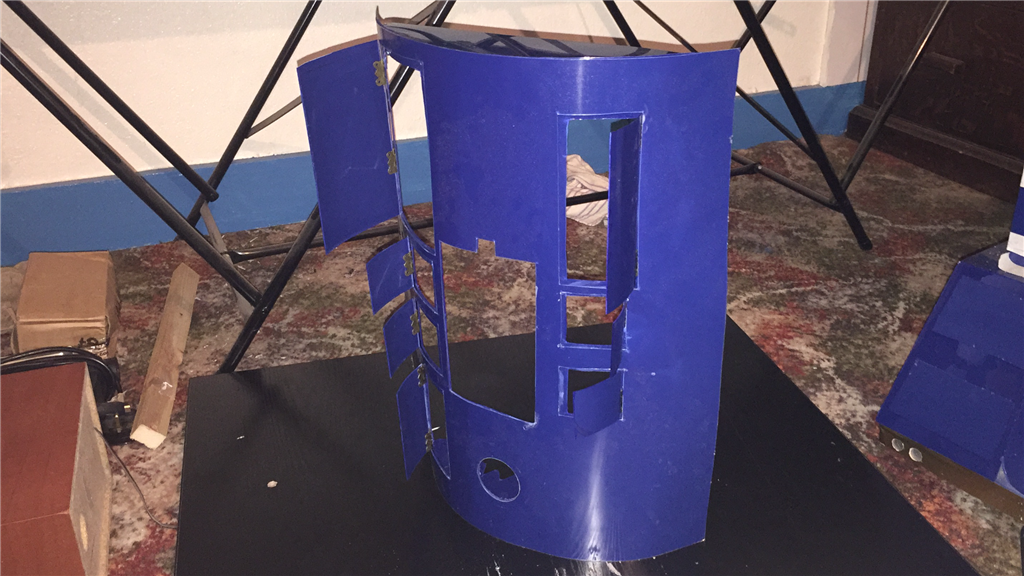
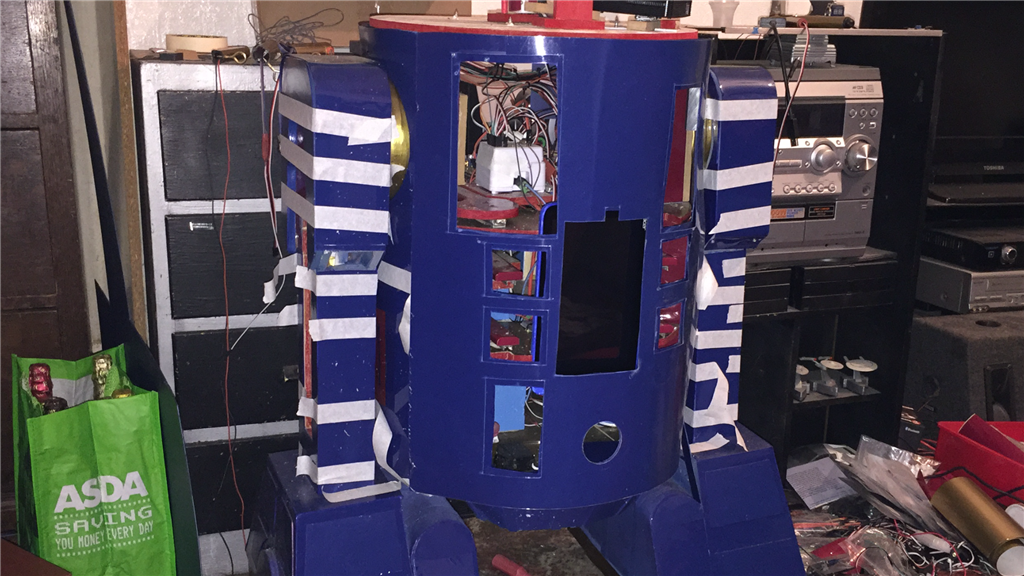
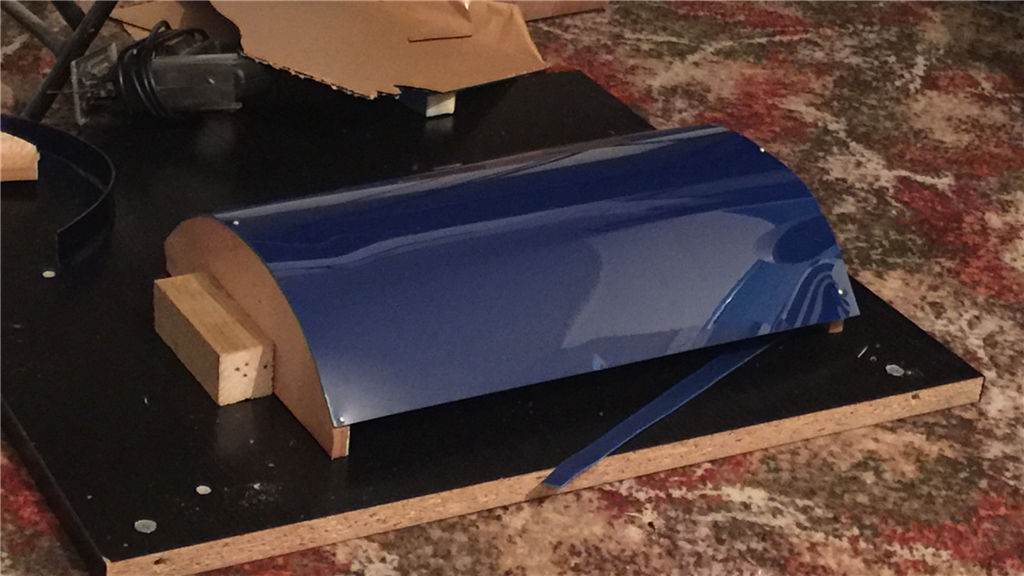
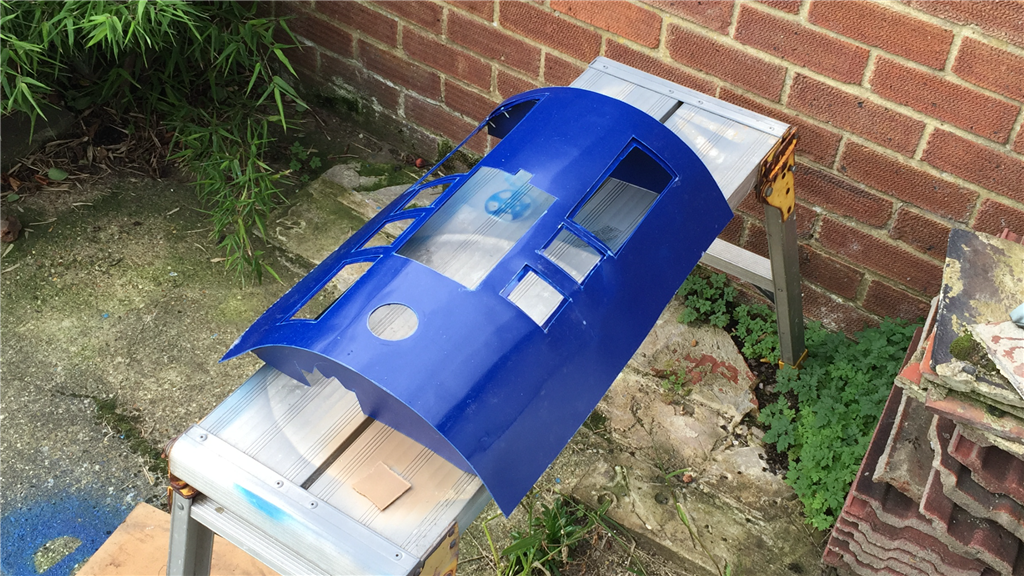
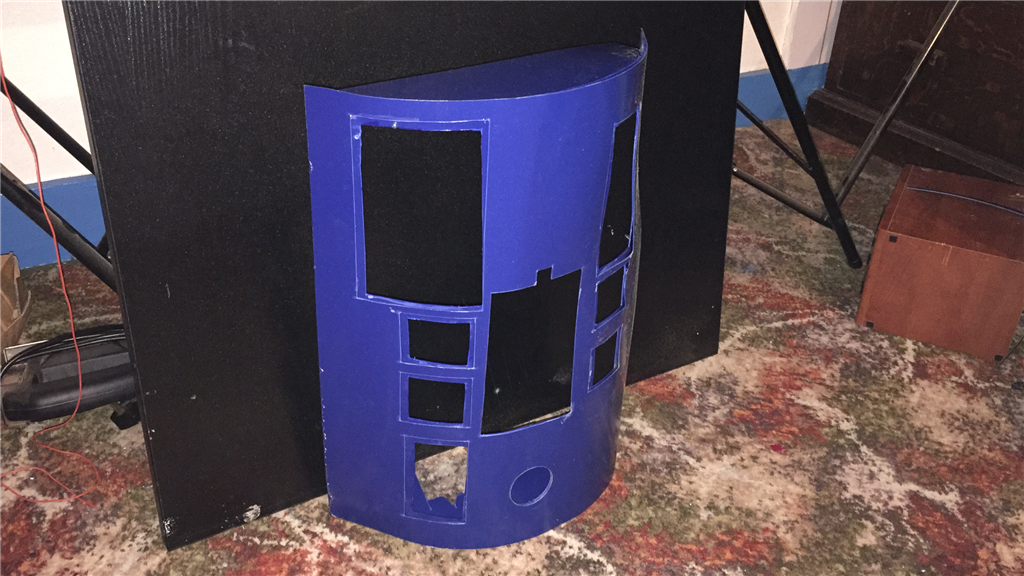
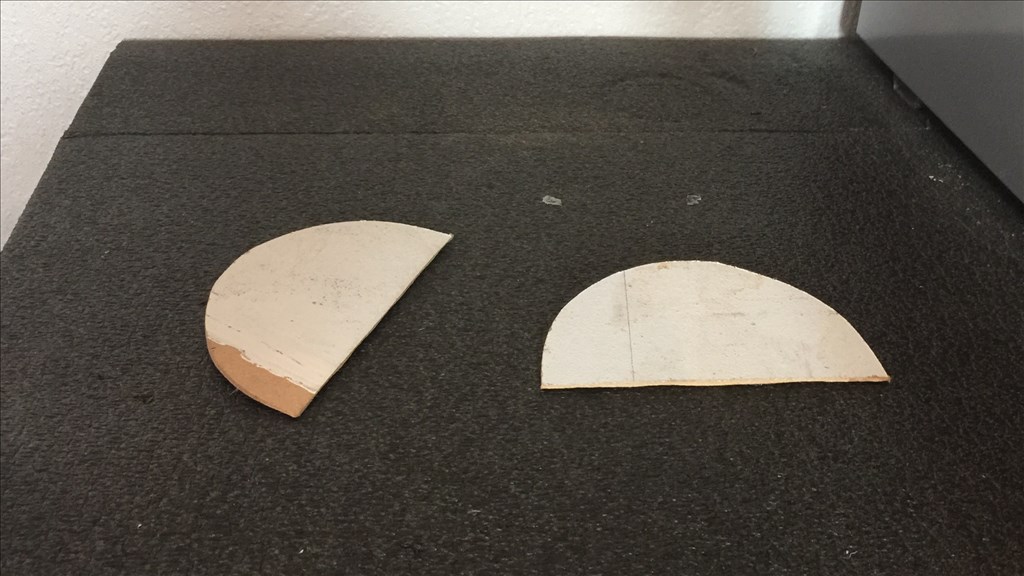
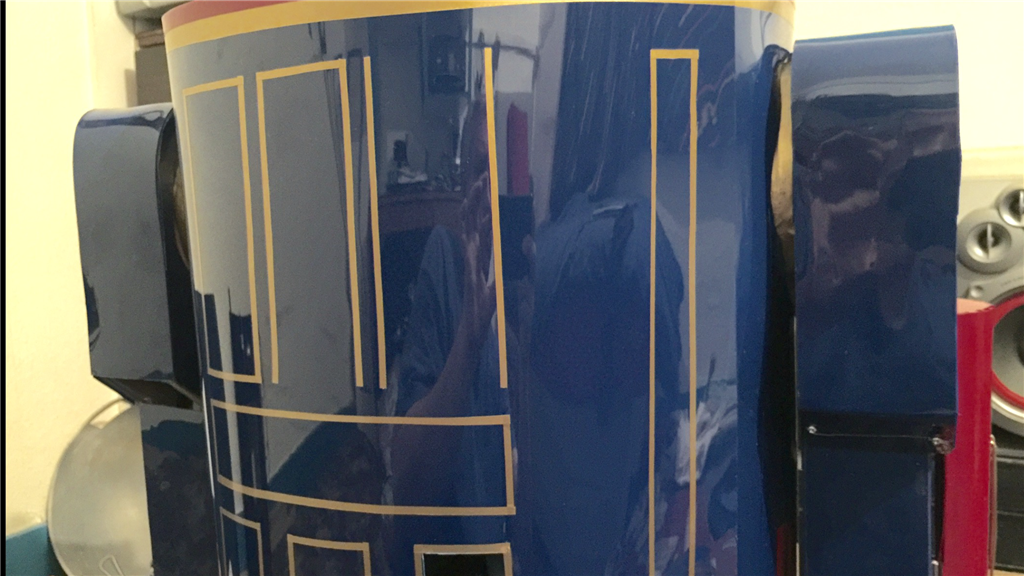
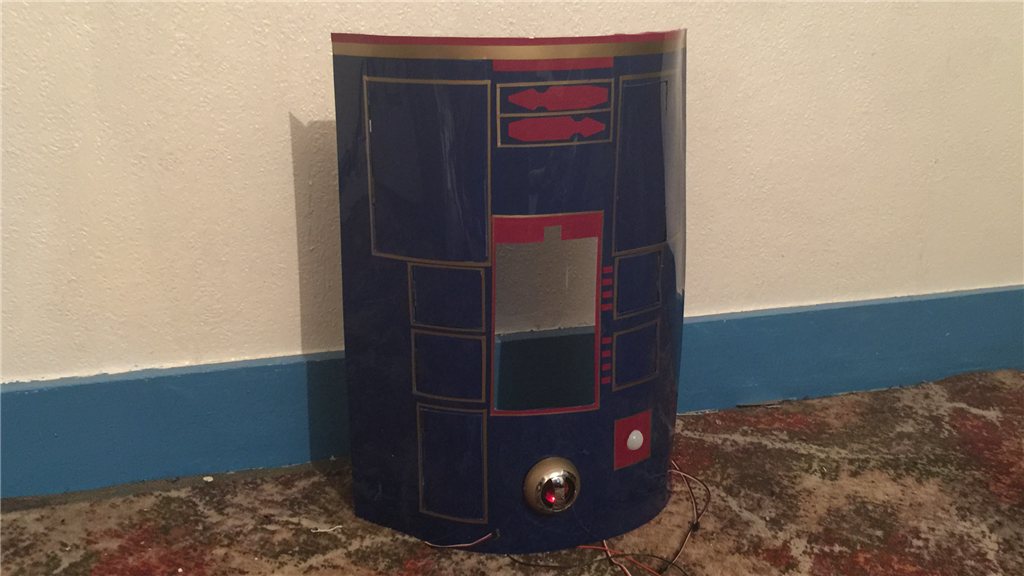
Finally, I set to work of the front body skin. I cut a couple of MDF semi circle templates (same as the body circumference), fixed a sheet cutout of HIPS to them and got to work with a heat gun to form it in to shape. After it was shaped, I made a paper template to mark out the cutouts that needed to be made, then marked it out on the inner skin, which was then it was then painted.
The same thing was done on the outer skin with the cutouts slightly larger than the inner skin so the flaps would rest on the recessed edges. A couple of semi circle HIPS cutouts were made and attached to the skin for added reinforcement. Then the two skins were joined together using plastic Weld and then painted.
The edges in the photo look a bit rough, but it's not the skin, it's plastic cling film covering because as with the legs and feet, I have covered the skin with cling film to protect the paintwork while I work on it (plus, you know that satisfying feeling you get when you slowly peel of led the protective wrapping off your shiny new electronic device... I get to do that too, lol).
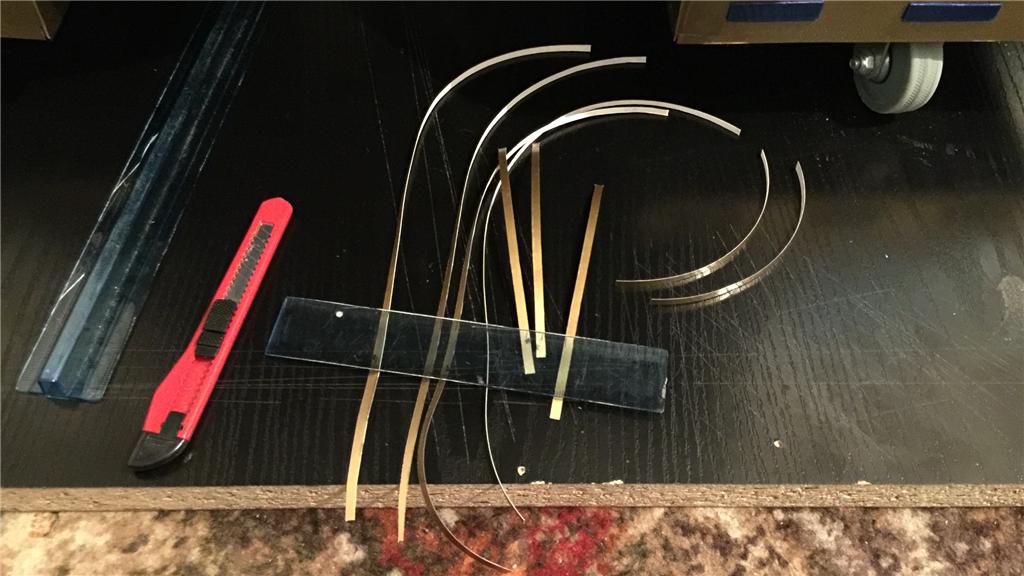
Talking about work, the work that needs to be done next will be to attach a couple of 3mm thick steel strips on each side of the inner skin which will straighten and reinforce the edges, and will be used to hold the skin section in place using magnets. Also, some micro servos will be attached to the inside of the skin, then I'll make some hinges for the flaps. I'll will be adding a speaker that will fit in to the lower part of the skin, but the speaker housing needs painting so I'm held up on that for now.
Work on the head section is already under way, and will feature in the next update which should hopefully be next week.
super nice work
Thanks Patrick. Here's a sneak peek of what the skin looks like on the body. Some final detailing needs to be done which I will do towards the end of the build.
thats a big one
Thanks Anthony. If I'm honest, it still looks a bit of a mess, but there is not a great deal more to do, lots of little jobs, but it's coming together nicely so he will look a lot tidier soon. I like what you're doing with the BB-8 build you have going on BTW. Nice job.
Defiantly a Star Wars trend starting in the forum what with your BB-8, my build, 3 or 4 other Astromech builds going on, and DJ's AT-AT as well. :)
Day 106 17th November 2015.
There is light at the end of the tunnel. I've managed to get a few more of the smaller jobs done which is bringing me much closer to the end of the build. I made a list of what still needs to be done, and they are mostly little jobs as well, and not that many of them.
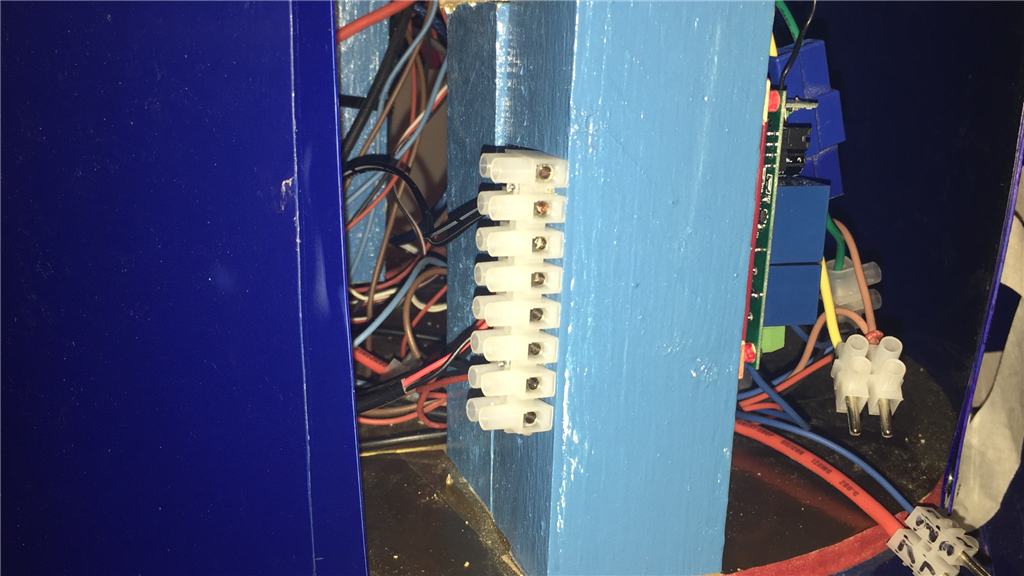
So since the last update, I've fixed up a remote relay power switch for the EZ-B, peripherals, and motor controller systems, and fitted a 8x terminal plug to charge the EZ-B 7.2v battery, 12v motors battery, tablet and projector batteries. This will be accessed via a small flap I'll make for the rear skin.
Talking of skin, the front skin is almost finished. I've cut out the flaps, fixed them to some small hinges, and attached some micro servos with linkages. I also received the steel strips which have been fitted, so the skin is nice and sturdy, and holds to the magnets in the body really well.
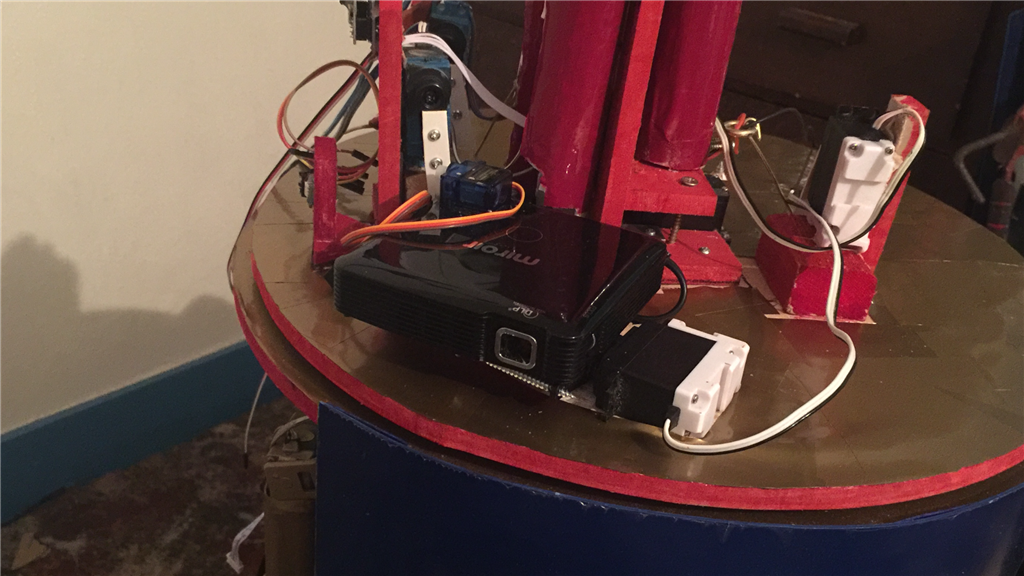
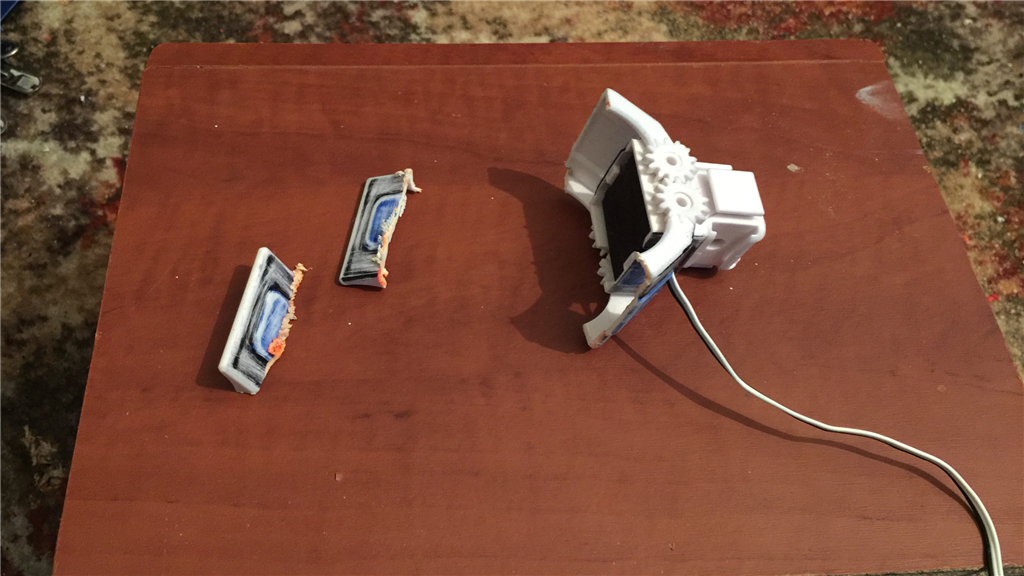
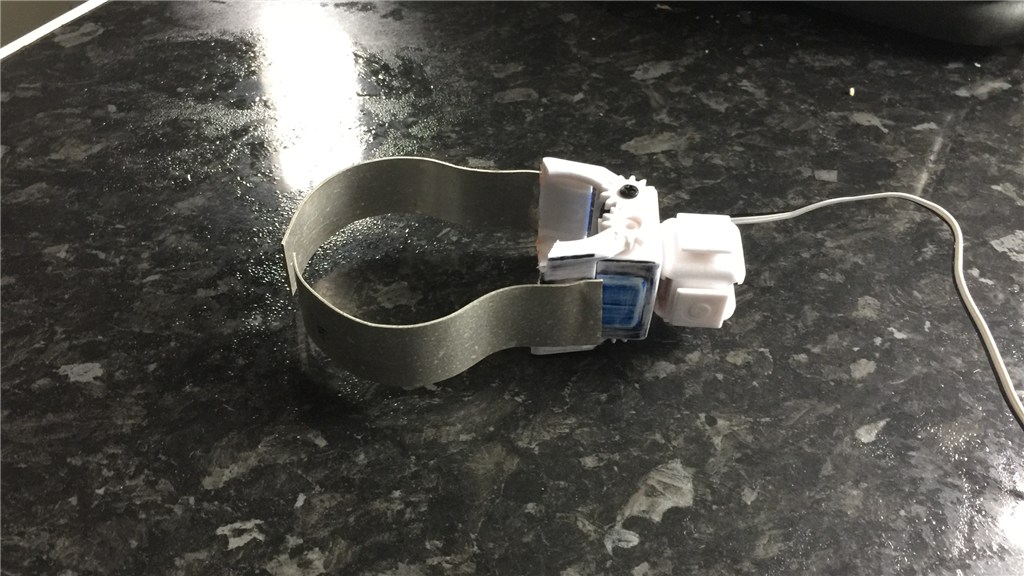
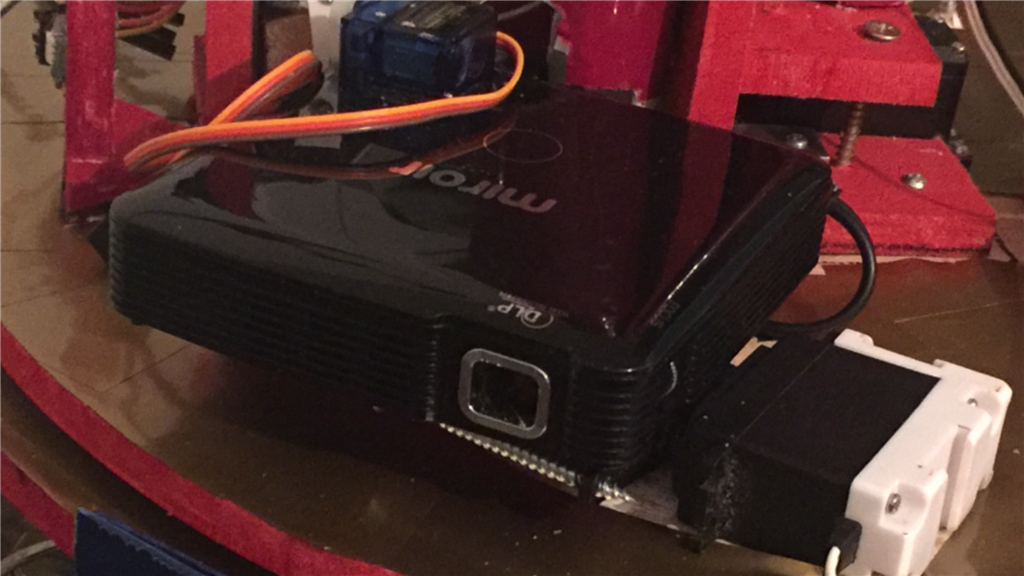
I also made a good start of the head section. I made up some actuators using some PVC pipe and fitted some HD servos and linkages to a couple of sensors and a spotlight I made in the last update. I've also fitted the pico projector on to a counter ballance, and fitted a servo along side it to adjust the projection height. I opened up the projector to try and bypass the On/Off switch so I could wire it to a relay, but for whatever reason, it would power up and promptly turn off again after a few seconds. Thinking it was a flat battery I charged it up but did the same thing again. So I had to do it the "dirty way" and fitted a cheap micro servo to the power switch. Works like a charm.
The v4 camera is in place, along with an RGB LED. A couple of more jobs need doing then it's finished. I managed to dodge the crappy weather the UK is experiencing at the moment for a day, and got to paint and lacquer the dome. It's currently stored away in a spare room for a week or two, to let the lacquer cure. A final bit of detailing and that will be finished too.
I got a few of my EZ-Bits and JD gripper together and made a manipulator arm which was partially painted, partially wrapped with gold vinyl. I added a ping sensor to it which will react when someone puts their hand nearby to give or take an item E4 is holding.
Finally, I have fitted the utility tools that I made previously, and are now waiting to be connected.
The next few jobs I'll be concentrating on over the next couple of days, will be to finish the head section and front skin, and to continue hooking up the newly added components. After a good clean up, I reckon E4-B4 will actually be finished within the next two weeks (the building part that is), then I can start on ARC and get this guy up and running.
Steve your droid is looking incredible! I can't believe how fast its going together.. jealous astromech owner ;)
Aaron
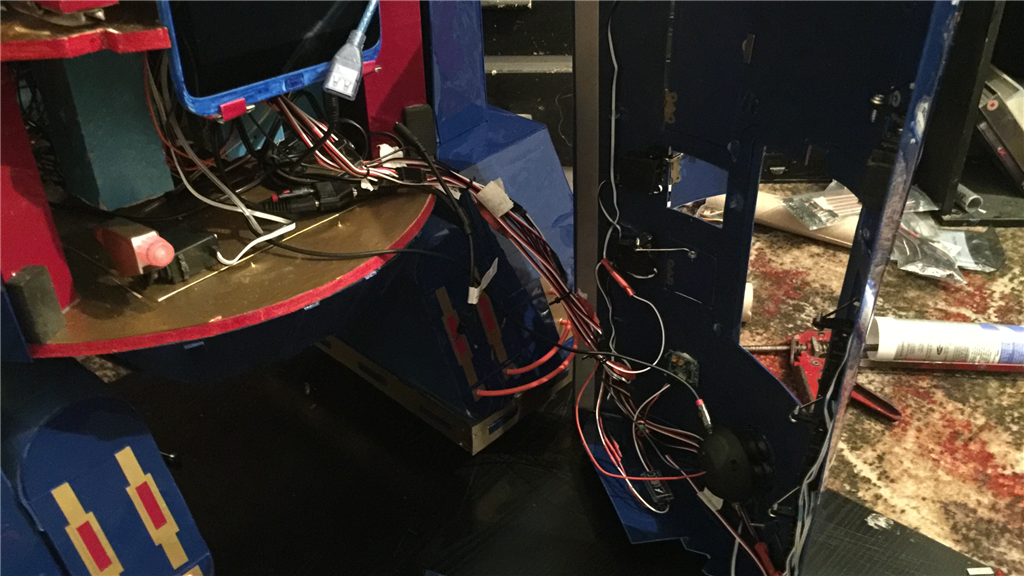
Cheers Aaron. Yeah, I have a lot more free time on my hands now so managing to get quite a lot done now. I'm just looking forward to the point where I can tidy all them wires up. I hate wire, lol.
Yeah, not to much to do now so I'm going to try and push in and get the majority of it done by this weekend as I want to start playing with ARC and bring this not so little fella to life (so to speak). :)
Hi Steve, Your progress is fantastic.. Your (big) little guy is really looking great. I look forward to your next update and programming results. Madame sends you Good Fortune.
Ron R
I greatly thank the Great Madame Ninndo for her positive thoughts, lol. I am honoured. Oh, and thanks to you too for your comments, Ron. ;)
I've been hooking up and testing some of the servo utilities this afternoon. I'm almost done for the day, so I'll post a short video of the test runs in a little while. Nothing special, but it was good to see everything working.
Day 107 18th November 2015.
As promised, here's a short video demo of E4-B4's utility tools in action...
Everything seems to be working pretty well, although I'm not too happy about the alcohol sensors deployment, as it's a little wonky and looks like it's been hitting the local bars itself. To straighten it up should be an easy fix though.
steve g
love it how it all works.
Yeah, I'm pretty happy with how the utility tool movements turned out. Just putting the finishing touches on to the front skin, then I'll finish working on the dome over the weekend.
Anyway, I'm pleased you liked it Patrick. :)
LOL! I love how this works. You have something to be really proud of here. I gotta make one of those retractable cup holders!
@Dave.
A cup holder, A CUP HOLDER you say? Watch this space. ;)
Yeah, I'm itching to get him finished, but still got lots of little jobs to do, and the're time consuming ones. I'm looking forward to taking all of the cling film and masking tape off that I put on to protect the paintwork. I did so on the front skin to add some detailing last night, and if info say so myself, the paint job really has come out really well (almost too well in fact. It's really shiny, lol). cool
Hi Steve, A big WOW... Looks real cool. Of course a cup holder, why not. I look forward to more info and video..
Ron R
@Ron.
Why not indeed :). I'll probably post another short video demo over the weekend. Stay tuned.
Really cool Steve. I love what you have done with this bot. Great work!
Thanks David. In really pleased you like I've done so far. :)
I'll drink to that !
Ron R
Bottoms up. Still, I could always put the water pipe hose from the water jet in to a bottle of drink, and have E4 squirt the drink straight in to my mouth.
Would save on elbow damage...
Day 111 22nd November 2015.
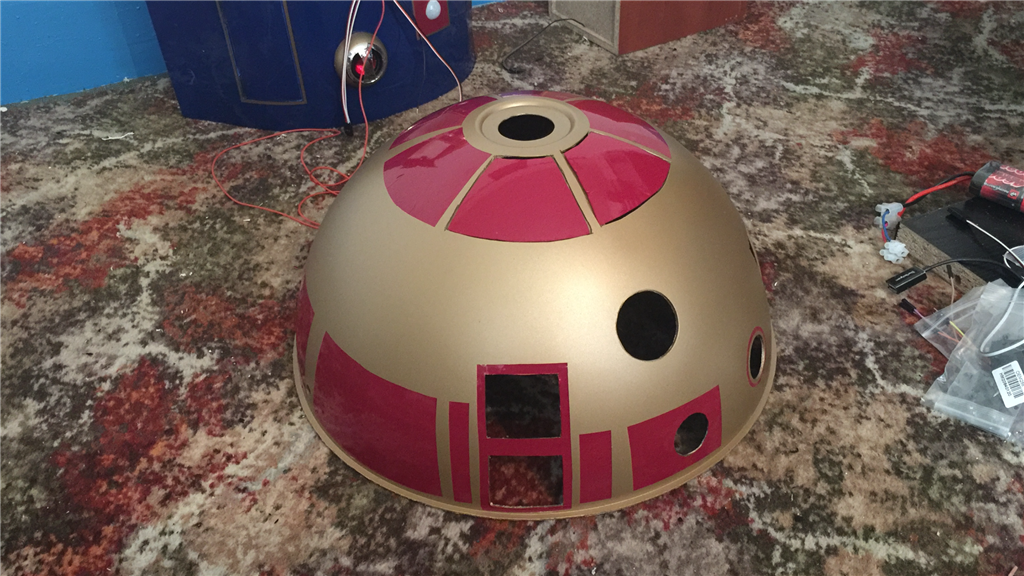
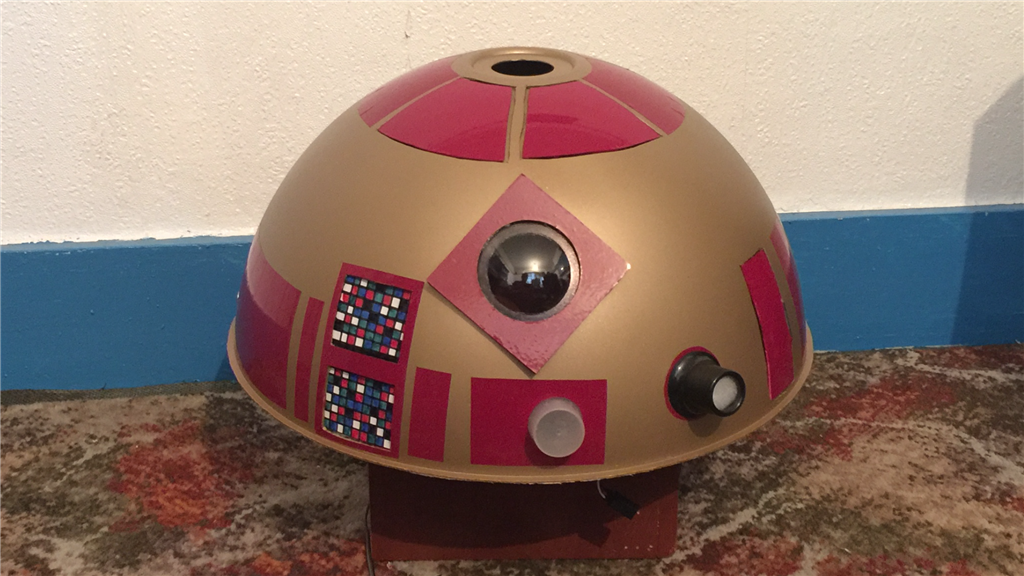
Work on the dome is well under way now. The gold paint finish has come out rather nice which I'm pleased about, and although the masking a trick job, the burgundy detailing really has made all of the difference and its looking more like an Astromech head now. I've got a few pieces that are currently being added the dome which should be finished today, and still have the eye piece to make which I should be able to make a start on tomorrow.
The feet and battery boxes have been unwrapped and finally got to add some detailing...
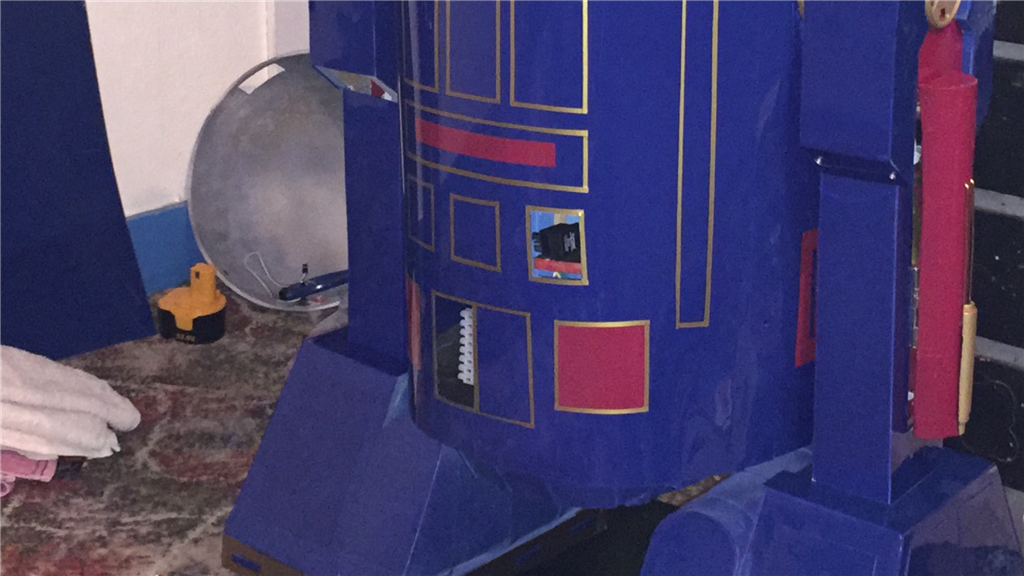
And I can safely say that the front skin is finished (I think). Instead of painting on the detailing, I used some coloured vinyl adhesive sheet which I cut to shape and attached. I got very lucky with the colour match from the paint I was using, and there's little to no difference so it blends in nicely. I've also fitted a PIR sensor, and the Bluetooth/Aux speaker which the tablet will connect to for all of the audio.
I said "I think", as I just noticed that there is one more piece I need to add to the inside of the skin. I may also add a little more gold edging to the lower left and right areas of the skin as well, but I don't want to overdo it with too much edging. Let me know what you think. Below is another short video demo, this time showing the servo driven flaps in action...
A pretty pleasing test, but a little more work is needed on the two upper flaps as I'm not 100% about how they open with that slight jolt. It's caused by a couple of small magnets which help keep the larger flaps flush with the skin when closed, so a little adjustment, and all will be well.
Oh, I had to revisit the projector counterbalance, as I inadvertently glued the hinge together which made it very stiff. Oops eyeroll. Anyway, the hinge has been replaced, and is working better now.
Next update in a couple of days.
Great Job ! E4-B4 is looking good... The project is coming together nicely. I look forward to the next video.
Ron R
very cool,looks good and sounds good.
Thanks guys. I've got a few more videos planed... another demo, a "making of", and a couple of E4-B4 in action (ones he's finished). That list I made of final jobs to do is getting smaller which is great, although I keep finding little bits and pieces I keep adding to it. Not long now though.
It's looking better and better. Love the doors. I'm sure you'll get the top ones working smoother. Those little things are frustrating but part of robot building. You're good at overcoming these little things (and the big ones too). ;)
Cheers Dave. Like you say, it's all part of the building fun, such as gluing a hinge together by accident, lol. What is it that Homer Simpson says... DOH. :)
Day 114 25th November 2015.
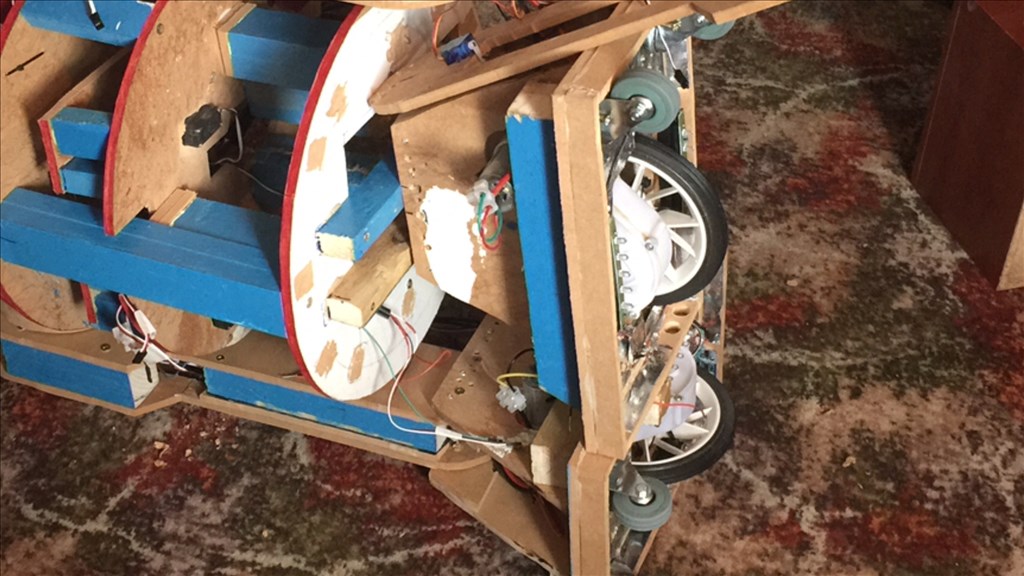
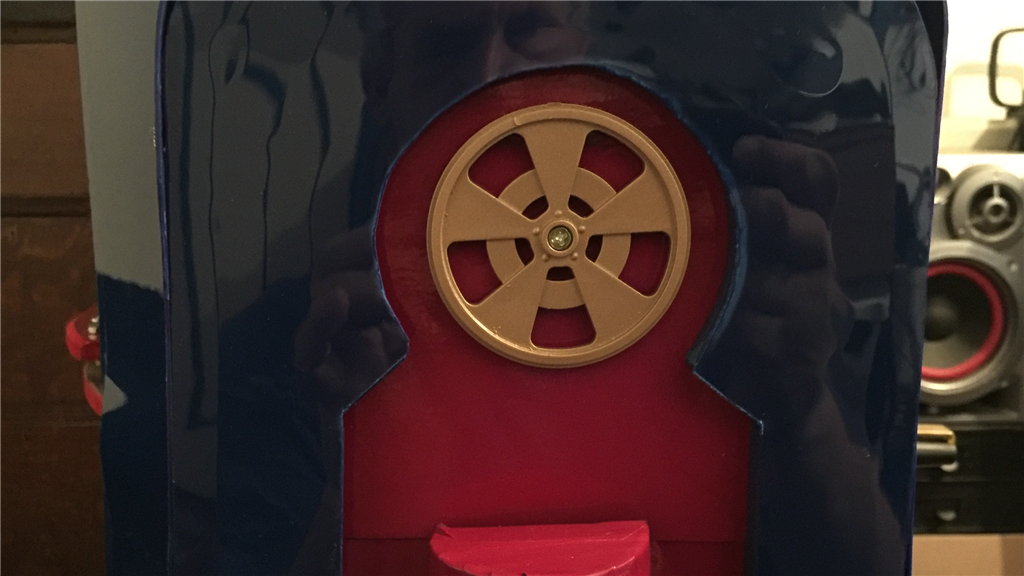
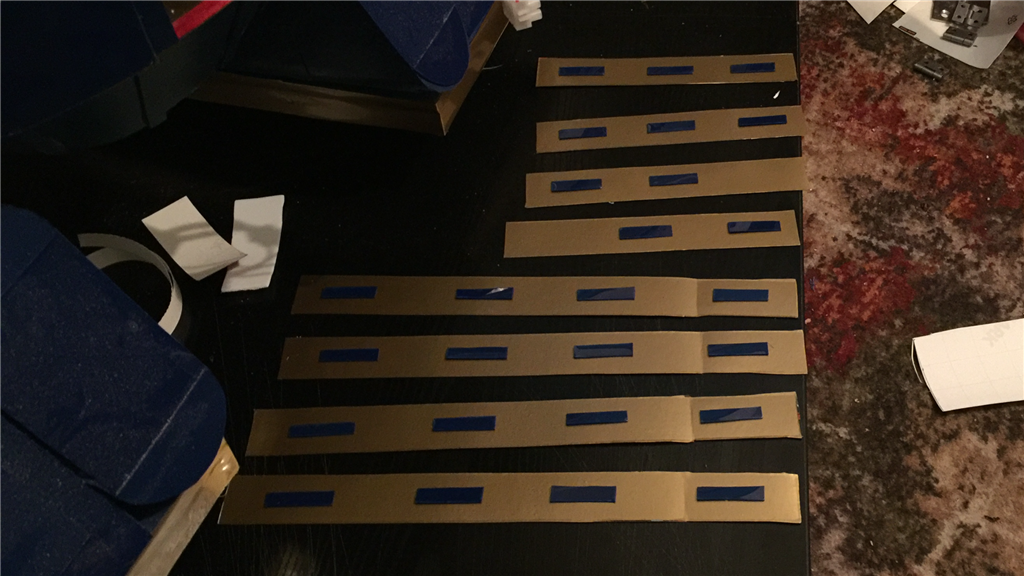
The "to do" list is very small now. I reckon the build will be fine by the end of the week. Anyway, I have removed all of the protective film and masking tape I put on and got some more of the detailing done over the past couple of days, mainly for the legs and feet. For the legs, I made up some leg covers using some PVC pipe, covered them with burgundy vinyl sheet, and have they have now been attached to the legs. I also added I little detail on the shoulder section. Can you tell what it is?
If you didn't get it, they are the wheels from an EZ-Robot dev kit. Nothing waisted here, and they were the perfect fit, and looked good. For the feet, I used some spare HIPS scraps which I had painted gold when I did the dome, and attached some HIPS cut offs I had left over from the rear skin. These were then glued to the feet skirts.
I dug out the rear skin I had shaped and painted a few weeks back, and added some edge detailing using gold vinyl adhesive sheet. Two steel strips were attached each side of the skin, and two cutouts made for access to the power override switch and charging port. These will have two flaps attached tomorrow which will be opened/closed manually when needed.
Next jobs are to finish the dome by adding a couple of servos and flaps (the projector flap is done already), attach the flaps to the rear skin, and hook up the front skin servos, speaker and PAR sensor. A couple more small jobs and its on to ARC.
Very nice. Love the lines! The shoulder looks cool. What's that round thing from?
You're having way too much fun here. :)
Cheers Dave. This just proves, recycling can be fun too. It will almost be a shame to finish the build as it has been fun doing a large build again. :)
LOOKING GOOD ! I look forward to the video..
Ron R
You like the ol videos don't you Ron, lol. No worries... I aim to please. All being well, I should start shooting something late next week. Hopefully you'll enjoy them. :)
Thanks, Me and Madame will be watching.. May the force be with you!
Ron R
Always. ;)
some idea haha
Lol, very good. What's that, Astromech's of the Caribbean or something? :P
titel sounds good hehe
Hi Steve, LOL... Maybe Nomad "Pirated" that picture.... LOL..
I have a question about sound bits for your E4-b4.. Are you going to use the R2D2 sound bits, and where can I get some for my new robot ?
I am starting to put a list of needs together for the build.
Ron R
@Ron.
Well, I was going to make my own "beeps" and "bops" using Audacity music editor, but I like the original R2 sounds so much I'm using them instead.
I had the sound files from quite a while ago now and forget where I got them from. I think I had a sound effects CD and uploaded them to my laptop but never used them. If you search the net, there are lots of different websites when you can get R2 sound bytes, and I believe there is a project on the EZ-Cloud that has the effects on a soundboard too (I can't remember who's project it was. I think it might be DJ's).
Thanks, I was just wondering. Right now I am having a problem with one of my 3D printers, so I have to get that running. I want to print out the front foot and bracket so I will have all the body parts. I plan on a caster in the front foot. I am hoping to find a ball caster that will fit so I it will have minimum drag.
Ron R
this is some for you,r2d2 translator.very funny.
r2d2 translator
Thanks Nomad, That will give me everything I want and more.
Ron R
your welkom :)
@Ron.
Do you plan on having the feet wheels motorised? I used a couple of swivel casters on the back of the feet, behind the drive wheels.
I don't know if you've seen his thread, but @robot56 used omniwheels and had great success with them. You can see them in action here on post #136.
@nomad.
Nice find. I'm actually going to do my own translator using soundboard (PC) files, the Display popup plugin, and Pandorabot which will display on the tablet in his chest area.
I have some VEX servos and wheels I was given when I built Madame Ninndo. I think I will use them.
I was thinking of a wheel in the existing feet, and a caster in the front foot. I figured I would use the Vex continuous servos.
@Richard R .. If you read this, I was wondering if the VEX continuous servos would be good enough. What do you think? I have three left and think they would work to drive it. I also have the wheels.
I think I have a multi turn pot which I will use for the feedback of the dome. I have to find it and see the value. Once my second printer is running I will make a gear for the dome and the foot.
LEDs and solenoids for wigglers need to be found.
I hope to do the showcase next week showing the teardown.
Ron R
Day 116 27th November 2015.
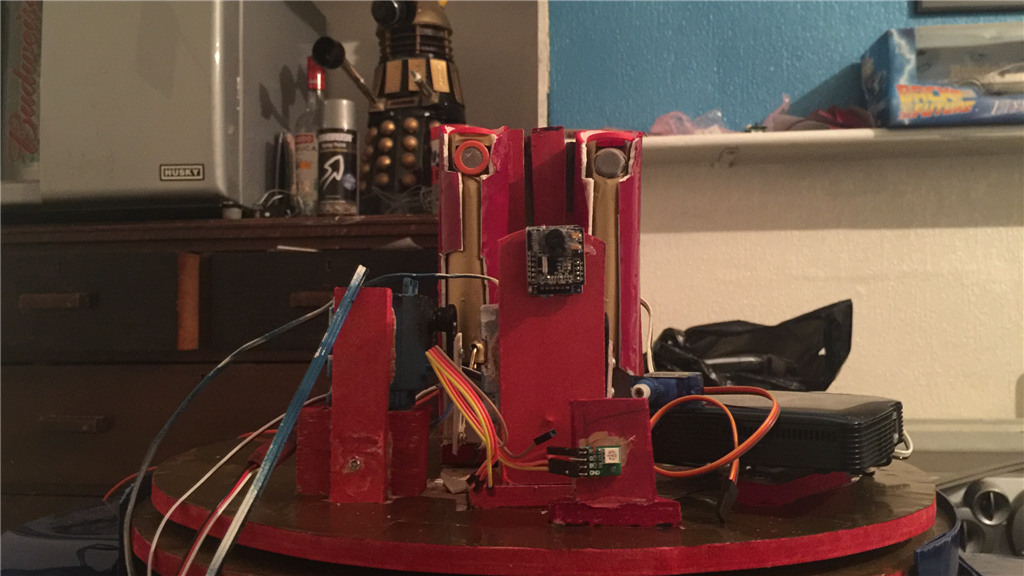
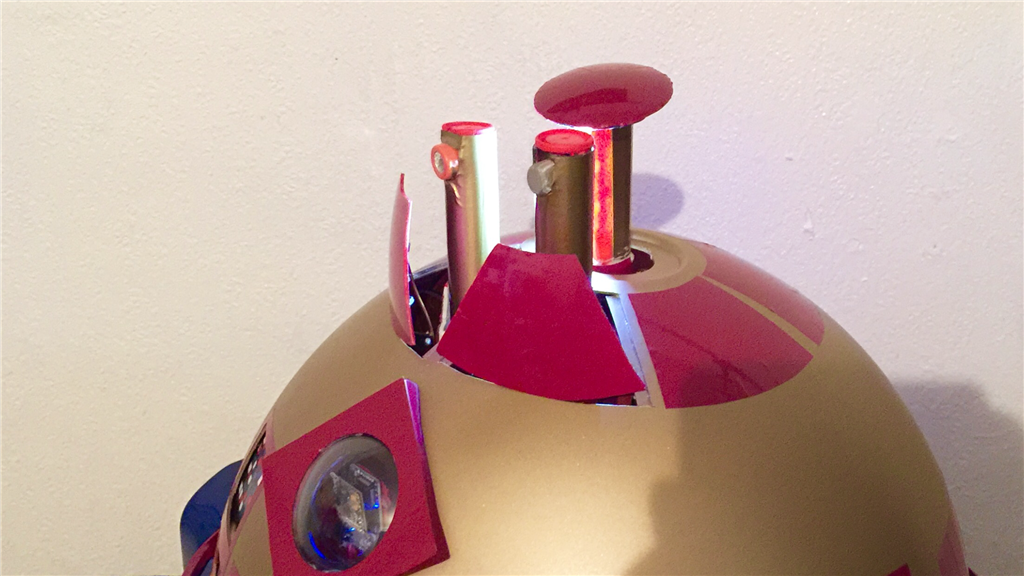
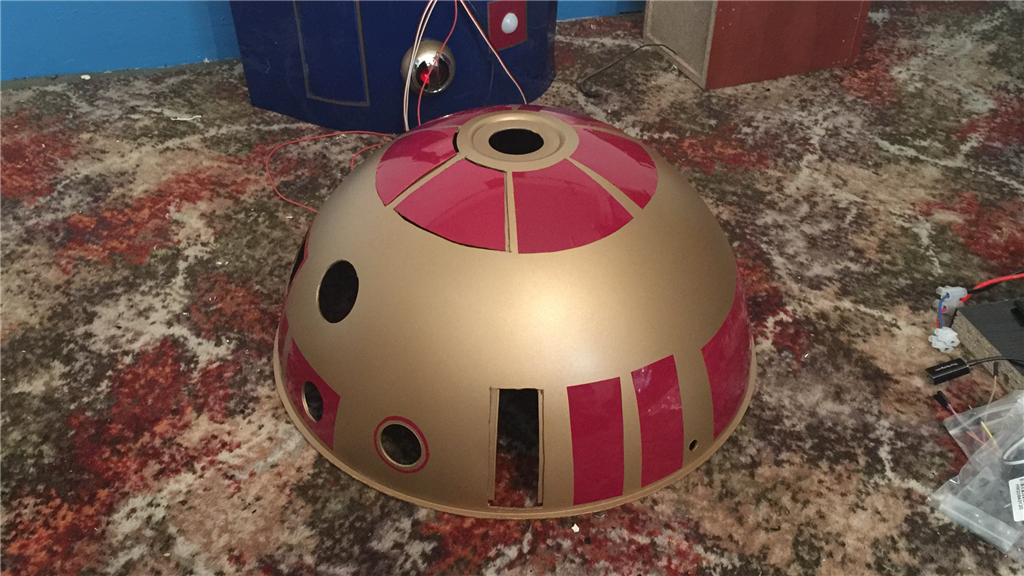
The dome is almost finished now, just one more small job to do then it's time to connect the wires. So here's a quick rundown of the dome.
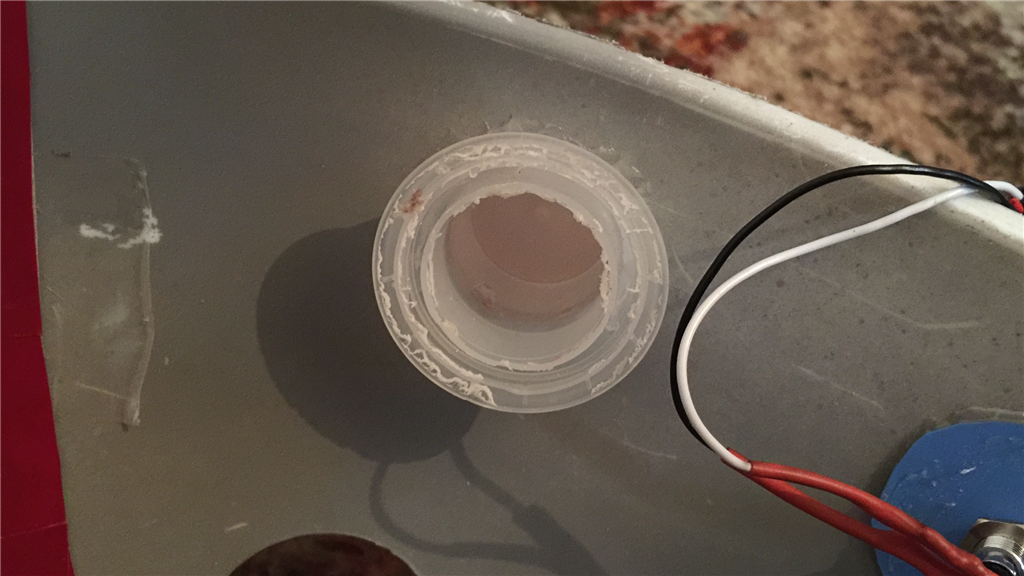
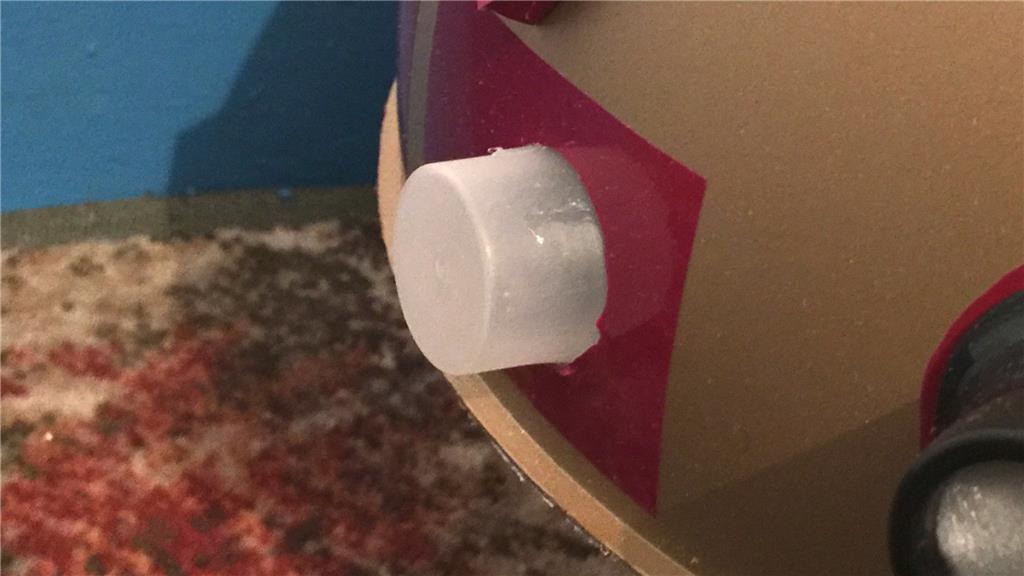
For the red and blue flashing light seen on R2-D2, I got myself a small RGB board (attached to the head section), and after a quick search through my recycle bin, I found a nice little cap from a fabric conditioner bottle which was a nice shape and size, and was also opaque which would defuse the LED nicely.
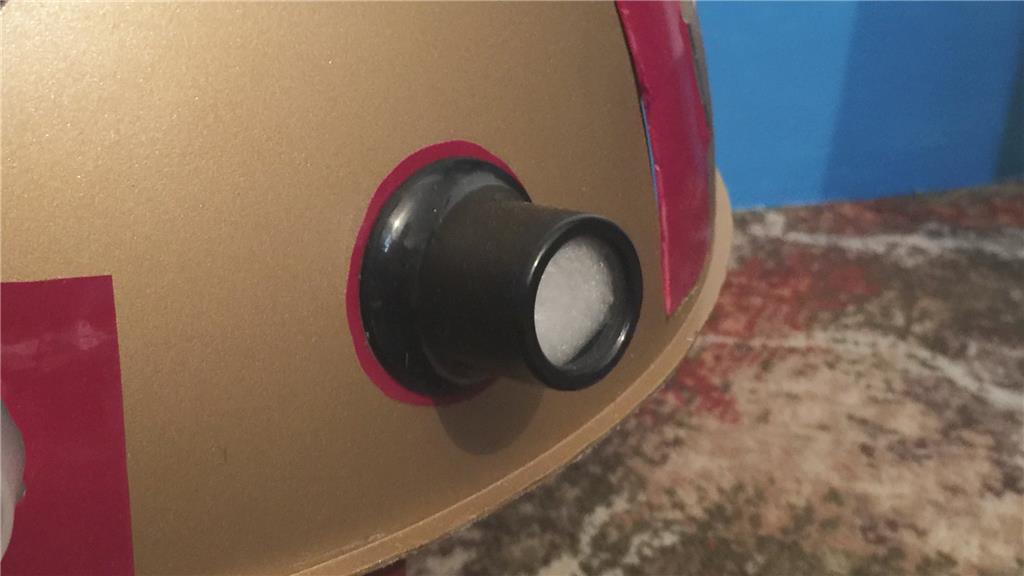
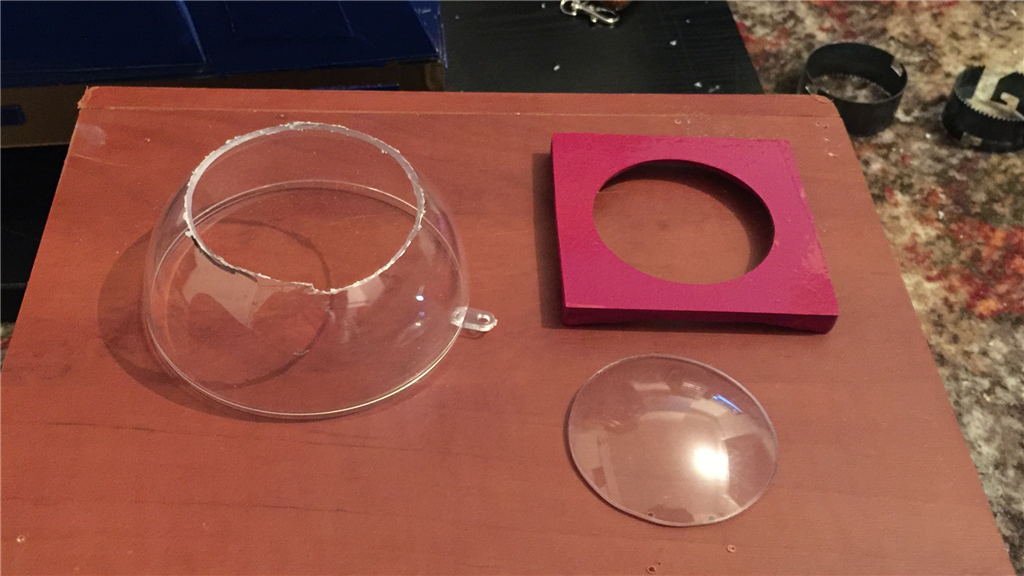
The next bit is the holo projector lens. Here I used a jewellers eye loop magnifying glass. I had to alter the design a little as the full aspect of the image from the Pico projector wouldn't pass through the shape of the lens properly. That's why the Pico has its own flap.
Anyway, not to waste the use of the magnifying lens, I got a little 3.3v blue LED, housed it on a small piece of plastic, and fixed it to the hole for the mag lens. I placed a small piece of white foam inside of the mag lens which would diffuse the light, it attached it to the dome. What's this LED going to do? Well, thanks to DJ adding a new control the other day, the LED will connect to a digital port and flash when a soundboard PC file is played... the files being the Astromech speaking sounds.
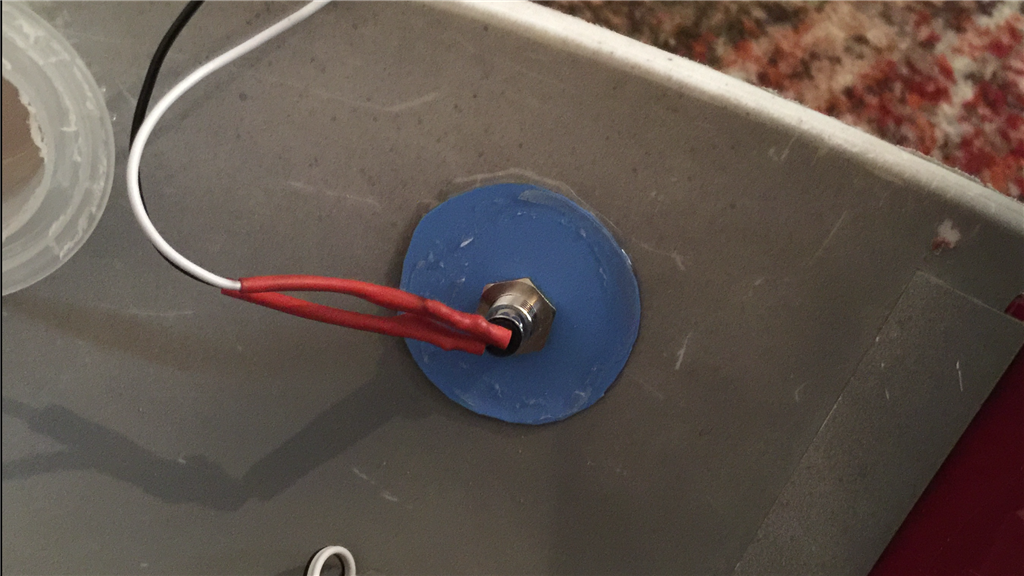
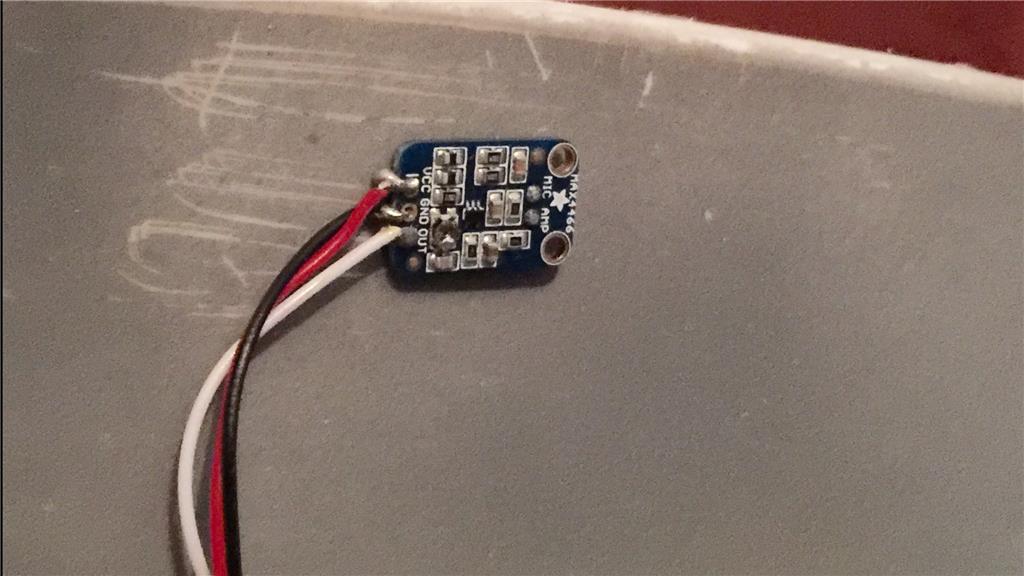
Next is the dome, is two amplified sound sensors which will act as E4-B4's ears, making him look in the direction of any sounds or speech when needed.
Next to go in, was the micro servos for the sensors and projector flaps. @Ron, I know you like your videos, so here's another little one for ya buddy (and for everyone else too)...
"Eye spy with my little eye..."
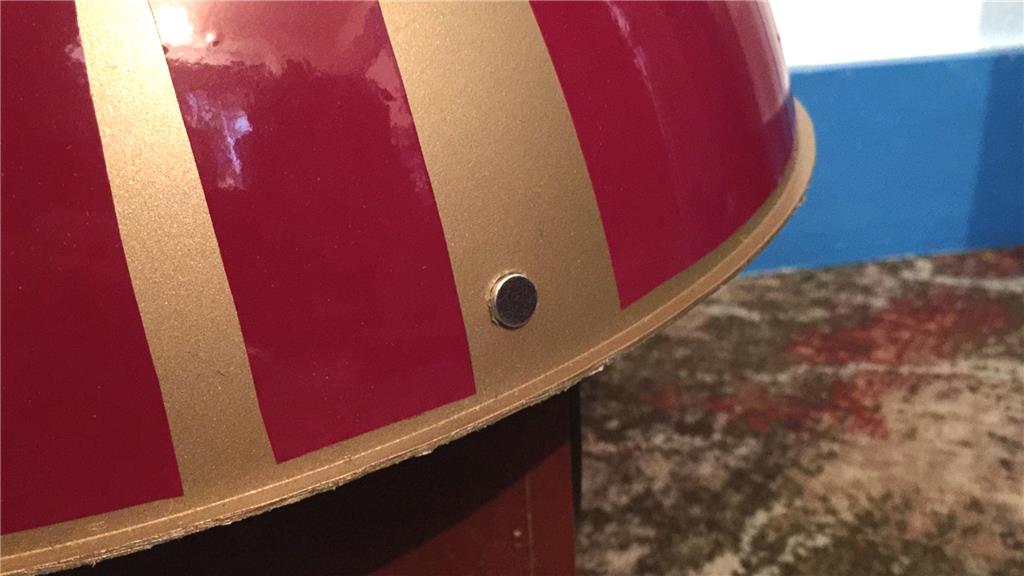
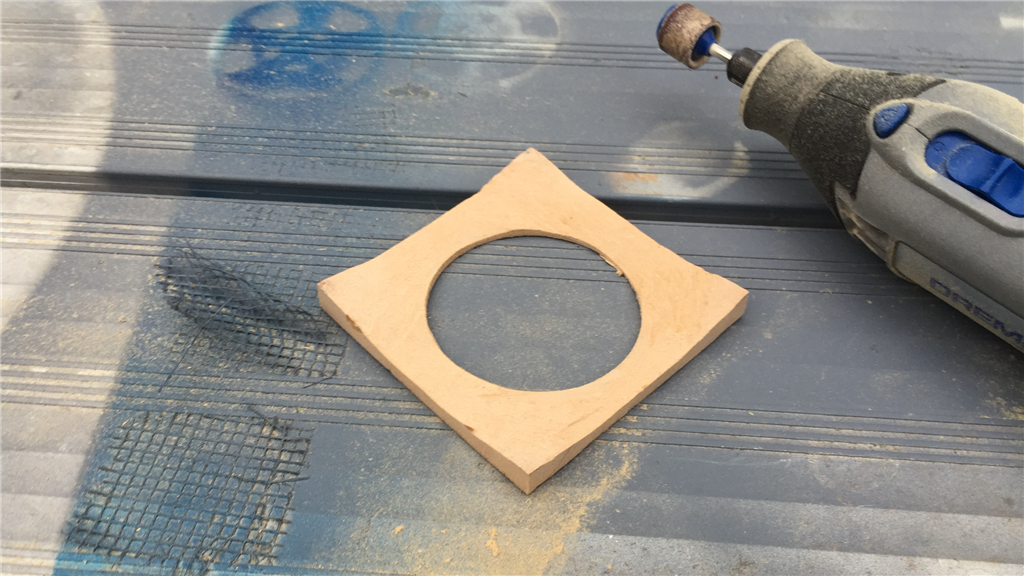
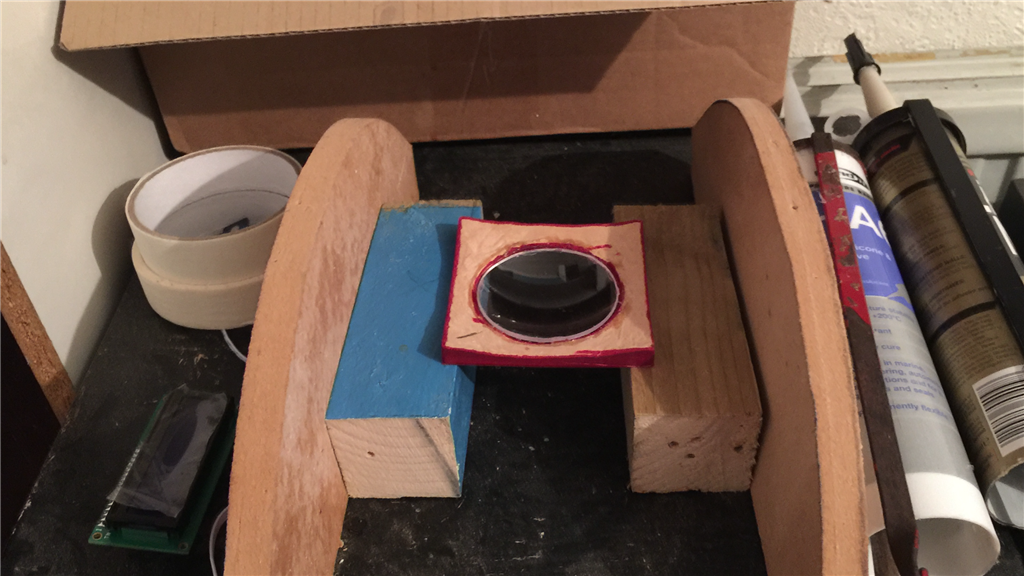
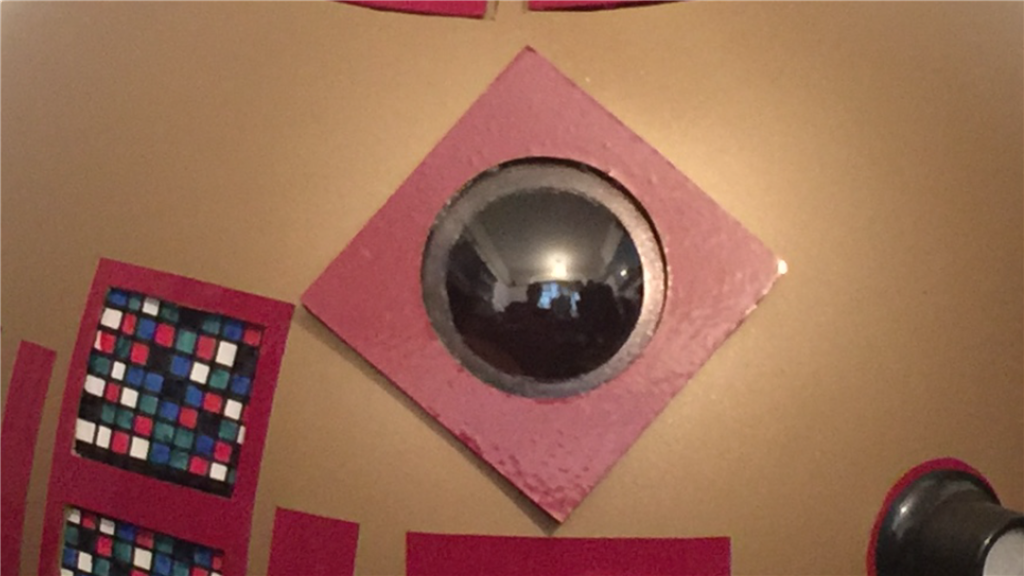
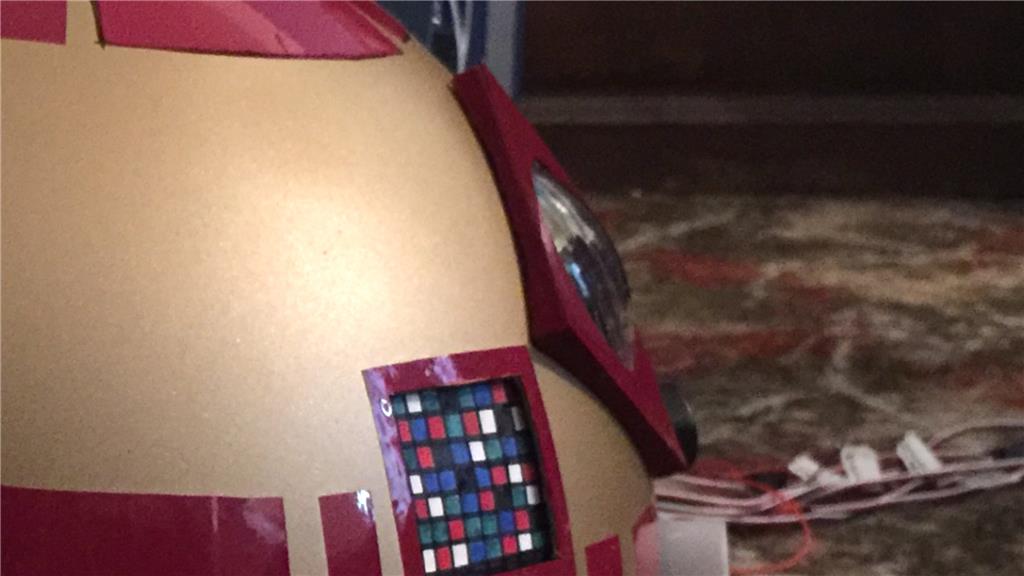
And of course, the most important part of any Astromechs dome... the eye piece. This was made from a piece of MDF, sanded one side down to match the contours of the dome, coloured in burgundy, and a section cut out of a transparent plastic sphere I got from somewhere, to make the eye lens. The lens was glued to the inside of the eye piece section, and then attached to the dome.
Oh, and that colourful bit you see next to the eye piece, is just a piece of cardboard I coloured in to fill a gap, and is only temporary. This will be the logic lighting panel, and the card will be replaced with the EZ-Robot 8x8 RGB LED arrays that will hopefully be available in the store soon.
Soooo close to finishing now. A couple of small jobs to finish off, then I'll be connecting the front skin flaps and dome to the EZ-B and SSC-32, and its ARC time.
More soon. :)
Steve Looking so good man.. I really like the way the dome came out.... Thanks for the video... LOL ..
Great job! looking forward to the next step.
Ron R
@Ron.
Looking forward to the next step? Me too, as it should be the last (of the build anyway). :)
I'm pleased you like the dome. Adding the eye piece made all of the difference. Had to do some head scratching over the flaps, but found a pretty simple solution and they seem to work okay.
incredible how well its coming together! looks amazing :D
@Robot56.
Thanks buddy. That means a lot. Just doing some finishing touches which should be all done tomorrow. Then he should be ready to roam around the house soon. :)
cant wait to see the video.
Cheers Patrick. Everything is on course so videos should be up this time next week.
I've just finished hooking up the front skin and the dome, and set up the servos, sensors and lights. Apart from one small glitch with the sound reactive LED, everything is working fine. There's a couple more small teething problems to iron out, but then he's good to go. :D
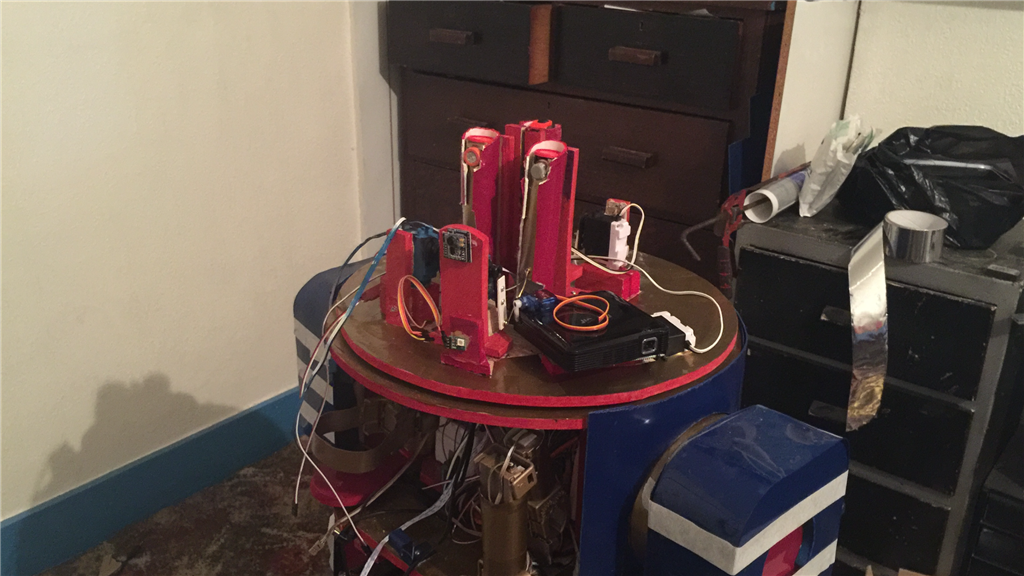
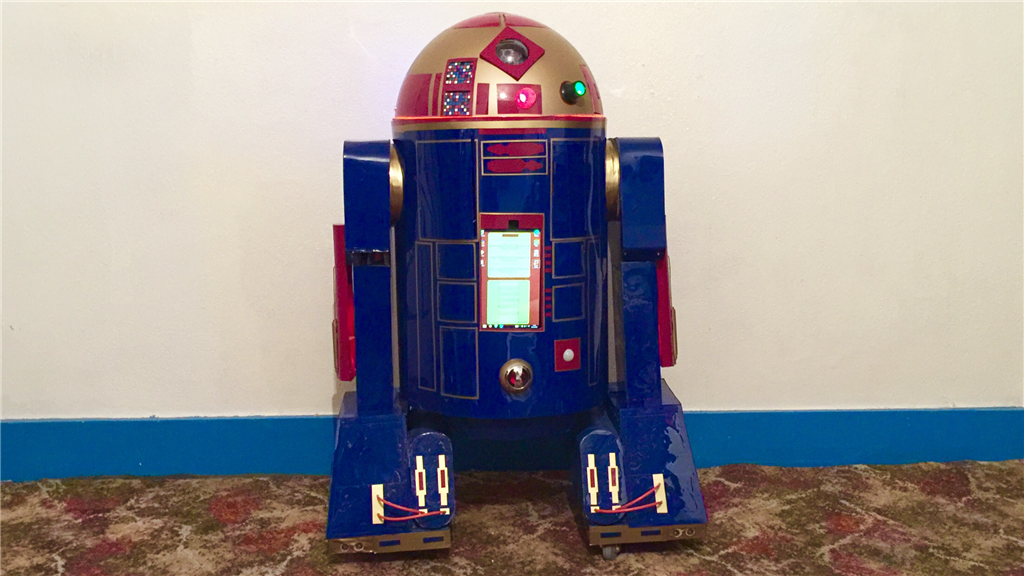
Day 117 28th November 2015.
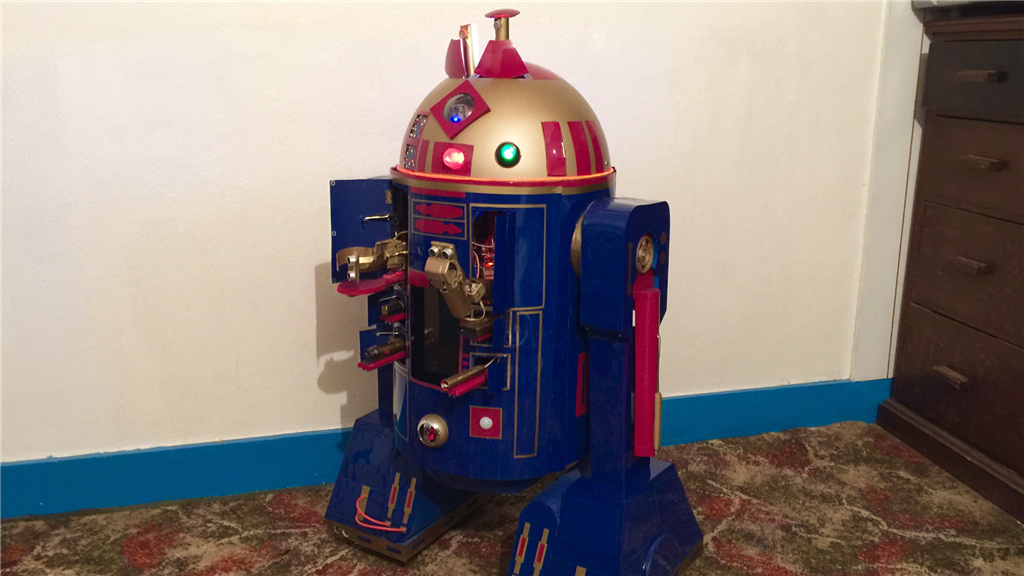
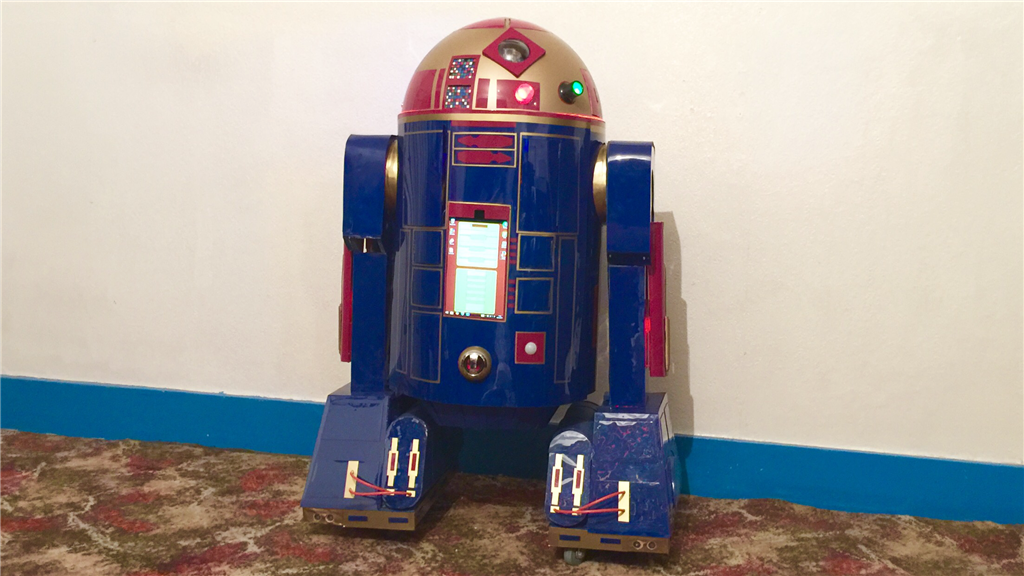
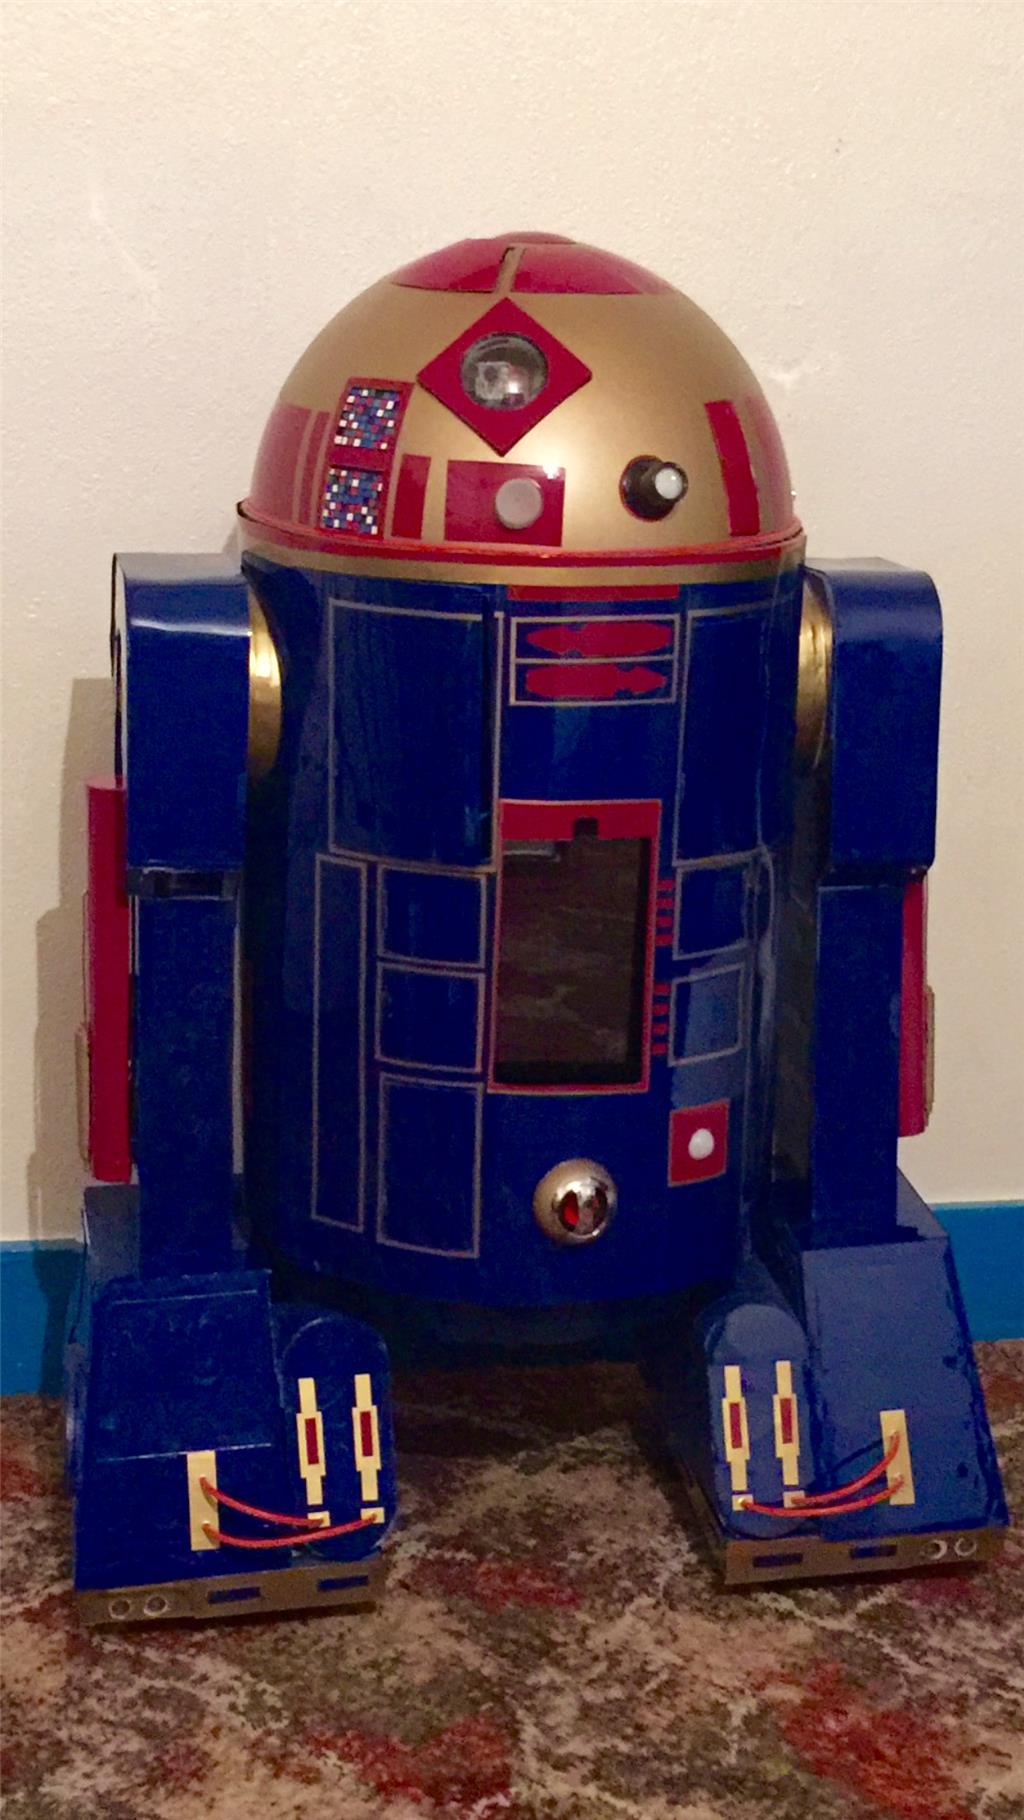
And... he's done.
Time to get stuck in to ARC.
More soon. :)
Hi Steve,
Looks Real Nice ! I can't believe you built it in less than 120 days. I look forward to see your videos of him coming to life.
Please share your scripts. I am very weak in that part, and I will like to see how you did things.
Ron R
Woow. Very nice. If I was a girl E2-B4 I'd be following him around everywhere. Looking forward to seeing him rolling around.
Nice job, Steve. Very impressive! I've been watching your build and I am looking forward to seeing it come to life.
Thanks for the nice comments Ron, Dave and Bob. Really appreciated. I've been stuck in hospital all day having pain management injections stuck in my lower back, so reading your posts cheered me up.
Scripting is going well (@Ron, there's going to be a lot of scripts, so when the videos are posted, if there's something in particular you want me to post, let me know), although I did have a bit of a mishap last night by deploying a utility tool before opening the flap, DOH. It broke the little linkage bracket off the flap, but it was easily fixed.
Another thing was the sound reactive LED. It was advertised as 8ma when I bought it, but it was very temperamental and dim. I measured it and it was reading 12 to 14ma, so it's either faulty or mis-advertised. Luckily there's no damage to the signal pin, so I replaced the LED with a single bulb RGB board and works much better.
@Dave.
Before I start on the others, I've got a short video clip I'm going to post for you in regards to one of your previous posts. I'll try and put it up tomorrow. I hope you'll like it. :)
Looking forward to it!
Be Well, hurting Backs SUCK !
Ron R
Thanks Ron. Yeah, they sure do.
@Dave (and everyone else).
You said,
Well buddy, the drinks holder idea of yours was a good one, but, I see your cup holder, and I raise you...A BEER DISPENSER.
Enjoy. :)
Steve, I have been away dealing with a serious family health issue, but I can not stay silent today. You have created an exceptional homemade robot! How cool is that robot in that video? Looking forward to more! Steve S ;)
Hey Steve. Nice to hear from you, and thanks for the kind words. Real sorry to hear about your troubles... I feel your pain as I'm going through something similar with my mother. Building E4 when I got some time to myself helped somewhat to take my mind off things for a while, and gave me something to focus on.
I'm pleased you like the build, and the video too. Had a little issue with either a temperamental remote relay or motor controller today, so I may change it out for a Sabertooth when I can afford to get one. I just did another video showing off one of his other fun features. I'll post it soon.
Anyway, thanks for posting, and my thoughts are with you buddy. :)
Okay, I've just watched the video for the 6th time and enjoyed it every time. This R2 is so great. You put it together in record time and from odds and ends you had around, which is simply amazing. The finished product looks and functions very nice to say the least. Like everyone else, I very much look forward to more videos. Maybe you can eventually do something with the K9 and R2 in an interacting mode. They could play rock-paper-scissors or some such with each other maybe. That, or plot world domination. Gotta watch these guys. I caught my JD, "Skippy", trying to buy a Fembot on Ebay the other day. Should have never gotten him that subscription to Playbot.
Sorry to hear about your back problems. That must make it all the more difficult to do a job like this. I would say I know how it is, but truth is, I don't. I've never even had so much as a headache in my life. The usual bumps and bruises and colds, etc, all transitory, but nothing chronic. Unless you count the shrapnel in my knee. But that only bothers me if I bump it and I'm very careful not to do that. I admire anyone who can accomplish the things they want to do in spite of such problems. Hang in there.
I'd be happy to contribute to this project if you'd like. No doubt this has been quite a drain on your income. Buy you a Sabertooth or whatever. Just give me a Paypal name or whatever and you shall have it. Also, let me know if you need software help.
Take care of yourself and happy holidays. Skippy says happy holidays too. Wait. Skippy has a question ... What is it? No, he won't send you a fembot either. No, you can't write to him yourself. Nevermind.
@WBS.
Great to hear from you, and thank you for your kind words. Yes this guy was a labour of love so to speak, but I'm pleased with the way he's turned out. I admit that I lost a little motivation half way through, but thanks to the guys here, they gave me the push I needed to crack on.
I have to say, your offer is very gracious indeed, and thank you soooo much for that as it would be helpful. But in all honesty, I can't with good conscious accept the offer, not for a DIY robot project, so will respectfully decline. I just wouldn't feel right about it, but I am truly very grateful to you in any case. If I do need any help with software however, I'll be sure to give you a shout.
I'm really pleased that you enjoyed the video, and E4 passes his regards on to Skippy (I think we should keep these guys apart. Who knows what mischief they would get up to, lol). I would like to get E4 and K-9 working together, maybe for an Xmas video, but I have trouble getting two EZ-B's running at the same time in client mode. Anyway, thanks again WBS, and I'm pleased you like the newest member of the family. :)
To any Sabertooth users, in regards to the Sabertooth controller, I have a question which I just need to be sure of.
Currently, the motor controller I'm using works well, but it has one flaw which is that when I power the robot on, the motor controller springs in to life and starts turning the motors at full pelt until an EZ-B connection is made, and a "motors stop"'init script is run. So because of this, both the EZ-B and motor controller are wired to a 2 channel remote relay control. I power up and connect the EZ-B first, and when the connection is made and Init script run, I power on the motor controller. But as I mentioned, I've run in to a problem (I figured out that it's the Remote relay that's giving me the issues). Even when I make sure the motor controller is switched off before I shut down the other systems, it can be 50/50 whether the motors turn at full pelt again when I power on the EZ-B. I think the relay is tripping which is causing the motors to turn when they shouldn't. E4-B4 has already slammed in to a wall because of this, but luckily he didn't suffer any damage, (although he did take a chunk out of the skirting board).
So the question is, does a Sabertooth controller work the same way and need a separate power On/Off switch where as when power is turned on, the motors would turn so it would need to be switched on after the EZ-B is powered on and "STOP" an Init script run, or does it work like the L298 where you can power the controller on before the EZ-Bs connection is made, and the motors will already be in a "STOPPED" state? I think I know the answer from what I've read elsewhere, but I'd like to be sure.
Thanks. :)
very nice
Hi Steve,
LOL ,, I am impressed with the Very Functional and Important Accessories which were shown on the first operational video. LOL,,,, LOL
All I can say is, it was really great to watch the progression of the build of this fine project, and thanks for the sharing of it by you with all of us.
I look forward to your programming updates. Thanks and we look forward to more on E4-B4 and K9.
Ron R
Cheers guys. Yeah, you can see that when building E4, I had two of my favourite subject matters going hand in hand with the design... science fiction, and beer, (hey, it works for soft drinks too kids,lol).
On your Sabertooth question, I have never had an issue with having to turn on or off the Sabertooth before or after the EZ-B. The Sabertooth operates off of a serial connection. If that serial connection isn't present, I suspect that the Sabertooth stops. I do things a bit differently by using an arduino to drive the Sabertooth (completely unnecessary for your robot) so I couldn't tell you if the V4 would send some garbage to the Sabertooth that could trigger an action but I seriously doubt it. I haven't seen anything that would indicate that this would be an issue.
Because the Sabertooth uses serial, both devices would have to be powered up (in either order) and then the serial connection established. I can tell you that if I push the button to restart the arduino that I am using, the Sabertooth stops the motors and I haven't programmed anything specifically to do this.
There are different modes on the sabortooth. I use simple serial mode for the most part. It is very easy to use. I don't know if other modes could cause an issue or not.
@David.
Okay, that makes sense and is good to know. Thanks. I know Dave S has experience with this, and I believe he has his Sanertooths hooked up directly to an EZ-B, so hopefully he will chime in as well.
Thanks again.
Okay, problem found, and resolved.
It was indeed a faulty relay on the remote receiver. Both channel relays are supposed to be N/O (normally open), but after removing the receiver and testing it with an LED, the one the motor controller was connected to was a N/C (normally closed) relay, so a manufacturing fault there.
Luckily I have a 4 channel receiver which I was going to use for something else, so hooked it up, and it works great. I still think I will go the Sabertooth route, but at least there's no rush for it now so I'll get one after Xmas (Just need to get some filler to repair that skirting board, lol).
In a previous update, you may have noticed hinges on E4-B4's outer leg panels. Here's a little video demonstrating one of E4's "just for show" features, and shows what those hinges are for. Nothing special, just for a bit of fun...
this is a serious r2d2,very cool
Ha ha, glad you liked it Patrick.
E4 had one too many cans of oil last night. :P
Nah, actually he was having a little bit of wheel slip when moving around the place, so I hacked up an old bike tyre (did something similar with K-9) and put the new treads around the drive wheels. He moves around sooo much better now.
I've also added servo release commands to a lot of the scripts for the SSC-32, to stop the sometimes irritating servo buzz. Ahhh, silence is golden.
I like the Rocket Man feature.... Looks cool.. I got nervous when I saw him on his back this morning. Good to know it was just an update, not too much of the preferred beverages....
Ron R
Hope the back is doing better.
Yeah the picture looked worse than it was, lol. Glad you liked the video Ron. Yeah the backs not too bad now thanks. Busy making the mobile controls today. Coming along nicely.
Outstanding, definitely seeing some good ideas especially when applying the saber motor controls
Thanks @R2d2tech01. In glad it has given you some ideas. Yes, the Sabertooth is deffinatly on my list of things to get next year, and E4-B4 will be the first robot to try it out on.
I've spent the weekend starting to build his ARC project, so hoping to post a showcase update later which you may like to see. It will have some new photos, videos, and short explanations of some of the things he can do so far. :)
I can see you're having a lot of fun building this robot. I'm really enjoying watching it come along.
You mentioned sending release commands to the servos in your many scripts to stop the servo buzzing. Is the command you're using :
Release (servoPort) Release a servo from holding its position Example: Release(D14)
OR
Servo (servoPort, position) Zero being a servo release Example: Servo(D14, 0)
To confirm are you using digital servos? When you do this are your servos also relaxing completely like there is no power and not holding position? When you try to move it with your hand after the release command has been sent will it stay in place and buzz? I ask this because I'm using a Hitech HS-7950TH programmable servo and when I send the release command "Release (servoPort), Example: Release(D14)" it still buzzes and tries to hold position. The problem I'm having with this is when the robot moves, this servo will bounce and rock back and forth within the deadband. When the robot stops sometimes this bouncing keeps going. This is in the wrist of my robot arm and makes him look like he has the Drunken Tremors. sick The only two ways around this if I can't get a true release is to either:
Sorry, I hope you don't think I'm hijacking your thread but you have done some good work on the servo release feature lately and I wanted to pick your mind on how it works in real life for other builders. I'll start a new thread if your answer does not clarify my release issue. ;)
Hi Dave.
Really pleased you enjoying watching my progress, and hope you liked the "beer" video I made for you. It has been fun (although I'm ironing out a few bugs at the moment, but nothing major).
In regards to the servo release issue, you're more than welcome to ask and you're not hijacking the thread at all. My situation is a little different to yours, as 28 of the 29 servos I'm using are connected to an SSC-32U servo controller so the commands I'm using to release the servos is a little different. I use scripts to control each servo instead of using the virtual ports, as this gives me servo speed control. These are the commands I'm using...
When the servo release command is run, it will completely cut power to it so where I can move it by hand.
The servos I'm using are the EZ-Robot HD and micro servos (with 2 tower pro micro servos, not sure if they're analog or digital). The other HD digital servo I use is for the dome and doesn't need a release command as it rarely buzzes.
I haven't really used the Release() script command and only used the servo position "0" previously with the Auto Position control, so can't really answer your question in that regard, although I know you can turn a servo by hand when using the panic release in the menu ribbon, and using the Servo(D5,0) script command does not release a servo (I was mistaken about that a while back as I thought it did).
I don't think the info I gave is really relevant to yourself, but hopefully you (or others) might find some of it useful. :)
LOL! I missed that video somehow. I absolutely loved it! That's one of my favorite beers also. Thanks for thinking of me. Now I know what the first thing my B9 arm and claw is going to have to be programmed to do!.
No worries about the servo buzz and release. I'll get it figured out.
Cheers!
@Dave.
Lol, I had a feeling you might not have seen that video. Glad you watched it and enjoyed it, and I would love to see your B9 serving a drink :).
Sorry I wasn't much help with the servo issue. I hope you get it sorted out to a point where you're happy with it.
BTW, I just saw your cloud project update on the forum, and wanted to say that I like your ARC project wallpaper. Really nice.
Hey, if you didn't live on the other side of the flippen world I'd love to have B9 serve you a cold beer. Maybe someday. Stranger things can happen. I almost bumped into Toymaker down in Jamaica earlier this year. Sadly we couldn't sync our schedules and meet up. That was a real loss on my part. I won't let that happen again if I ever get the chance to meet a fellow internet friend from afar.
Hope you didn't look too close at that project of mine you mentioned. It's a mess. I need to get rid of bunch of useless scripts and set up a few Script Managers. The whole project needs organizing. However I'm glad you liked the Lost in Space wallpaper. I'm real fortunate to have it. I found a free download of it on the Sci-Fi-Air-Show's web site. It's called "Da Vinci" Jupiter 2. Here's the link if interested:
www.scifiairshow.com/#!extra/c1k9b
@Dave.
Yes, I did see past the script controls. No worries, my project at the moment is not much better with loads of test scripts I need to clean up.
I'm just waiting for one of my showcase videos to render so it gave me a good chance to look at that link you posted (just realised its 2:15am. Well past my bedtime). Really cool content. I love the Jupiter 2 model, what a fantastic build. I like the video too. It was nice to see the BSG Vipers and 1999 Eagle space craft. Thanks for posting that. I really enjoyed looking at that.
Hey, you never know, we may cross paths one day and have a brew. Stranger things have happened. ;)
UPDATE 7th December 2015.
Here it is, THE BIG ONE. The showcase part of the E4-B4 build diary.
It was a fun, all be it challenging build, but I feel I'm in a good place now to share some completion photos and a couple of showcase videos. The first video is one of two that I planned on making which shows off some of his functions. I've still got a lot to do in regards to writing scripts that will interact with E4's abilities, but it's off to a good start. So, find yourself 15 minutes, grab yourself a drink or a snack, sit back and have a look at E4-B4 in action...
And for those who don't want to read through the whole build diary thread, here is a "making of" video montage of photos and video clips I took during the build that shows the entire build process from start to finish. Enjoy...
There will be more to come when I get more done, such as installing the 8x8 RGB's when they arrive in store, and I have plans on building a charging alcove for auto docking and battery charging. I saw that there will be a wireless camera available early next year, so I may just grab one to help with the docking ability.
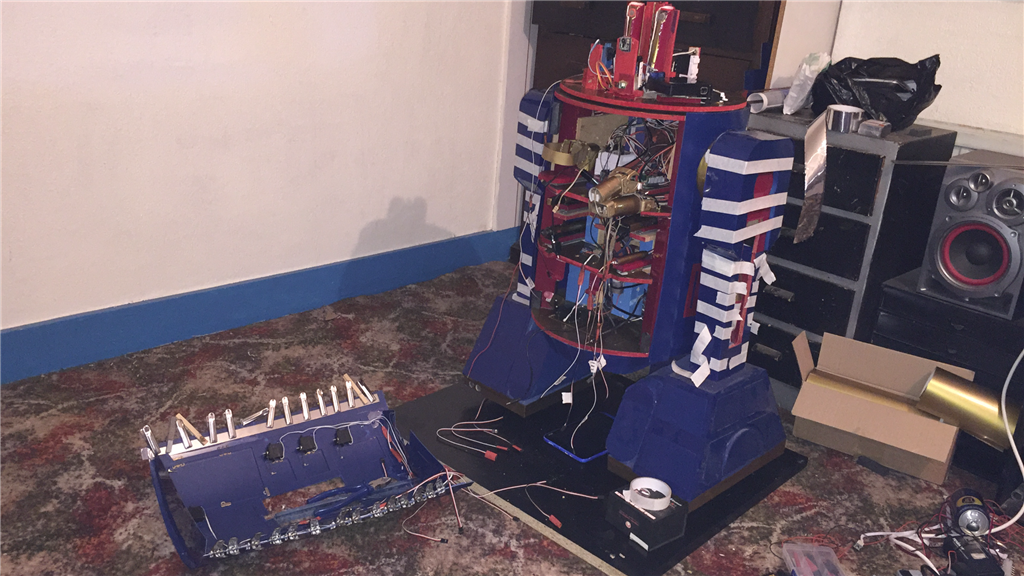
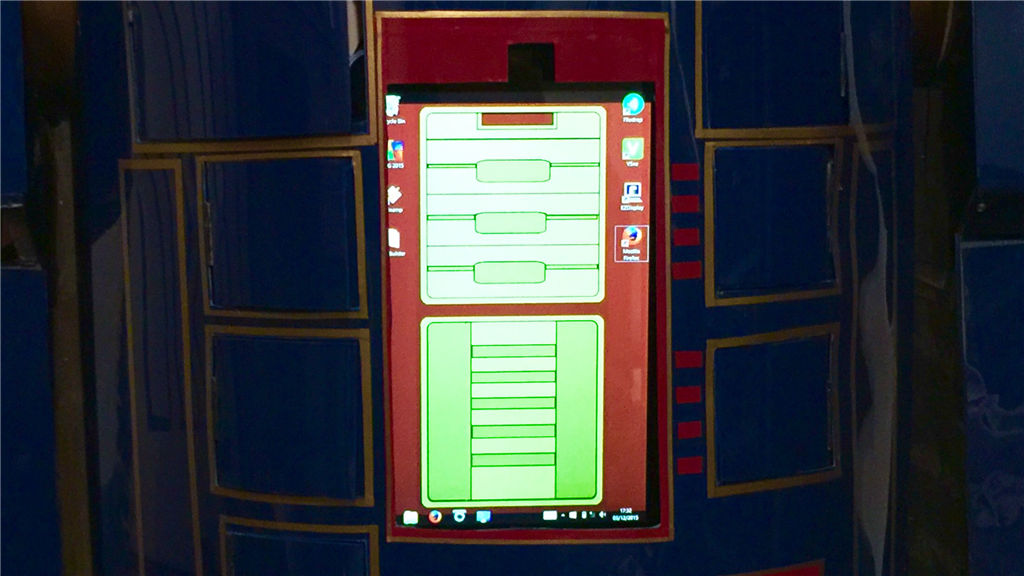
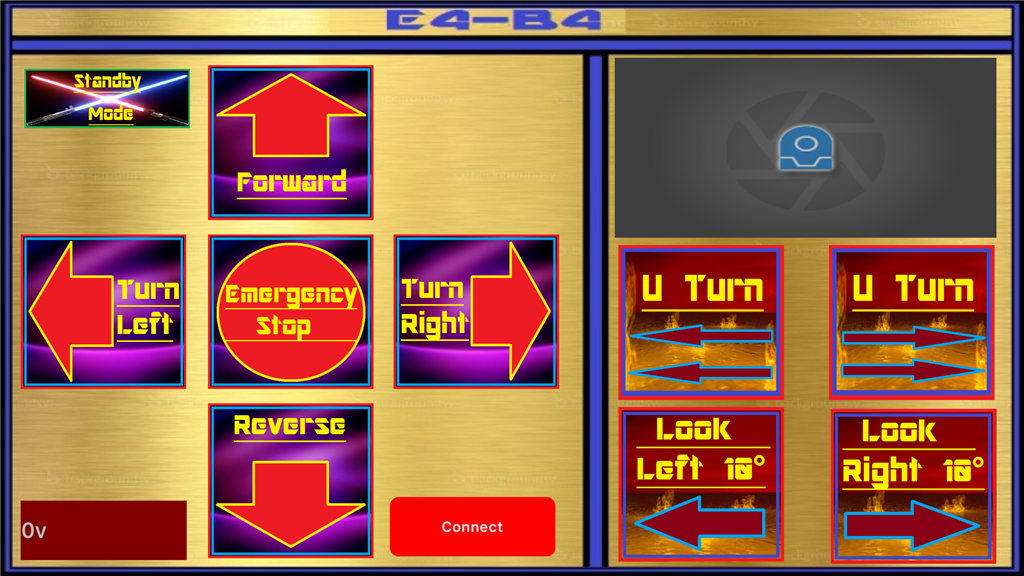
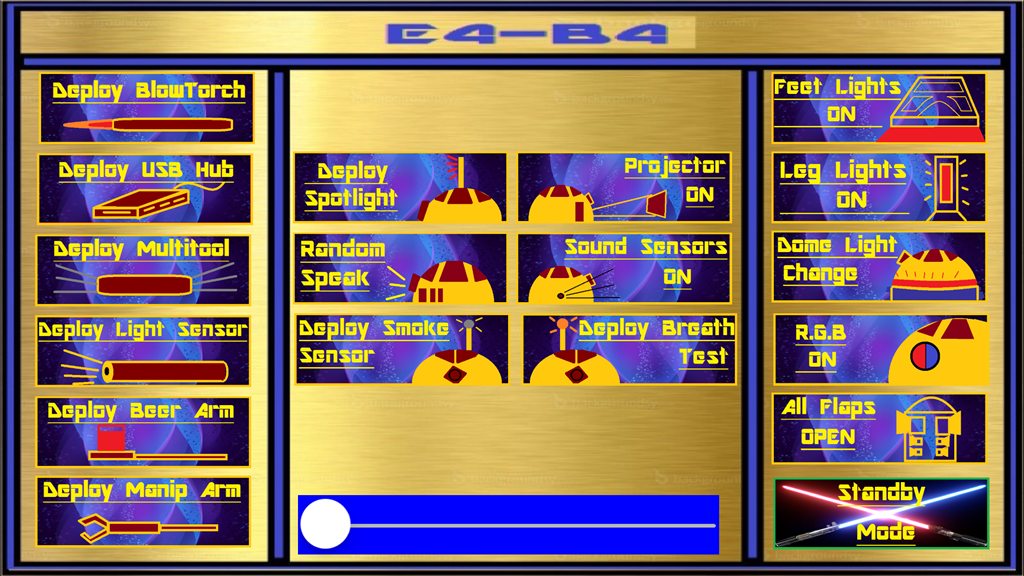
I've also made a start on his mobile interface controls. I've got some room for some more buttons should I need to add any, but everything I need for mobile control is pretty much there...
Screenshots from my iPhone 6 Plus.
I may change some of the button designs as I was only working with MS Paint which is not the best software in the world, but it does the job (with a bit of lateral thinking).
Anyway, I hope you enjoy the videos, and as always, I'd love to hear your comments. :)
Steve.
stunning video&pics
Thanks for your kind words Patrick. :)
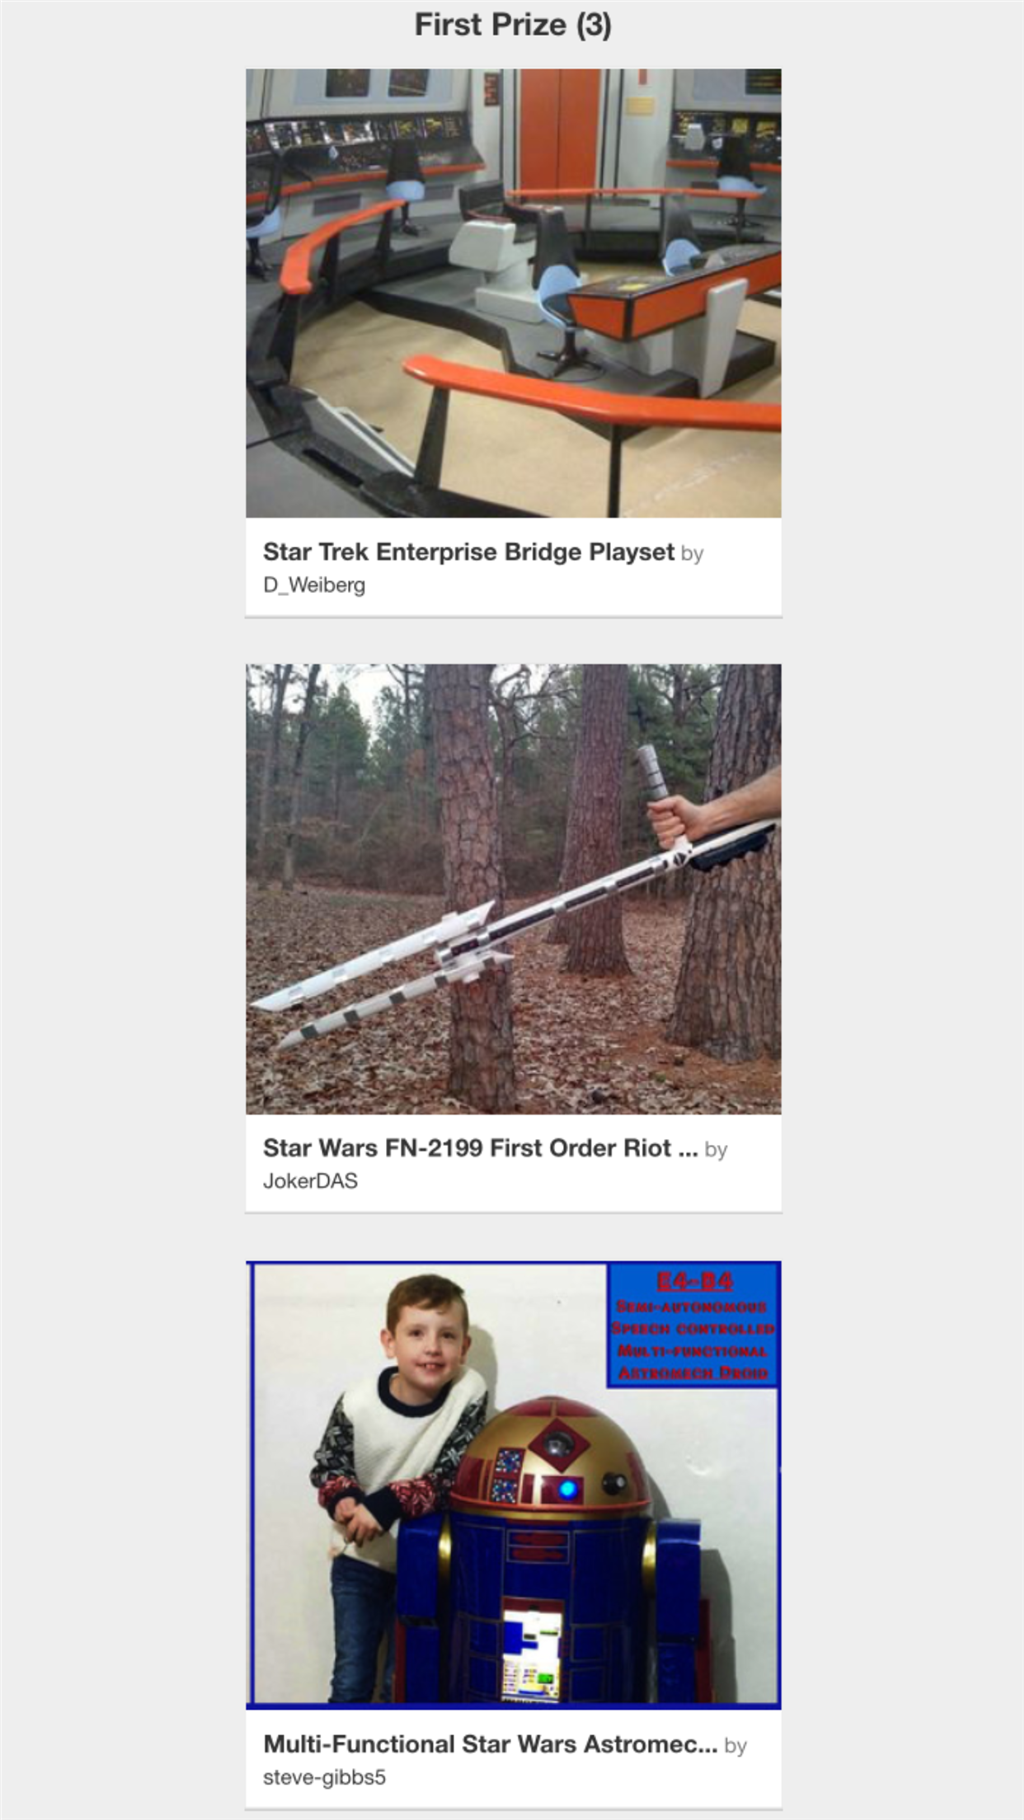
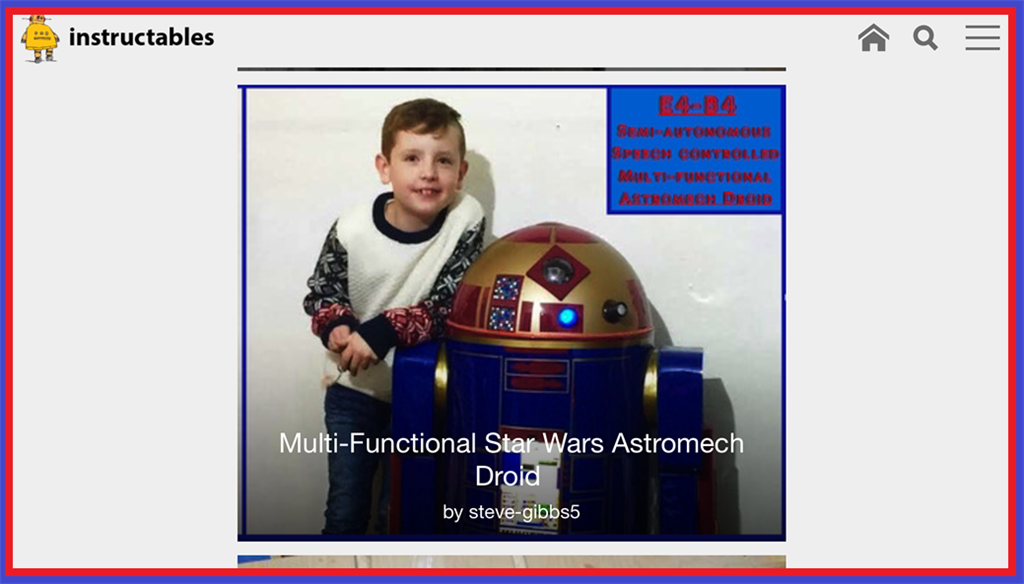
I have posted an Instructable on how E4-B4 was built, and just received an email from someone from their head office saying that they like my project and it is eligible to be entered in three contests they're running, and suggested that I entered. So I did, and here are the links for the contests...
Tech Contest
Robotics Contest
Sci-fi Contest
I made sure EZ-Robot got a few mentions with links to the site. Maybe some of our members here could enter the comps as well, as there is plenty of great projects here. ;)
FANTASTIC PRESENTATION OF A GREAT PROJECT !
I really enjoyed the journey of the build. Thanks for taking the time to share. I am sure you have inspired many.
It was fun seeing the high quality presentations.
Ron R
Good Luck in the contests
Ron R
great news,hope you win. :)
@nomad.
Thanks buddy. The guy who emailed me seemed to think is has a chance of winning something. I wouldn't have entered if he hadn't said that. Oh well, wait and see. :)
@Ron.
Thank you for your nice comments and support along the way. You, among others, certainly kept me motivated throughout the build, especially when I needed motivating. I'm pleased you like the showcase presentation. I was up until 4am trying to get the videos finished but I think they came out alright. I'll sleep well tonight that's for sure. :P
Your entry is head and shoulders above the others in the Robots category. Several of the entries there weren't even robots as far as I could see. Heck, both of the biped robots I looked at could not even actually walk.
In the Sci-fi Contest, it's no contest. So far anyway. The Tech Contest is a bit harder to call since there is such a wide range of gadgets in it. Even in it though I didn't see anything as great as yours, but there were so many I didn't look all that closely at them. Some of them that didn't look like much may have had significant technical merits.
If it's strictly won by number of votes, then who knows which will win in any category since it becomes a contest of who can get out the vote instead of actual quality of entry.
Anyway, voted for you in all 3. Good luck!
Got my votes !
Ron R
@WBS.
Wow, I don't really know what to say to your response except, thank you. Yeah the Sci-fi one should be a breeze, considering there's only two entries, lol. The guy who emailed me said that there was a new comp that started today which was perfect for my project, but there's a long way to go with that one. Anyhow, it's the taking part that counts... right?
Anyway, thanks (and to Ron as well) for your votes and kind words. It makes building E4 even more worth while doing. :)
I just wanted to mention one thing about the blowtorch that I missed out previously. I fully intended to automate it using a servo of something to switch the gas flow on, and an igniter (saw a 3.3v one on an online robot parts store, I think mainly used for fireworks. Can't remember which store) to ignite the flame, but from a safety aspect, I decided to keep it manual for now just in case something went wrong and retracted while the flame was still burning. If the flap closed on that, it could make for a large amount of molten plastic mess... or worse. Any ideas anyone has on this would be great.
Great stuff and thanks for sharing all this wonderful information. Are you able to control both EB brain units with 1 iPhone or controller? It looks like you need 2 to run all those serves and gadgets. excellent astromech, the rebellion would be proud.
@r2d2tech01.
Your more than welcome. I'm more than happy to share what I've done and hope it will give someone ideas or inspiration. I'm pleased you like what I've done and thanks for your kind words.
In regards to using 2 EZ-B's, that was the original plan, but I had trouble having 2 v4's stay connected at the same time. Because of this, I now only use one v4 and decided to use the SSC-32u servo controller board which connects to the v4 using one of the UART ports, and run all but two of the servos through that instead.
Thanks Steve, BTW voted for you on instructables, hope you get dude, and may the force be with you, always.
@r2d2tech01.
I appreciate the vote, thank you very much. Live long and prosper buddy (oops, wrong universe :P)
I had to rewrite the ARC project as it became very unstable and kept crashing, but I think I've figured out what was causing it (badly placed sound files by me, competing to play over each other). So I've made two projects now... one dumbed down for mobile control, and the other which now plays sound files using exec() commands instead of using the soundboard (after a helpful reminder from Dave S). Seems to have made a big improvement.
I also received my new DSR conference microphone today, and after initial tests, it seems to work really well, with speech recognition commands being heard from across a large living room. I just need to find somewhere to install it into E4. confused
I've got a busy few days ahead what with Xmas fast approaching like a speeding train, and I'll be doing things I should have done while building E4. But I hoping to get part 2 of the video showcase filmed and posted soon.
I'm still blown away by this project! Well done and placed my vote!
Is there any literature on how the SSC-32u servo controller board works with the ezb? I would be interested in that for my astromech as well Nevermind I found it haha
Also I will copy the code I wrote when I get home for a script that autoconnects the boards when a signal is dropped on multiple boards. I had the same problem that you did and the script helped a lot
Aaron
@Aaron.
Really, many thanks for what you said (and for the vote too). You know, this whole project is mainly down to you really. If it wasn't for your excellent R7 build and showcase which motivated me, chances are I would never had started this particular project.
Yeah, the SSC-32 is a great bit of kit, and I'm really pleased with how it performs. Sure I would have liked to use two v4's, but as it goes I wouldn't have had enough ports for servos anyway. It would be nice to have a look at your script though, and next year I may change my router anyway as advised by @thetechguru.
E4's been doing a little home schooling this evening, where I've been teaching him more objects and some family faces with the camera control. Tracking is next.
Anyway, thanks again buddy, and keep up the great work with your Astronech. :D
UPDATE. 12th December 2015.
Here it is guys, the second part of the video showcase to the one that's in post #129.
Enjoy. :)
I have been having great results with the conference microphone I got, and as you can see in the video, E4's speech recognition can understand me really well from a cross a room with, so far, about a 97% success rate with confidence set around the 70 mark.
I had to change the "E4" speech recognition command to "E4 listen", as it kept getting false positives and in-pausing the speech Rev control. It also doesn't help having a TV channel here in the UK called e4. Every time an ad for the Chanel comes on screen, E4-B4 would spring to life and go bananas, lol.
The "Astromech Translator" has proved popular as my nephew was enjoying asking E4 to tell him some jokes yesterday.
WOW! Great work, Steve. In post #144 you wrote you wouldn't have enough servo ports on 2 - v4's. How many servos are in your E4-B4?
OK, Now you're just showing off. LOL. Truly amazing how much this little droid can do. You've done a great job here. I'm stunned how fast you built and programed this. Your skills are blossoming with each bot you build. I hope your next one is NOT a terminator. eek
@Bob.
Many thanks for your comments buddy. I'm really pleased you like him. In regards to servos, he has a mixture of micro and HD servos, 30 in all. The EZ-B has the motor controller, 4 pings, 5 relays, 2 RGB LED's, 2 servos and a PAR sensor which takes up pretty much every digital port which left 28 servos to hook up, so the servo controller was the best option.
@Dave.
"Little droid", yeah he is a small fella, but boy does he way a ton. I need to make me one of them cranes that lift droids in to the X-wings when I need to lift him. After what I've seen with your stunning B9 arms, maybe you could help me with that, lol.
Anyway, thanks Dave for your kind words and support. I'm certainly learning lessons on the build side of things and slowly but slowly getting there with writing scrips, although I've still got a long way to go with that. I'm just not picking it up as fast as of like, but I'll keep plugging away at it.
Yes now the head scratching begins "what to build next". Okay, you have a point about not building a terminator. Now a Cylon centenarian on the other hand... "By your command" eyeroll
Thanks again guys. :)
Steve, what an amazing robot, well done!
I was also made in Mitcham (born in Lavender Avenue off Figges Marsh) so know the area well and I built my first (big) robot there in 1979 in my Dads shed.
I did not realize that object recognition worked so well, is this Roborealm that you are using?
After such an incredible build as this, I am looking forward to see what you do next!
Tony
Hi Tony. Great to hear from you, and thanks for the compliments. I know Lavender avenue well as my surgery is Lavender fields.
In regards to the recognition, I do have to roborealm but haven't used it for a while. What I'm actually using is ARCs recognition. There are times some objects will need several trained angles as it won't pick up so well, such as the remote controller in the video above, but as you've seen, recognising the beer can and phone bought back some amazingly fast response times. I've had hit and miss results on actual tracking though, but that's probably down to poor lighting on my part which is being addressed shortly.
We'll deffinatly arrange to hook up sometime. I hadn't forgotten, it's just that life got in the way (as it usually does).
Anyway, I hope you're keeping well and it's really nice to hear from you.
Yes, what to build next? Hmm. ;)
Hi Steve,
I am lost for words. I can only say watching you go from the concept to the completed robot with all it's abilities has been great! It is incredible what your guy can do! I never thought your plan was to make such an interactive robot. He seems to be a great companion. I can't say enough except WOW !
Thanks again, for sharing !
Ron R
Be well
Hey Ron.
I enjoyed sharing the build with you guys and getting all of your feedback. Yeah the plan always was to cram in everything I could to make him as interactive and practical as I could with what I had. I've got a couple of friends who are coming over next weekend for a few Xmas drinks. It will be interesting what they make of him. They knew I was working on something robot related, but didn't know what.
I'm pleased you enjoyed he showcas, and thanks again for your kind words. :)
Take it easy.
Steve,
I want to thank you. Your build is amazing and it give me motivation to push through some issues that I have had with Rafiki.
David
Hey,, I hope he serves the drinks,,, LOL
Ron R
@Ron.
He sure will :D.
@David.
Wow, in pleased I could help in that regard. I know you've got a lot going on, and I know for sure that you will iron out the issues you're having and end up with a fantastic product. And I want to thank you for the email about the speech rec recommendation. It works great. :)
Take it easy my friend and have a good rest. You being healthy is more important than anything else.
Cylon Centenarian! YES! You gotta do that robot next! That would be AWESOME!
I continue to be blown away with this creation. It's going to be hard to top. By anyone. My vote for next robot would be for a Johnny-5 or a Wall-E. Full size, of course. :D
Then there is the C-3PO. He could be there simply to translate for E4. That would be great, but that walking thing is really hard to make work, so it's probably not practical. OTOH, a C-3PO costume would be great for occasions when you show E4 off at some convention. The two of you could make a smashing team.
@WBS.
Again, thank you for your kind words. I'm continently greatful for your positive comments about my build. Yeah, I can just see SQUEEZING in to a 3PO suit, lol. Nice idea though.
Really though, I'm not really planning on another build just yet (although there's a couple of ideas floating around my head), but when the time is right, and my bank balance, I may go for a more unique build of my own design rather than going for a Sci-fi bot. I deffinatly won't be doing a half or full size biped build... that's way beyond my scope right now.
I would like to stay away from using wood next time. I love working with it, and as you know, it makes great sturdy frames and is easy to work with, but it's takes up room and gets heavy the more is added to a build. So I would like to work with something else that's equally strong and easy to work with. But that for next year... possibly.
Hi Steve, A couple of questions for you. I'm wondering what projection camera you used and what video editor are you using to do your great videos?
Once again nice robot!
@Bob.
The projector is a "Miroir MP-60" connected via HDMI to the Acer W3. The Acer has a neat setting where you can choose if you want the screen to automatically switch to landscape when the projector is powered on.
So the way I have it set up, ARC is displayed in portrait mode. If I want a movie played, a script is run to move a micro servo that will switch the projector on that in turn reorientates the screen to landscape, a short Sleep() runs while the projector powers up, then the movie will play in landscape.
When the movie is finished (using a speech rec command or a sleep() for the length of the clip), the servo turns the projector off that again, that in turn reorientates the tablets screen back to portrait. It's a pretty neat option.
As for the videos, they are filmed on an iPhone, and the title pages I either do with a picture editor, and/or use a few iOS intro designer apps. The editor itself believe or not, is plain ol' Windows movie maker. I've used it for ages so I know how far I can push it's limits. I should really upgrade to something else with more features, but it does what I need it to for now. It can be temperamental at times as I film everything on my iPhone, and every now and then WMV will say that certain .MOV files are corrupt. A quick restart, and all is well again. I also have iMovie installed on my iPhone which is handy for throwing together and cleaning up smaller videos on the fly.
Hope that helps, Bob. :)
Just a quick FYI. The free version of Videopad (http://www.nchsoftware.com/videopad/index.html) is pretty good with a number of transition effects, plus video on video overlay capabilities. Also multi-track audio mixer built in. I'm not certain it's still free though, having just looked at the site.
Also, some of the video stuff I do is creating swf files. I translate them to avi using the free version of Recool SWF to Video Converter (http://www.swf-video.com/swf-video-converter/index.html) I then use Videopad to put everything together. Like this example: https://vimeo.com/71411621 The sound is somewhat low on here, so you may have to crank up your volume control.
Thanks for the info, guys.
No problem Bob.
@WBS.
I had a look at the first link you provided, and the editor does still seem to be free for non-commercial use. I'll check it out, thanks. :)
@Steve G
Here is some inspiration for your next build :D
@rgordon.
Wow, that's some build. If anything was to give me inspiration, that surely does. Fantastic. Thanks for sharing. :)
that is a crazy cylon build
stunning
I saw that you posted a couple of months ago asking if the servo driver could be used to turn ports on or off, or if it can only be used for servos. Were you able to configure it to turn on or off using the relays or with code?
I am trying to figure out if I can completely eliminate the V4 in the dome and only have one board using this :)
Aaron
@robot56.
Sorry for the late reply. No, I didn't get any further turning SSC ports in and off. I was going to go with the suggestion in Post #5, but didn't get that far as I decided to use 98% of the servos with the SSC, and do everything else with the v4.
:D HAPPY HOLIDAYS EVERYONE. :D
Hear a few pics of my nephew, Jake, when E4 gave him his little Christmas present of a Lego Luke Skywalker in his flight suit..
With all of the fun going on, I forgot to shoot a video of E4 giving my nephew his gift. So here's Jake almost being squirted with the water jet...
Fun picture. Hope you had a fun Christmas.. Good wishes for a Happy New Year
Ron R
LOL! What fun. Family is the greatest! Looks like you all had a good Christmas. :)
By the way did serve any drinks...LOL.. Ron R
Thanks guys. Yes it was a nice day all in all. Hope yours was too.
E4 did serve a couple of drinks and used his beer arm to give a couple of little presents. Once my nephew learnt the phrase to squirt the water, a few other members of the family got a drink of water or two, lol. :)
Well, would you believe it...
E4-B4, IS AN INSTRUCTABLES CONTEST FINALIST...
So I'm in for a prize of some sort, and the final judging to pick who wins what, will apparently be done this Monday coming. There's a few really good projects what made it to the finalists list, so it'll be fun to see where E4 ends up. And he's the only EZ-Robot entry. Fingers crossed for a good finishing position. :)
Instructables Sci-fi Contest
its allreddy great to come this far.thumbs up
Congrats, Steve, fingers crossed for you.
Grats Steve. You have my vote!
It doesn't surprise me.
got my vote
Thanks everyone. :D
Hey Steve,
Best of Luck ! ..... He is a First Place Droid.... I'll be watching Monday !
Ron R
Thanks Ron. E4 is up against some stiff competition. ;)
You deserve to win. That is an awesome droid!
Many thanks @rgordon. Very kind of you to say. ;)
Steve,
I'am giving you a golden ribbon.
@Aerius.
Lol, that's all I wanted.
Thanks. :)
Well, the Instructable contest results are in, and...
Missed out on grand prize to a BB-8, but really happy with the result. So E4-B4 has won me one of these...
Also great that he won as its another bit of notoriety for EZ-Robot.
So, a BIG, BIG thank you to everyone who supported and voted for E4-B4. It means a lot to have the support from you guys and I'm very grateful indeed (and so is E4). :D
http://www.instructables.com/contest/scifi2015/
congrats.
Thanks Patrick. Looks like I've got a new toy to play with, lol. ;)
you can store it on your atik for later use
Congrats and well deserved despite some really tough competition in that contest. There were some really cool devices, but I think your excellent instructions pushed you into the top 3 (it is "Instructables" , not "look at the cool thing I built").
Alan
Cheers Alan.
Absolutely right. There really were some great entries (I did like the wood millennium falcon, although I wanted that prize, lol), so E4 did well to get placed where he did. Like you say, it's not a wow factor contest, it's about the content so I must have gotten something right. ;)
Thanks again.
That is great. Good job Steve!
Thanks David. I am well chuffed with the result.
sure to audit this statement.Check whether you need long haul care protection. In spite the fact that no one likes to consider being with a noteworthy disease that can wipe out all investment funds, this is a believability as you age. So evaluate your requirement for long spell of care protection.
Augusta Precious Metals
Great News ! A big Well Done and Congrats !
Ron R
Cheers Ron. Thanks very much.
@DJ. If you're reading this, any chance you could get rid of that spam crap posted in post #196? Thanks.
Hey Steve, maybe down the road you can use the orbit headset and use mind control to operate E4. The only concern with that is, he may send feedback and control you....
Be Well,
Ron R
Lol, that's a thought (no pun intended). I was actually thinking what I could use it for in regards to EZ-robot. I'll have to see if a can come up with anything.
I think it's an open source code, so E4 may be able to read your mind....