


Hello all It's been a while since I posted, been busy catching up on back orders for IKON so that took up most of my time.
I finished Doombot's skeleton/frame and I took him apart to make molds so I can reproduce the parts in aluminum and carbon fiber and kevlar. Its gonna be one mean deadly machine.
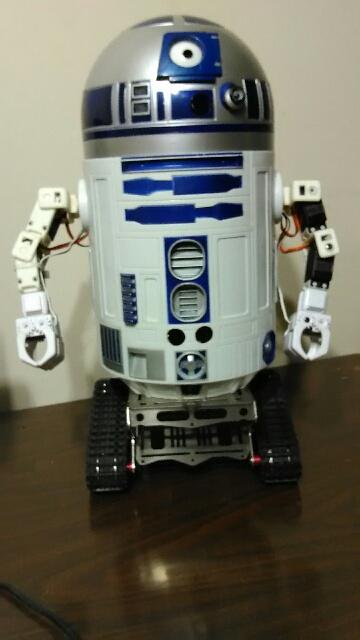
Anyway in the meantime I created Dirgebot, a smaller, less menacing and simpler to program (less moving parts) machine that's somewhat kid-friendly (for me). I wanted something my kid can play with (she wont even go in the room where Doom was parked).
Anyhoo here is the progress. Depending on how this proto goes I may market this model as a complete, not a kit, but something that can be used out of the box with no guesswork. I'm looking for an ARC programmer who can work with me, in exchange for stake in the future company. I recently established Bertone Industries, LLC and I have access to a warehouse and it will be manufactured here in the US using rotocasting techniques. Please contact me if interested here: marcbertone39@gmail.com. Thanks guys!
:D
This still uses the V3 board and a webcam, alongside the W3 Iconia mounted on its chest. I will upgrade soon. Please be nice to us dinosaurs! haha
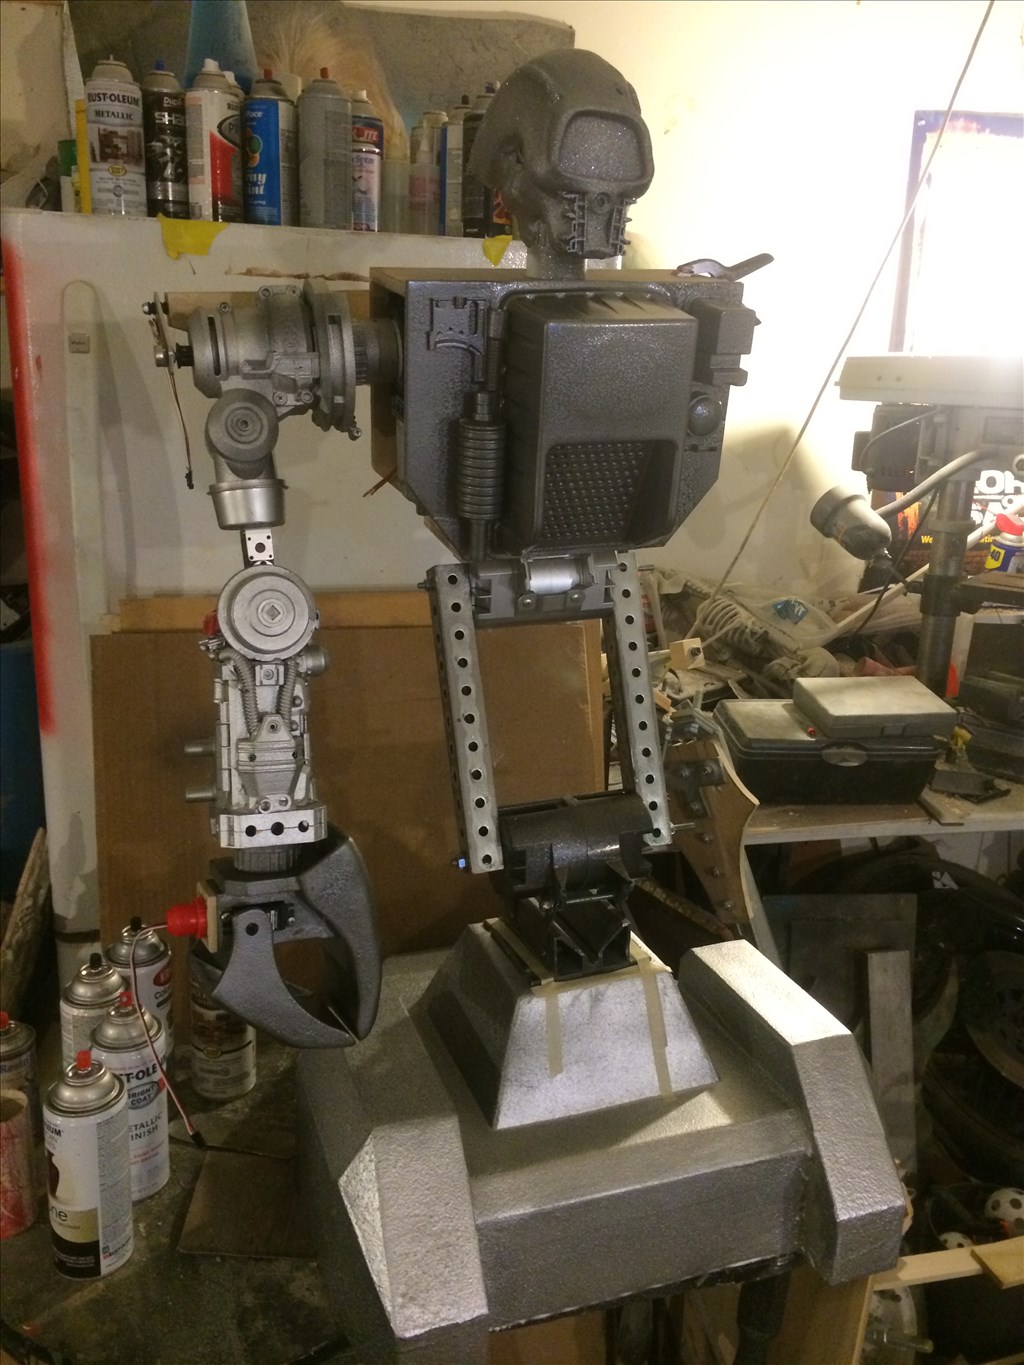
He stands at 3' 4" currently.

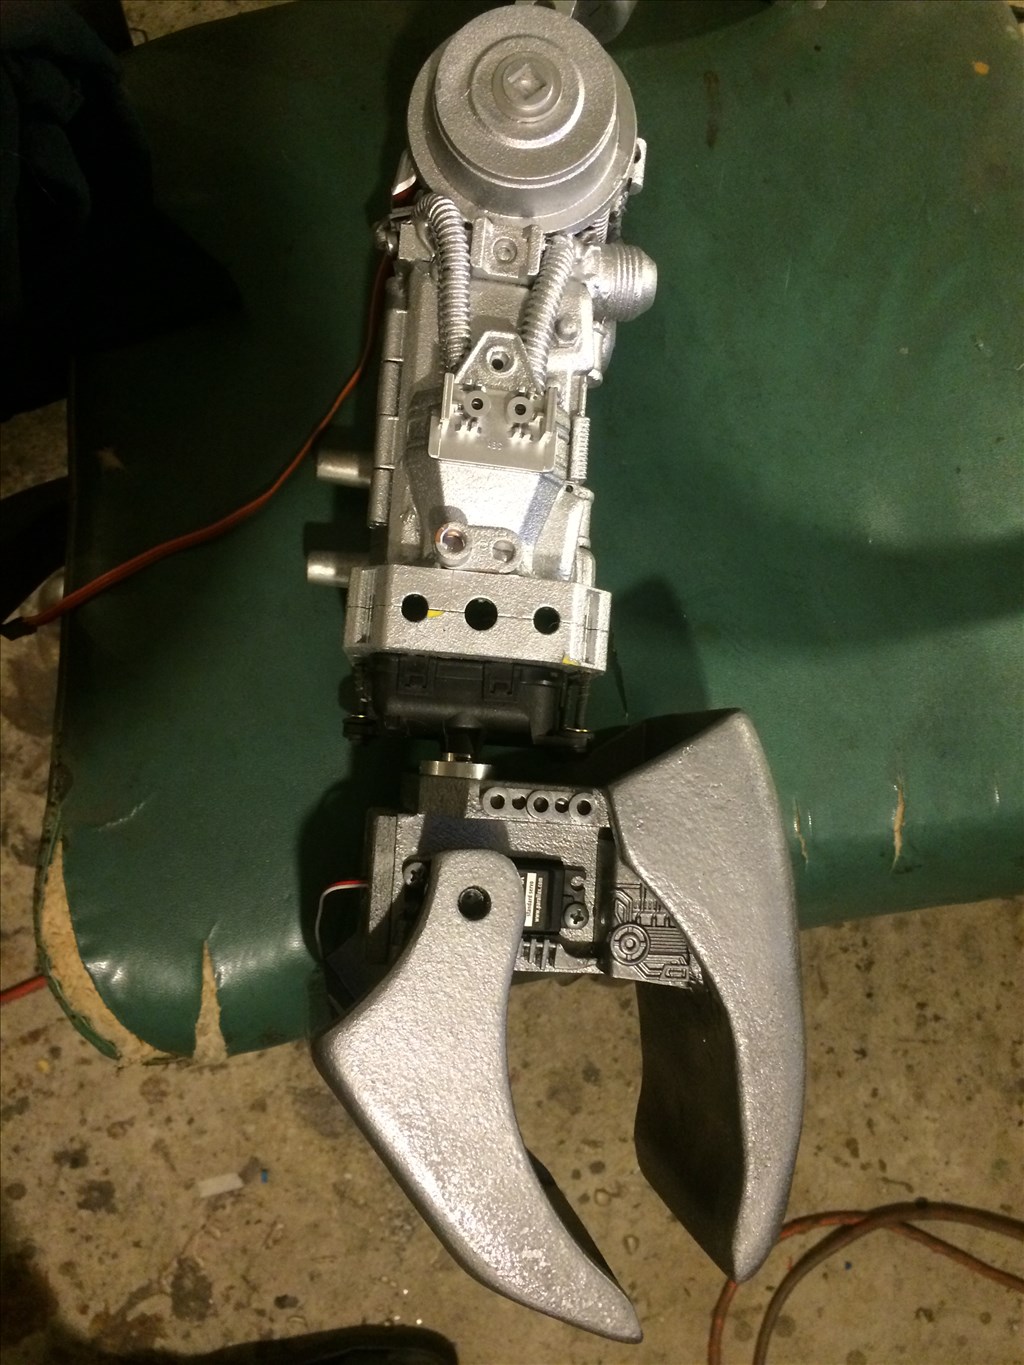
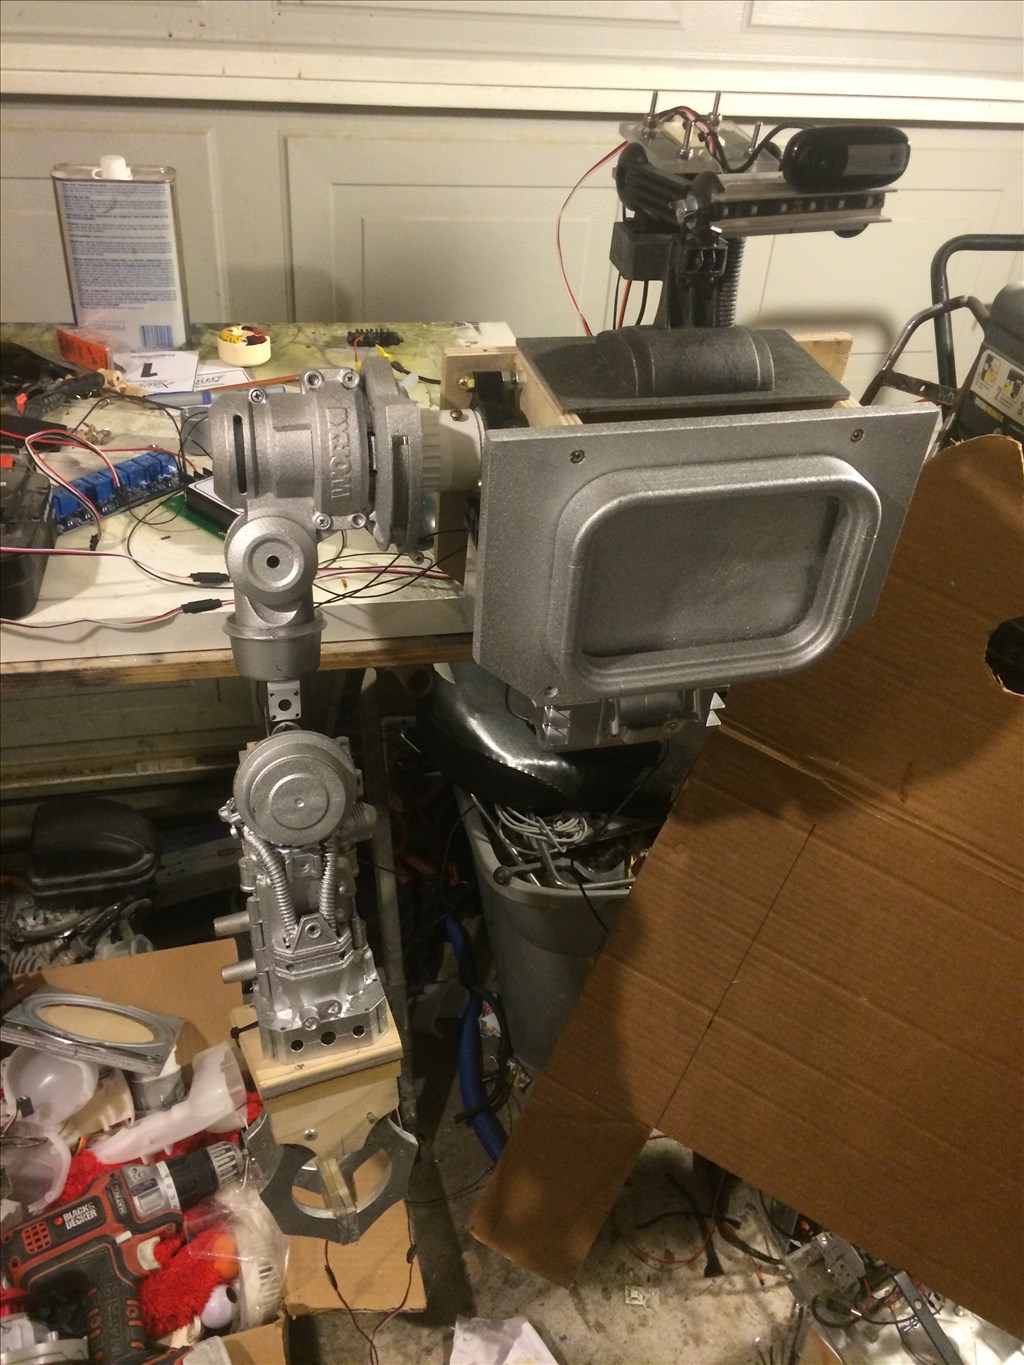
Testing the arm
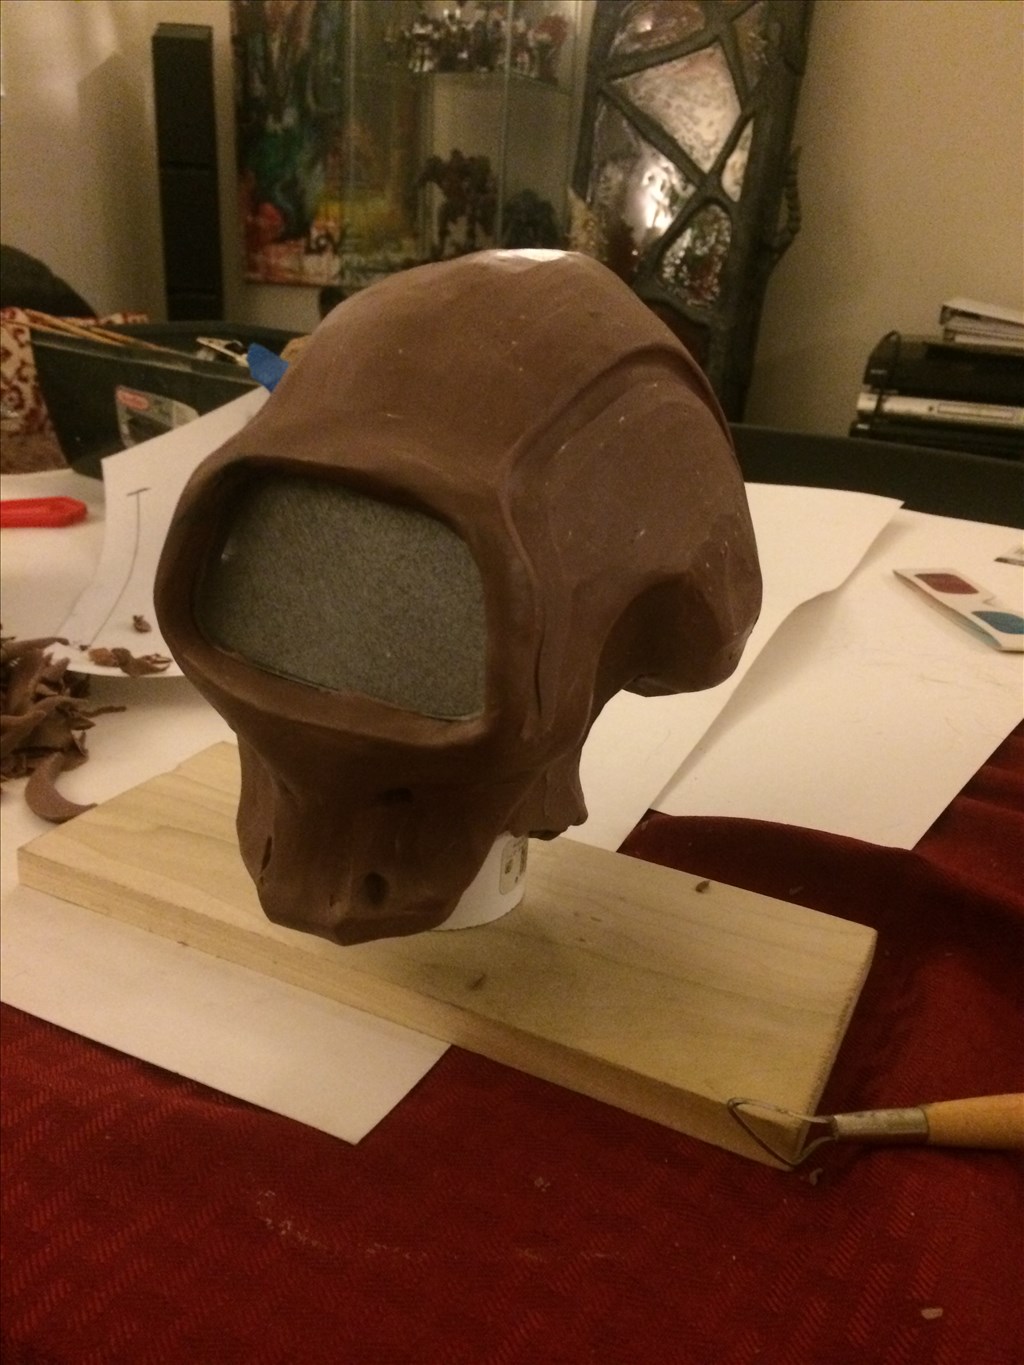
Head armature
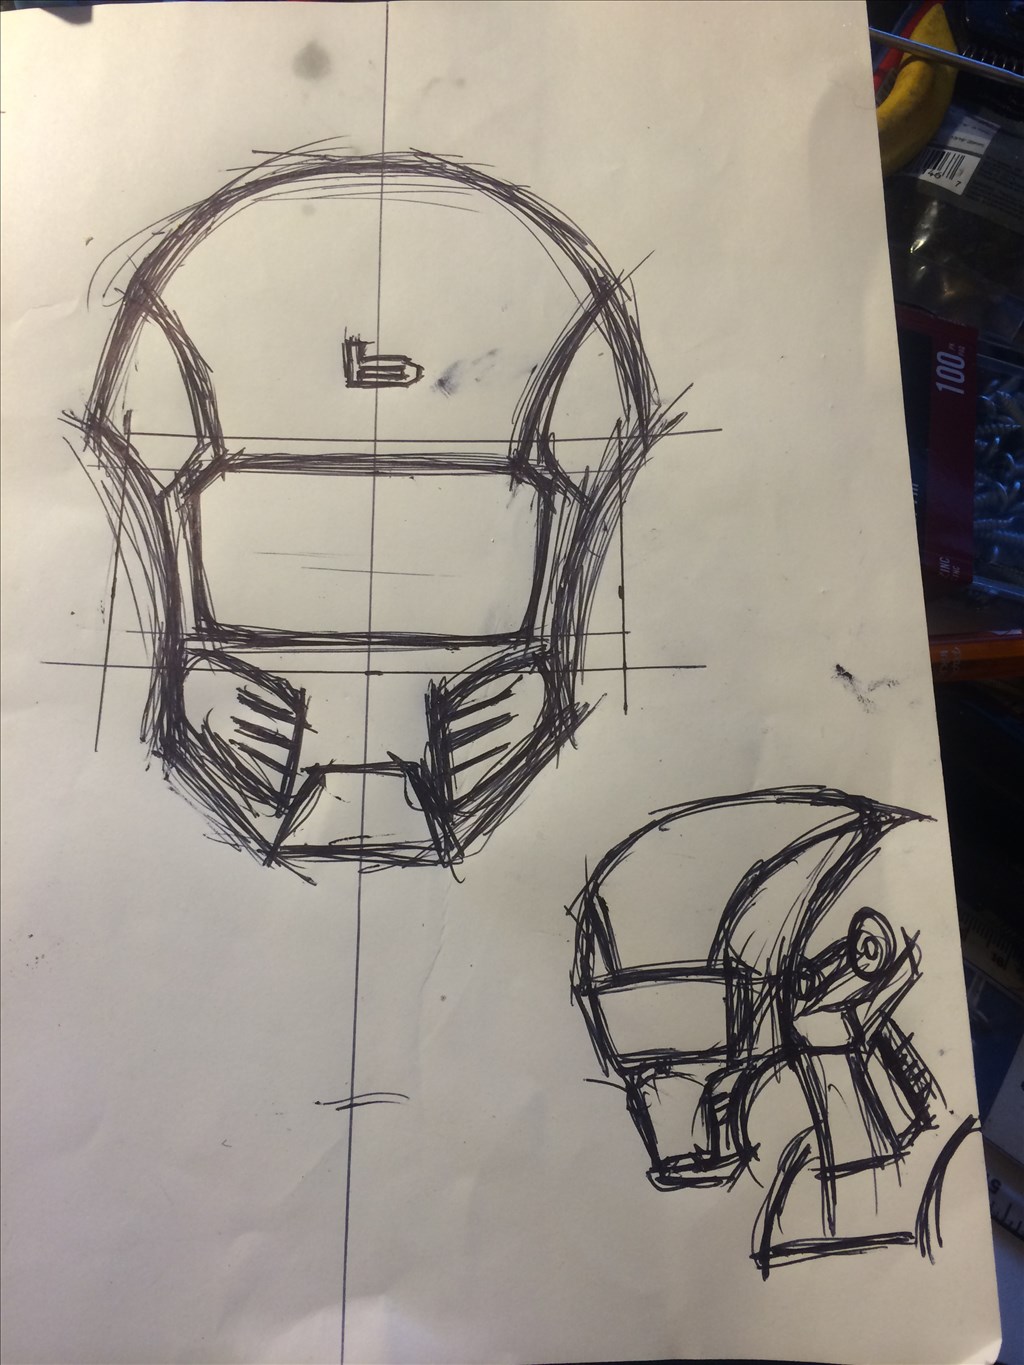
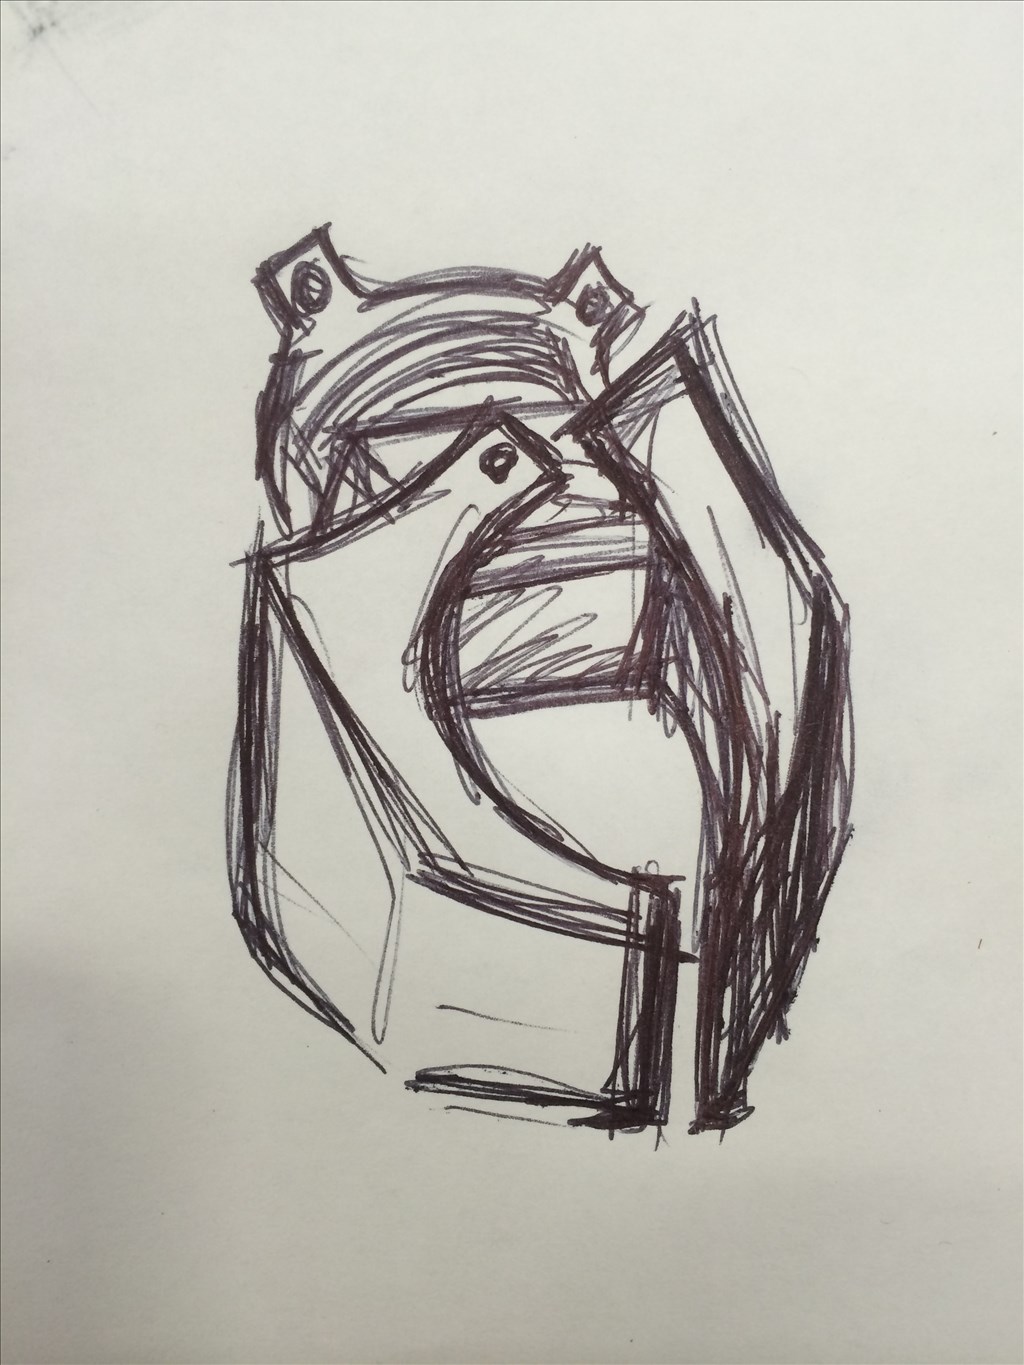
Sketching the head
Chestplate attached

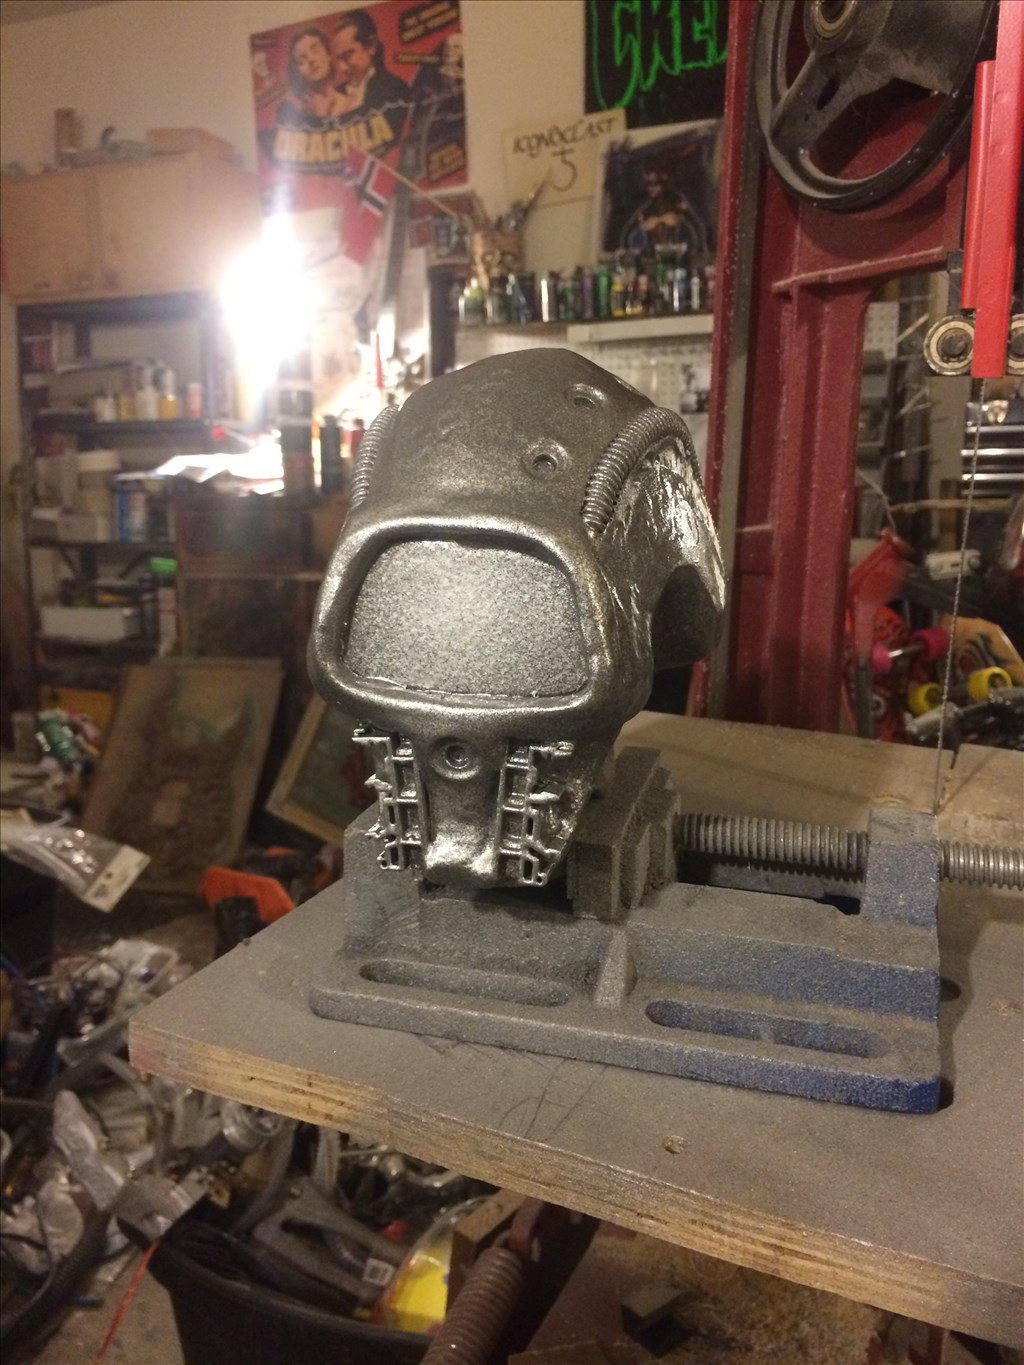
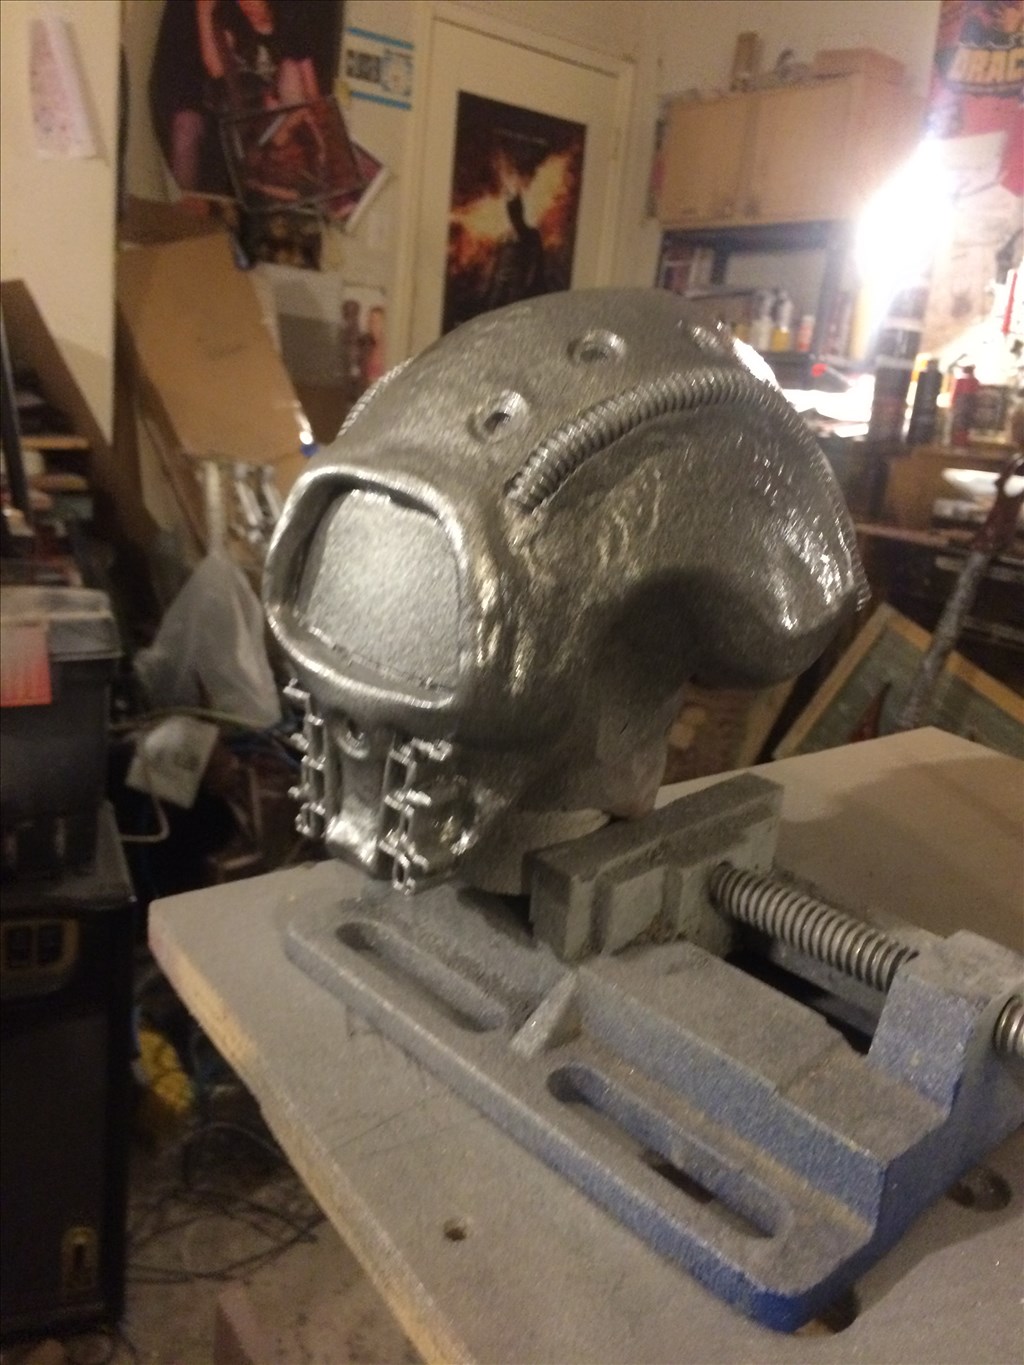
Nearly finished sculpt. I'm gonna make a tutorial for making molds and casting fiberglass panels. This head is gonna be produced in fiberglass, alongside the rest of the robot when the sculpting is done. Hope you all like it. :D
Other robots from Synthiam community
Cardboardhacker's M2d2-The Diy Miniture R2d2 By...
Rz90208's First Look At Fud2

oops, I think I messed up on the pics. Here they are againeek
Welcome back... Your bots are always so menacing looking... Love them... :)
Thanks @Richard R!
Jeez still "menacing"? This is about as commercial as I get haha :D
@Anthony Thanks brother! I think this is the first time you ever commented on my work...I love the new Chappi design you're working on. Especially the body.
Welcome back! I was just wondering the other day how your first bot was coming along. Now I see a second one about to come into being. Very exciting and impressive. I'd love to see some videos of those big arms working and know what motor and feedback you used to make them move. Love your style.
Thanks @Dave Schulpius!
I saw your arm and boy is that heavy duty! A ton of high dollar parts on that! Are we using the same window motors for the shoulder joint?
Its not on the photos yet, but I have a potentiometer hooked up on the other end of the shoulder to read feedback. I'm still deciding on what hbridge to use.
I can't wait to unveil Doombot. He's evolved into something nasty, almost military-esque.
Lookin forward to this..... !
Looks very cool.
Alan
Nice to make your acquaintance Doombot.
That is looking like a seriously cool bot you have there. Looks great so far, and I look forward to the final unveil. Good job. :)
@thetechguru
I responded.
@Steve G
Nice to meet you bro. Here's my other abomination:
Doombot V 1.0
Thanks for the link. Now I know what Richard meant when he said "menacing". That was properly bad ass. Love it. :D
@Anthony
I was thinking the same thing! I can put your 3d modeling skills to work with my designs my brotha...
I was also thinking, I'm a master mold maker (haha) and I can help you mass produce the XLR-one if you're interested. I'm posting the mold making process for this bot. Shoot me an email if you want.
@Anthony Sent.
I love where this is going! You guys are all taking ezrobot to new heights .. it's amazing!
@DJ
Thanks for responding. I'd like to know who I need to talk to for possibly using the EZB4 and Camera as OEM for this future production robot. ;)
Nice. I'm into weaponization of bots but I like your designs. Mine are rolling weapons. You inspire me to try one after seeing your doom bot (I think that's what you called it). It scares people to roll up in the driveway and see a rolling AR-15 staring at them. But I don't like visitors anyway. The local cops aren't sure about my bot. Anyway I hope you get time to do a video walk around of your bot. I'd like to see more.
@pacowang
Thanks bro. Yeah I'm definitely into military robots and I have every intention of turning Doombot into one. In fact so much that Doom is never gonna be fully autonomous, but rather r/c controlled. I'd like the Doombot model to go into the battlefield in place of our soldiers. I'm in the oil industry, and I must say i work with a lot of vets that are good people, they're not all the psychopaths that people seem to peg them as.
Id like to see a fleet of Doombots in place of our human soldiers, cops, firefighters. They might not even have to leave home to fight eh? I'm never gonna be pro war or pro violence but I definitely would want to aid in reducing human casualties.
Doombot has a flamethrower in the works for the other hand. I used a motorized water pistol and took the pump off of that, made a nozzle for it to spray, then I'm gonna put a thermo coupler to ignite it. I'm not sure if I can post pics of that here but it will show up somewhere :D
Dude....your work is awesome! Can't wait to see videos of both robots.
@rgordon
Thanks dude! I appreciate it. Have you seen my artwork?
Have not seen it but, yes I would like to see it! My daughter is big into art, especially Manga and Anime. I use to draw a lot but do not anymore.
Here are two of her drawings that I have here at work on my wall....
Doc1.pdf
Tiger.pdf
@rgordon
Very nice work! Here's my site
IKON
I do draw and paint and mangle stuff in Photoshop but nowadays I'm mostly a sculptor. I work with extreme metal bands if that's your bag.
@anthony I sent you another email bud.
Oh Man! Those are the coolest guitars I have ever seen! I like AZAZEL and Twisted Mass the best. Please tell me that the eyes on Twisted Mass are servo driven so they move around... LOL
I am very inspired by your artistic touch on the robots you have built and will be following your progress with great interest. Would love to know all about how you made the arms and what motors and control techniques you use to animate them. Also some basic "how to's" on working with fiberglass would be welcome.
@Doombot
Did I see somewhere in this thread that you have used Carbon Fiber?
Something I have no experience in but I know it is the way to go for armoring
@pacowang
Yes I have. I have also used Kevlar and Carbon Kevlar hybrids. My expertise is fiberglass though. I'd like to get ahold of ballistic grade Kevlar but only the military has access to that.
Nearly done head sculpt. Only a few minor details left but this is pretty much it.
:D
Truly awesome and bad to the bone dude!
@rgordon
Too kind, brother.
Up next is a simple "how to make a mold" step by step. I'll do this head since it's a simple 1-piece part. ;)
@Doombot, I really look forward to your procedure. It will certainly help with future design efforts within this community.
@Robot-Doc I think so. 3D printing is great for making prototypes but not for production. It just wont hold up.
@Doombot, this is one very cool looking robot!
Tony
Thanks @Toymaker !
Doombot, Dirgebot is looking out of this world, great robot. You have a unique approach to robotics, and I like it. Looking forward to your "How to make a mold" lesson. Glad your business is well. Steve S
@Steve S Thank you sir. Glad to be back.
I am really anxious to see this mold making how to :D
Doombot one simple question for you as I see your machine is created out of metal like mine, where did you place your ezb4? I have nothing but connection issues with mine being placed in his head, surrounded on 3 sides with aluminum. I'm trying a redesign at the moment to get away from metal and still look good.
@kamaroman68
I don't have my EZb4 just yet, I'm still using V3...however I am placing mine in the drivetrain housing which is gonna be fiberglass. I wanted the top body detachable so I can still use the bottom part of the robot by itself.
I use metal for the frames but my work is mostly fiberglass. You can paint fiberglass to look like metal if you wanted to go that route.
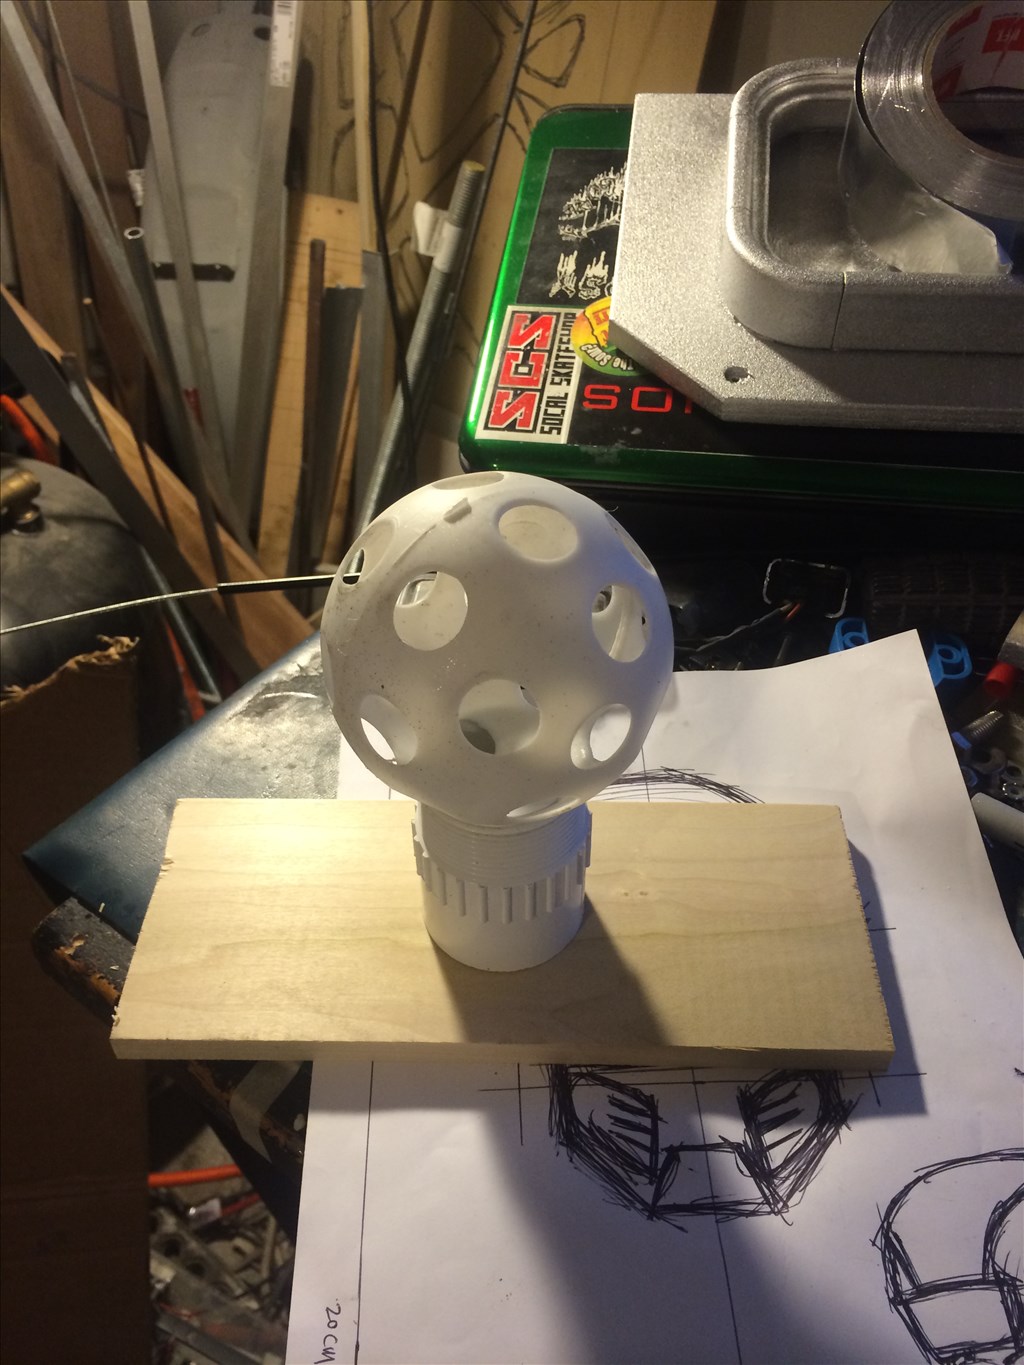
Hello all here is the sculpt for Dirge's base. I made it out of foamboard, then layered it with epoxy resin. as you can see, it's still bumpy and uneven...after this dries, I will lay down fiberglass cloth for strength, then body filler (bondo) then sand, then repeat, until the structure is solid and mirror smooth. After that a negative mold will be made, but we'll cross that bridge when we get there.
I am preparing a few lessons in guerrilla mold making including where to get the cheapest sources for materials, hopefully someone will get something out of it.
\m/
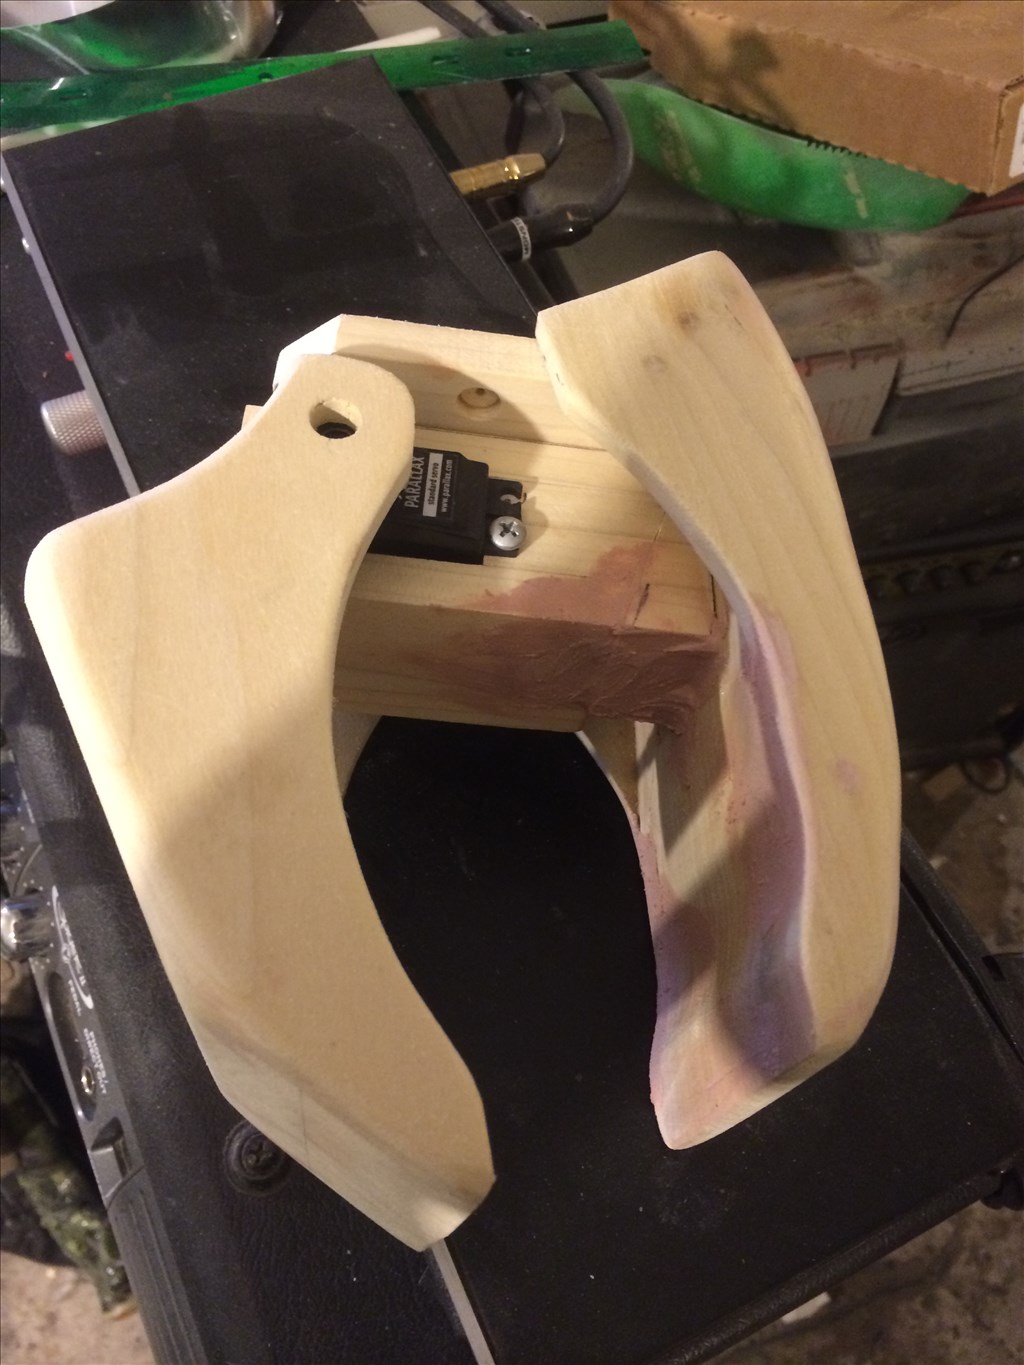
I sculpted this claw last night. I may or may not use it. It's quite simple - highly influenced by all the crappy construction going on in Houston...I stared at this excavator while sitting in traffic and somehow I saw the beauty in it. I'm gonna sand this down and prime it sometime tonight.;)
Nice work Marc... The claw especially.... Did you just sculpt that free hand or did you design it first using PC software?
@Richard R
Free hand from a sketch...I glue together blocks of wood then chop em up with a bandsaw and sand it down with a grinder or dremel
Wish I new how to 3d create those claw parts so we can 3d print them... I promised myself I learn how to use some 3d creating software this year.... :)
I'm making molds if I decide to use these...I'll give you a pair if you want them...these aren't even done yet. They may change
Sure.... but no rush.... Maybe I can cheat and just buy a 3d scanner... I could scan your molded parts so we can produce stl files for printing.... :)
The software Anthony uses is very expensive... I think around $2500 - $3000 or so.... I would not be able to afford that so I have to settle with difficult to learn or seriously limited version software for now... Beside, I am about to drop more than $1000 on a dumb a** cat I recently rescued LOL.... The little guy needs the money more than I do...
@Richard R I'll look around for 3DSMax if I can find a licensed copy. I have a friend who does CADs for engineers maybe he can do it (if you want the stls so bad) ;)
Can't wait to see the tutorials.
@Marc, thanks.... It's not that I want the stls all that bad.... But I do want to get and learn some 3d software so I can design and make robot parts on my own... Right now I can only print other peoples stls..... Want to learn how to make my own.... :)
@Richard R Have you tried Google Sketchup? Its not great but it's an OK start to get used to the 3D software interface.
I have looked at it (have a copy downloaded) .... just haven't had a good look at it yet... Actually might this afternoon... Thanks for reminding me....
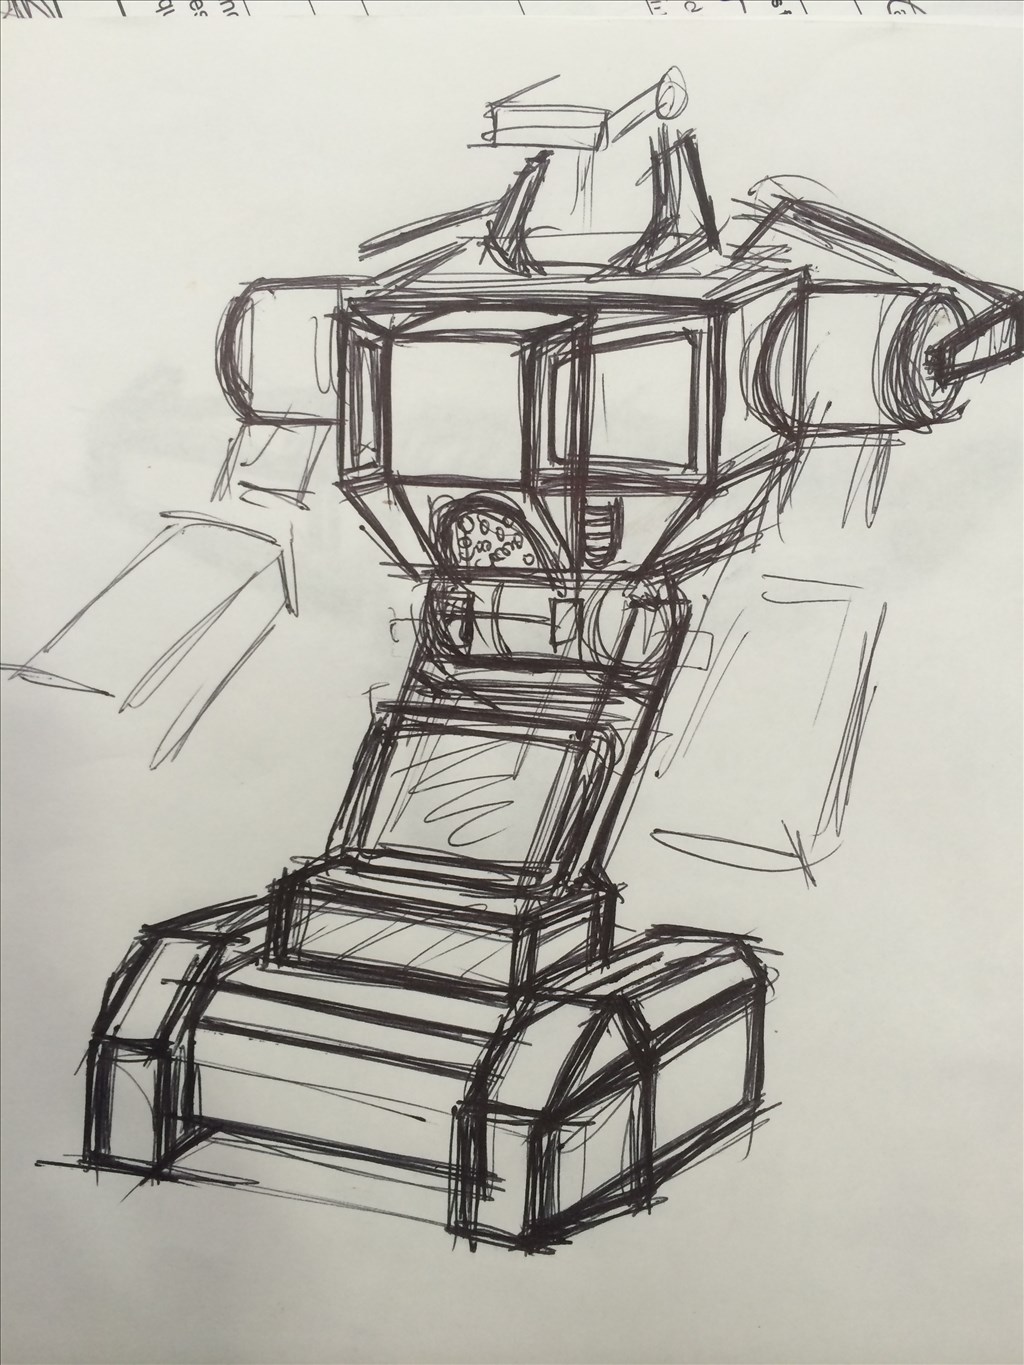
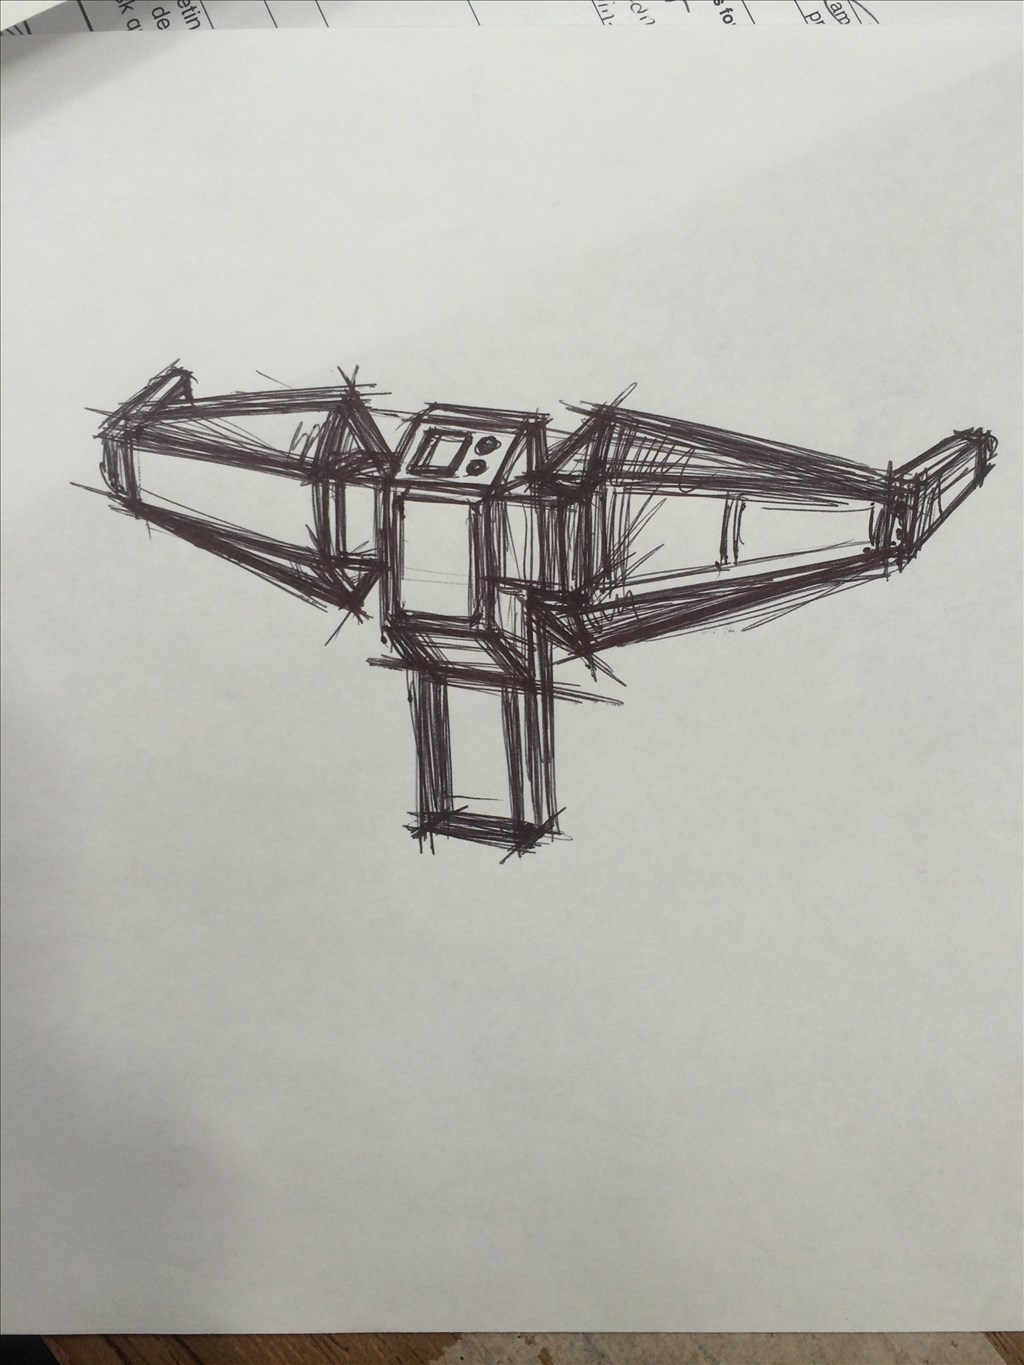
Here's the sketches of the Torso assembly and the Scapula parts. The Scapula holds the potentiometers to go to the shoulder assembly for feedback. The boxes in the middle and bottom are gonna house the EZb and the junction of the wires.
@Richard R
Claw Design
Dude, I love the sketch up of the full design! The claws are awesome too, But you're full design is just so perfect.... No flimsy robot lives here... LOL :D
@Doombot cool drawings they remind me of a Da Vinci study
@Richard R
Yeah Thanks my brotha. I'm liking this build a lot. Only heavy duty for me man METAALLL!\m/
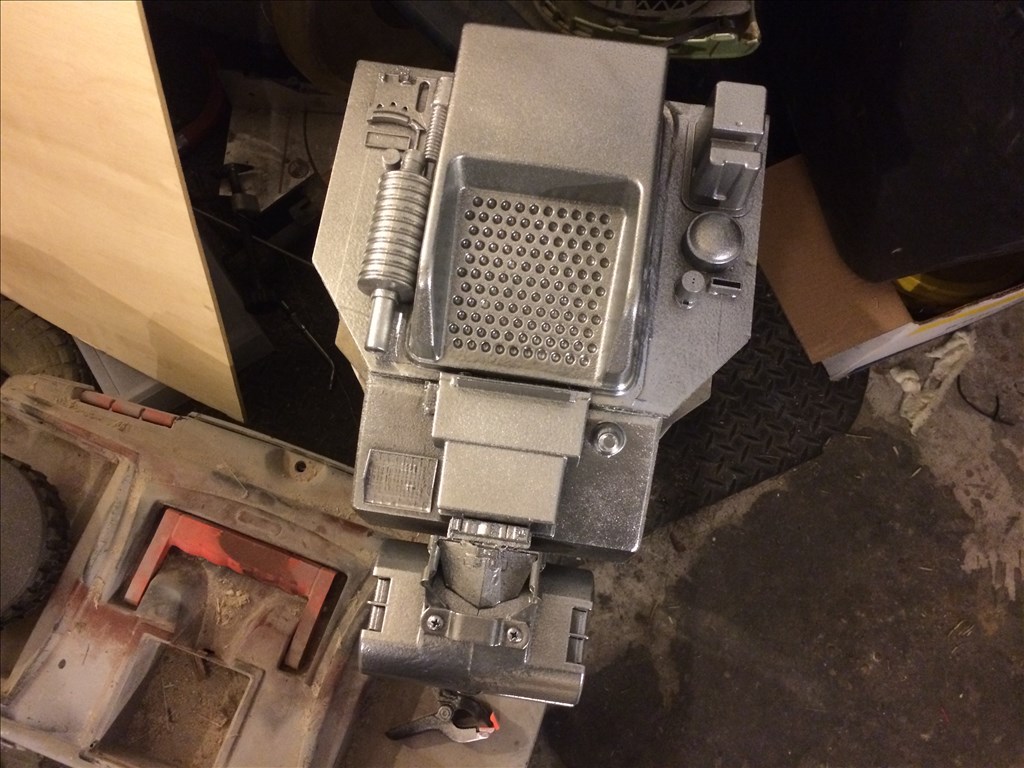
It still is very military/construction inspired...can't wait to finish paint it.
I sculpted the chest section last night too...I'll post pictures of the progress later. :P
@bborastero
Of course! I'm Italian-American...It's in the genes my brotha :D
@Richard R, Try "Blender". If you have not been into 3D applications there is a steep learning curve. But it is free and powerful.
I have been working with 3D Max since it came on the market in the 90s. Big cost associated with it but I have seen work come out of Blender that rivals anything from the big studio packages.
Just a thought
http://www.blender.org/
@pacowang
Maybe you can do the 3D renderings of my work like @Richard R was asking? ;)
@Doombot
What do you have?
@pacowang
Send me an email marcbertone39(at)gmail.com. Thanks :D
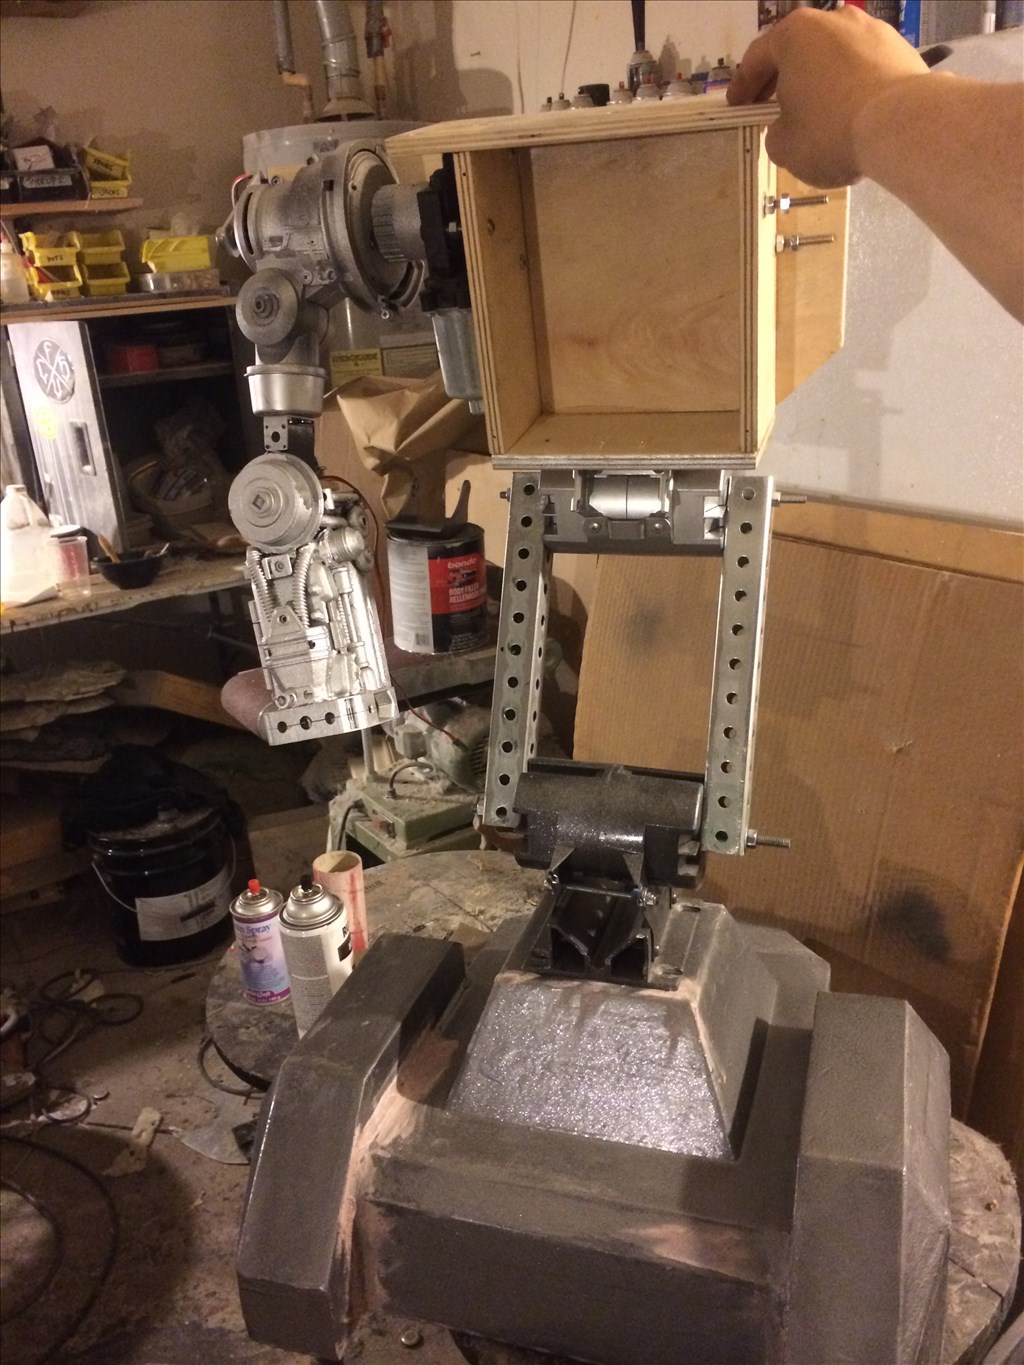
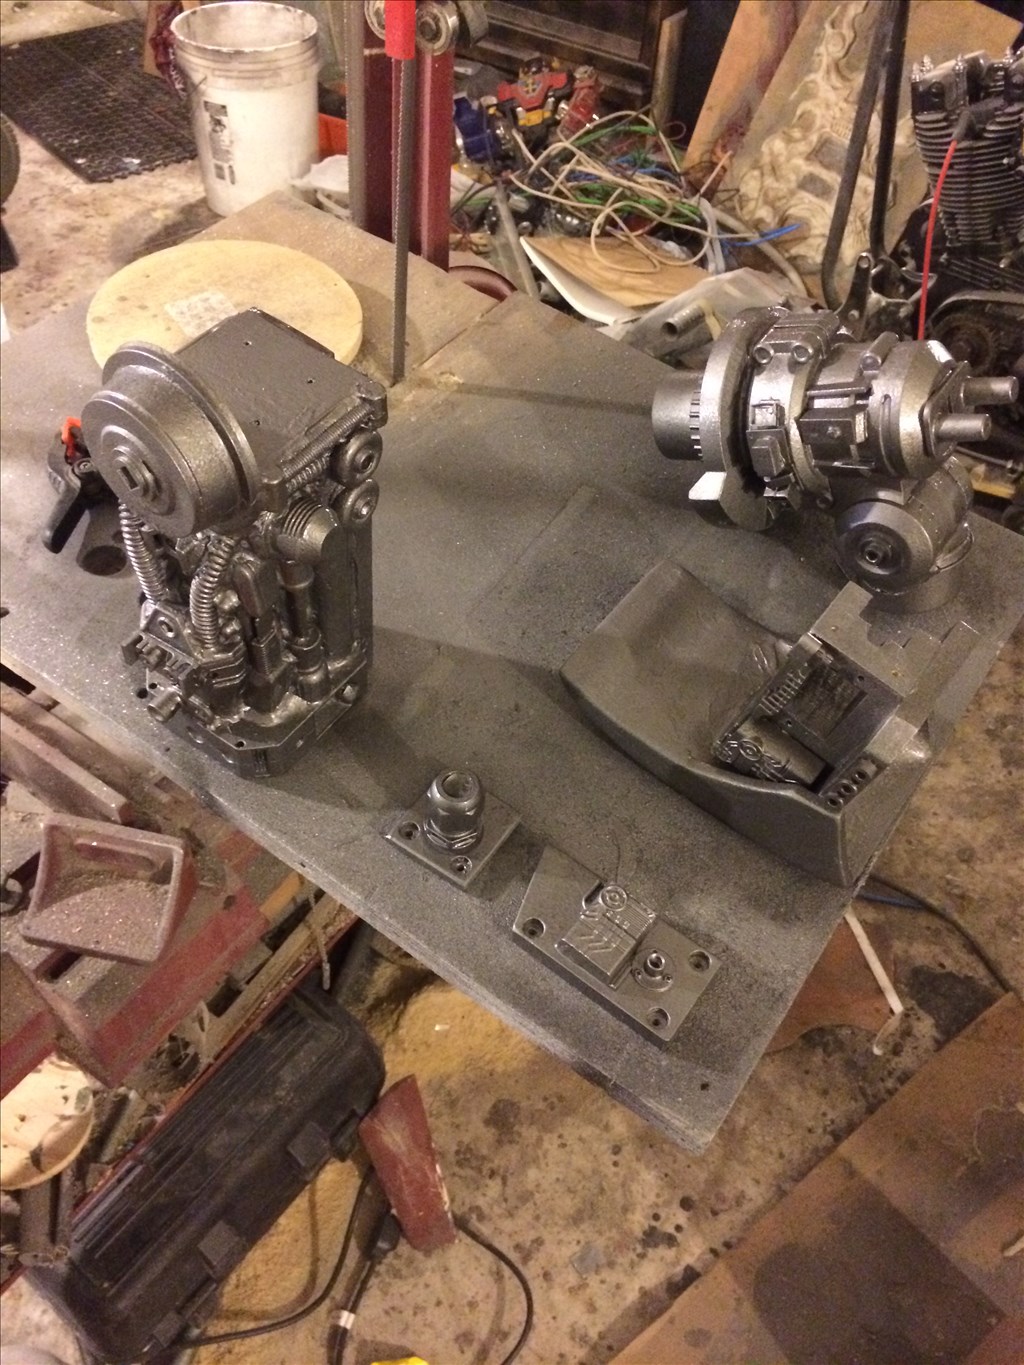
Updates... Did some fabrication last weekend.
Temporarily checking how the torso matches the base.
Right arm assembly almost finalized. I love how the wide shoulders and the oversized claw fits the wide base. I pretty much winged the dimensions off the sketches and somehow I got lucky. I'm loving this build. Good luck tipping this robot over. It's one heavy duty machine.
@Richard R If you like how the claw looks I'll send you a pair. ;)
@Doombot, that is just sick
@pacowang
Yeah I know man I got problems :D
@Doombot, good problems compadre
Nice, Nice, NICE !
@Everyone
Thank you gentlemen! :D
I like the almost steampunk industrial look to it.
Alan
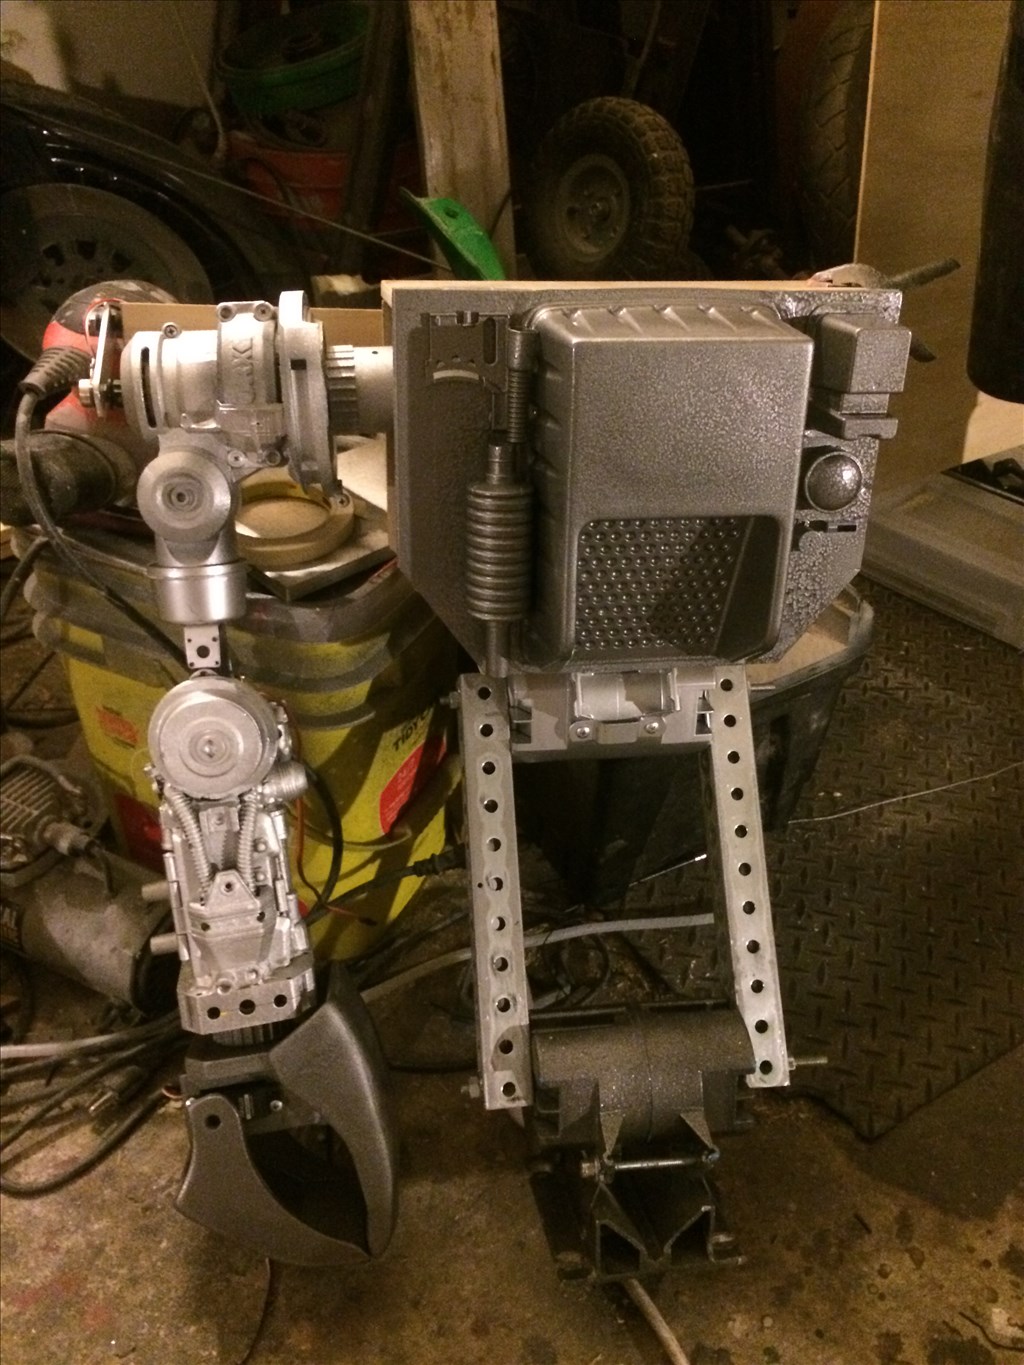
More mockups
I'm so happy!
My 4 year old daughter is NOT afraid of it! Great Success! ;)
;)
@Anthony
You're right. Your powers of observation is impeccable! The head is also clay and the base is foamboard. Clay is SUPER heavy.
These are the original sculpts. This is how people with no 3D printers do it. stress
It doesn't matter what they're made of, the finished product is gonna be cast in urethane plastic...theyre gonna be EXTREMELY light. Like foam. I'm using a plastic called hardcast that's very good with thin walled plastic...very strong and very light. I will post pics of the pieces on a scale when they are cast.
I'll post the process once I finish this sculpture...I'm using a technique called "rotocasting". :D
@Anthony
Oh, and never underestimate the power of "aluminum" spray paint...fooled ya! The arm is mostly plastic and foam...that base looks like it weighs a ton...FAKE! hahaha I sprayed cast iron and stone spray paint on that....
@Anthony Yeah dude there's so much you can do with different finishes... As for metal I just cut beams but I can't really work with it. One guy that works for me is quite a great metal sculptor...great welder, also works on choppers and bobber bikes. I may employ his skills in future builds.
As always my skills lie in fiberglass and moldmaking...
@Marc, I can't tell you again how much I love that design.... The claw steals the show dude... Anyway I was thinking how you could improve the claws grip strength... Is there room on the back for another servo in parallel? Also, below is a worm gear (with a modified HS805bb giant scale Hitec) drive for inMoovs upper arm joints... Maybe something like this scaled down to use a regular servo? Just a thought...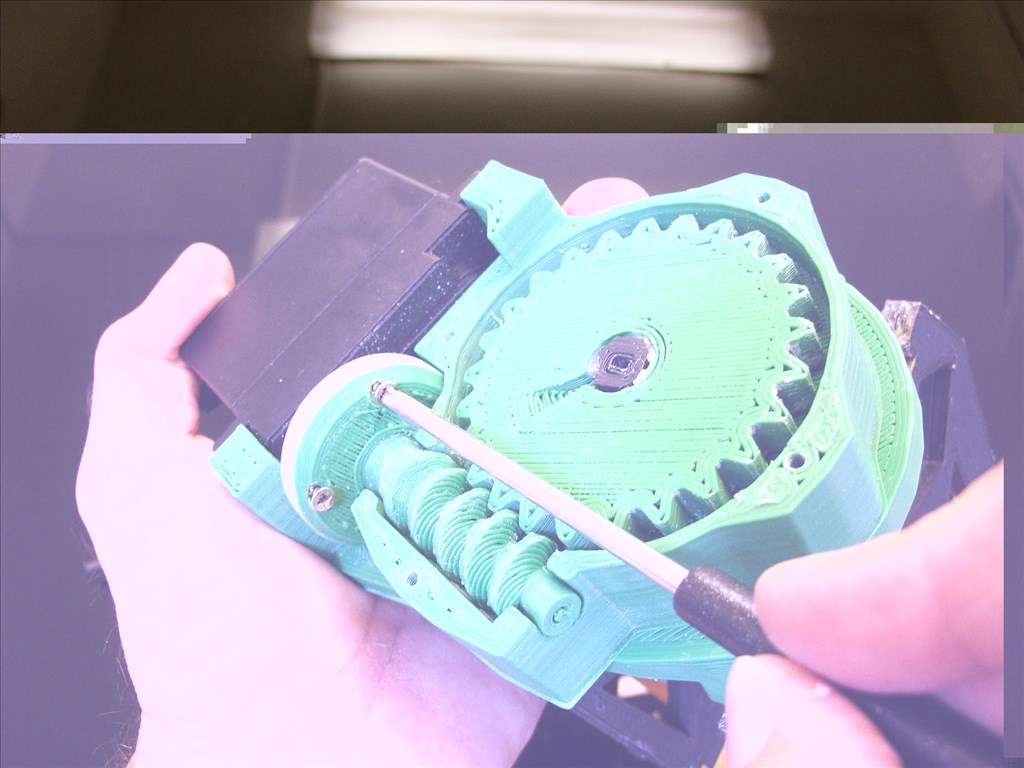
@Richard R Yes there is room on the other side for a second servo if you want. As I progress on the build I'll put up more detailed pics.
Like I told you before I am going for simplicity in this build...I don't want to overwhelm future programmers by putting in too many DOFs...this guy is a workhorse not a dancer...
I dunno how much power you would need though, this test servo that's in the claw right now is just a standard servo...3 kg methinks? It grips just fine in the tests...however there are plenty of powerful hitec servos that cost a little more. The inside of the claws are gonna be sprayed with rubber undercoating so that increases the grip (stuff wont slip easy). However when you get your claws you can totally hack and mod it if you want...you're not gonna offend me by re-engineering my stuff at all...if you need extras just let me know...
Thanks about the design man...I thought the head was gonna be too small but it looks fine to me. I'm quite happy how this turned out. :P
I'm still thinking of a proper name for this guy.
The proportions are perfect Marc.... That bot is a winner.... I Gotta' remember the "kiss" principal and think simple and durable... :)
@Richard R I think a little trim on the inner shoulder will do...when that's perfect it's mold making time!
Always "KISS" (not the band). Why complicate things? The "art" part of my projects look complex but they always work simple and direct.
To those who don't know, KISS means "Keep It Simple, Stupid" or in my case, "Keep It Simple, Sexy" LOL :D
Lately I have been frustrated in my attempted builds... I want to start building more reliable and durable bots... My inMoov is great but it is complicated, fragile and somewhat of a maintenance who**.... That's what I love about your designs... Durable, powerful, low maintenance and as you put it "all heavy metal"... LOL... They appeal to my desire to have an everyday bot running around the house that needs no more maintenance than a common Roomba.... Recharge it, clean it and put it back in service....
Challenge yourself by shaving off the unnecessary stuff and simplifying instead of adding all kinds of party favors to make yourself look "fancy"... That's my pet peeve...bells and whistles *ugh. Try to make a killer robot using only the components in the dev kit...
This is what frustrated me with Doombot...however he is done and he is a secret...until I unleash him to punish my enemies :P
@Marc, always KISS (the band) works too... Throw Destroyer, Revenge or even COS on and even if you fail at least you fail to some good music (that's not up for debate).
Or the real KISS way... license that bi**h for all it's worth ;)
Back to the project, it's looking pretty damn awesome!
@Rich
"You got it dude!" (Michelle Tanner reply) ;)
Hey, I'm still a businessman...of course this is all leading to something...
BTW, Destroyer and Revenge is where it's at!
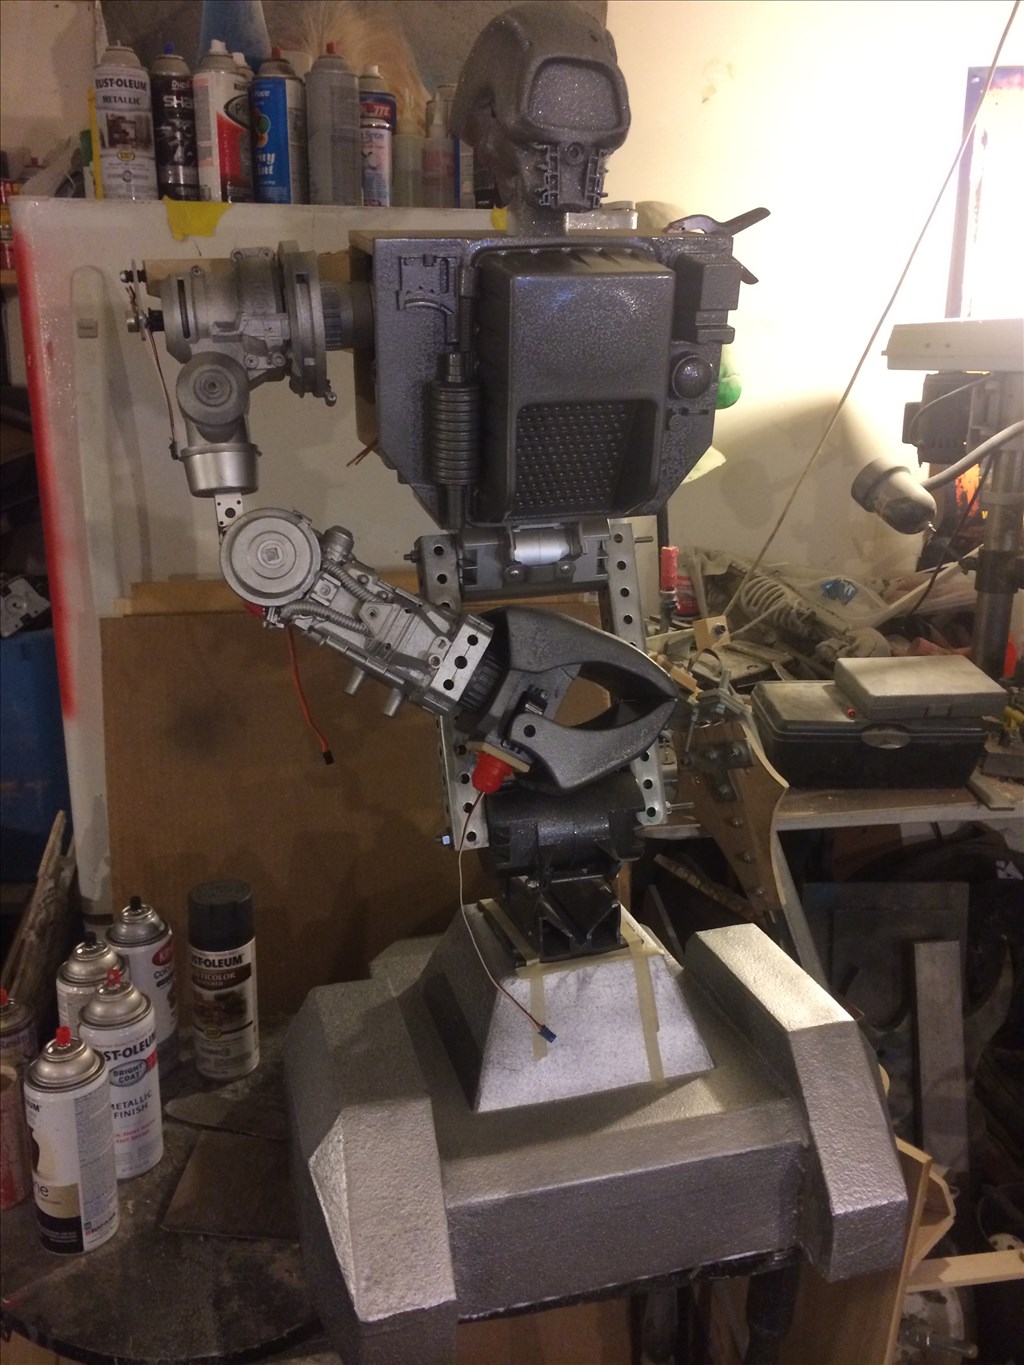
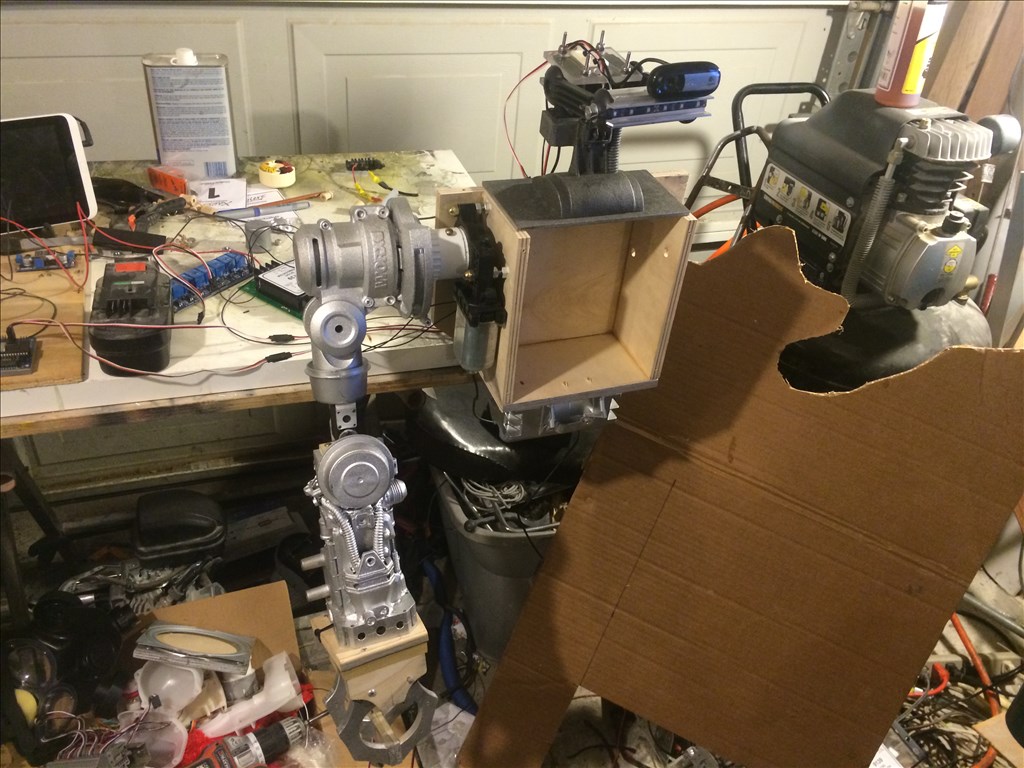
update: installed @Toymaker supplied Bosch motors courtesy of @Dave Schulpius Thank you gentlemen for the assistance, and thanks @Richard R I got those parts I needed, and then some.
;)
Seen here attached as a rotation for the claw. More updates today as i have nearly completed work on the torso section...
Those Bosch motors fit the arm and claw perfectly... I love this.... :)
@Richard R
Set Screw Hub
You're gonna need one of these...I will send a pair of em your way (along with the claws) I have extras.
@Doombot.... Sweet, thanks dude!.... I'll have some pics to send you within a week of my build.... No sugar coating dude... I want you honest opinion on it, ok?.... :)
@Richard R Ah dude I know it's gonna be awesome man...but of course I look at stuff objectively...I realize not everyone has the same taste as me... :D
Update Prepping the parts for moldmaking...sealing it with resin spray...waiting for it to dry thoroughly. Once again i will document moldmaking these parts into tutorials for everyone. It's easier than you all may think. I'm gonna go from simple 1 piece molds to intricate 4 piece molds, and casting in fiberglass.
Torso
Various arm parts and some of the claw :D
Dude... one day you should do a quick tutorial on how you do those molds? I would love to learn...
@Richard R I'm getting there...I wanna be as thorough as I can as I want everyone to learn how to do it... ;)
Really, Really looks GREAT.. I cant wait 'till the next full mockup.. Still no name?
Gynoid needs a big handsome boyfriend..
Ron
@Ron
Hahaha Thanks man so flattering...
I have a few names I'm playing with I'm gonna name it officially when it's standing up with it's claws up in the air.... ;)
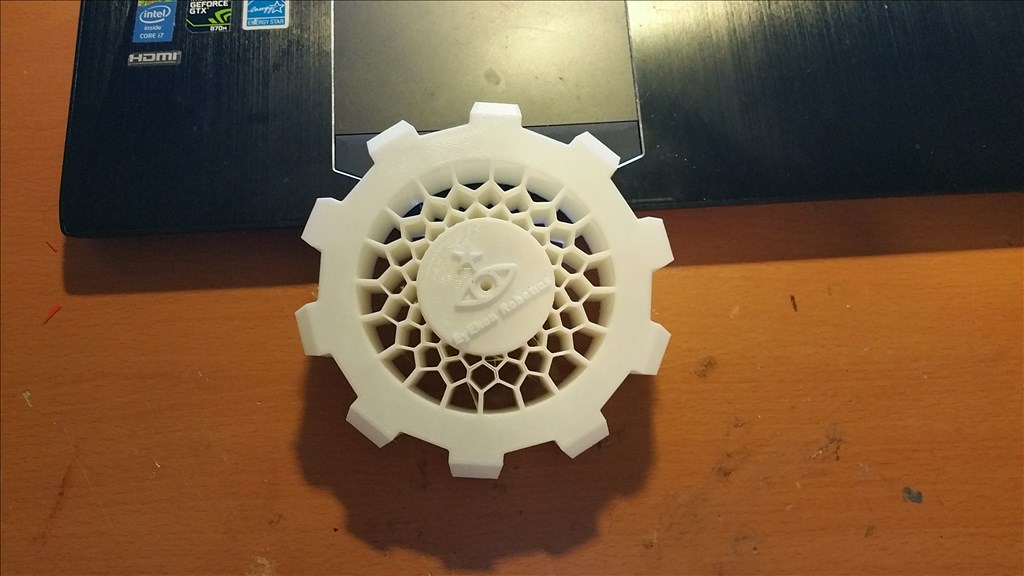
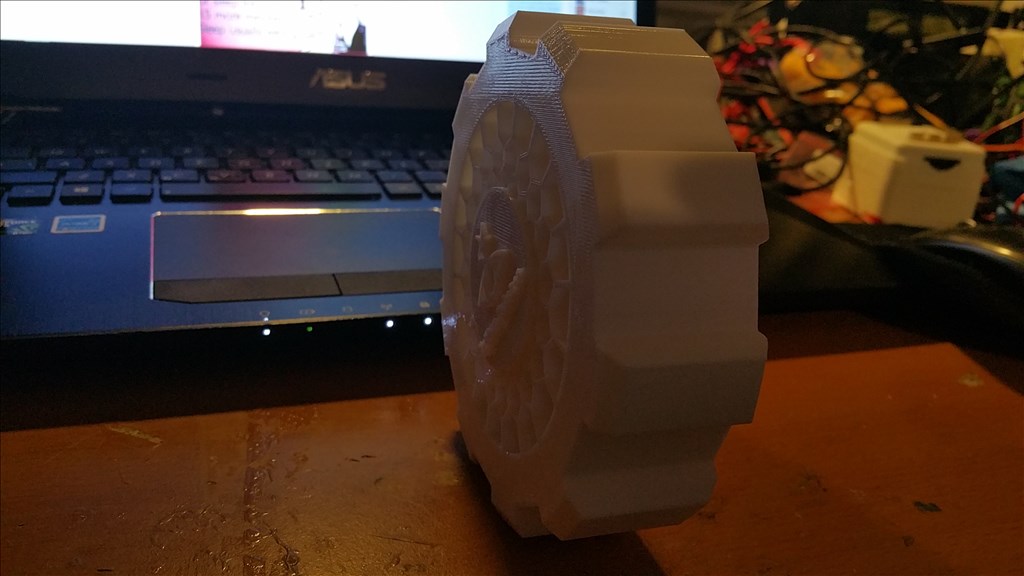
Update Got @Anthony turn my wheel design into a 3D masterpiece... The honeycomb design acts as a suspension system. 5" X 1.5". I'm making molds out of this print and cast in 90A urethane rubber (that's about as hard as a skateboard wheel). I designed the treads so they can work on almost any surface, including grass.
Thanks to XLRobots for the speedy and professional response.
i could envision a large Dirgebot powered by a Harley Davidson engine..Rad
@rb550f
Hah I wish :D
Here is a interesting design I found on Instructables. It reminded of your robot..Great inspiration. Love to see more updates on your great project.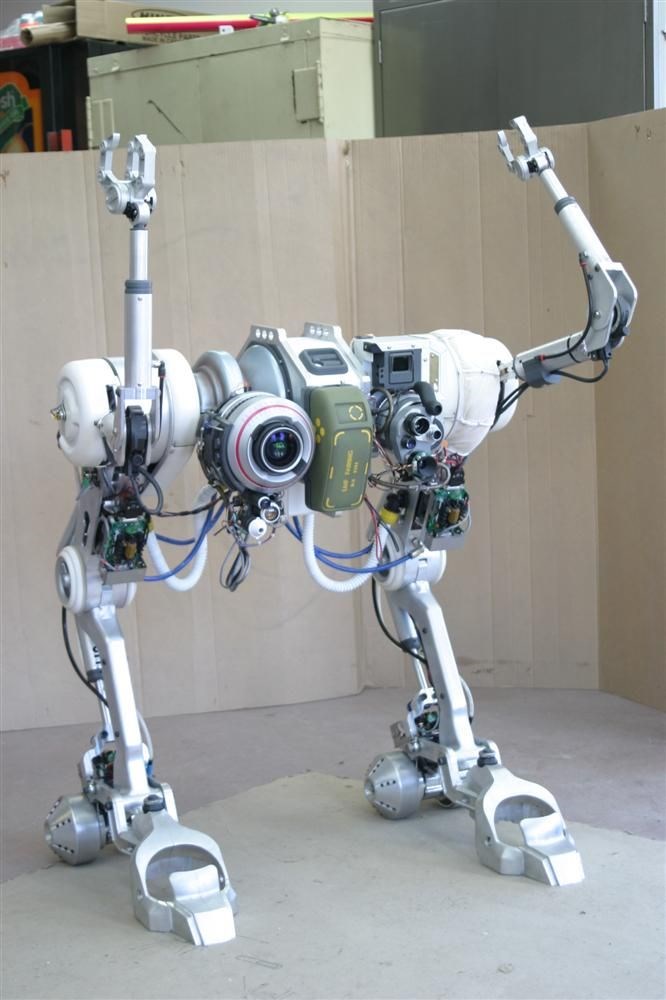
Wow that's a killer bot dude! I'm not a big fan of bipeds but that design works! I love your BMAX too!
Yes I am working diligently on this Dirgebot but it's just taking longer than expected...I'm pretty close though...Thanks for caring.
Your work looks amazing. Making molds and producing light powerful cool looking parts is definitely the right way to go. I seem to produce better parts on my computer than I do sculpting parts by hand. So a 3d printer is the best way for me to make many of my parts. I need to learn the art of mold making and casting parts. I look forward to seeing more of your Dirgebot and Doombot.
So very impressed by both Doombot and Dirgebots. Killer work on the sculpting and casting. It was well worth the time to read through both threads just to see the various process you went through. Love it all!
@doombot Hello... You must be busy but any new pictures of your projects... We haven't heard from you lately. I know it's Harley time... but ! Ron